Specialized Nursing Care Procedure
Subtopic:
Perform Shortening and removal of drains

Learning Objectives
Understand the types and classifications of drains used in clinical settings (open vs closed, active vs passive).
Recognize indications for drain use across various medical conditions and procedures.
Describe step-by-step procedures for shortening and removing different types of drains.
Apply aseptic techniques during emptying and care of drainage systems to prevent infection.
Monitor and document drainage characteristics to support effective patient care.
Perform wound care associated with drain management while minimizing complications.
Drain shortening and removal
refer to the processes of adjusting the length of a drain and subsequently removing it from the body. A drain is a medical device inserted into a wound or body cavity to facilitate the removal of fluids (like blood, pus, or serum) or air, preventing accumulation that could hinder healing or cause complications.
Examples of Drains
Nasogastric Tube (NG Tube): A tube inserted through the nose, down the esophagus, and into the stomach. Used for:
Decompression: Removing stomach contents (e.g., in cases of bowel obstruction).
Feeding: Delivering nutrition directly into the stomach.
Lavage: Washing out the stomach (e.g., in cases of poisoning).
Catheters:
Urinary Catheters: Tubes inserted into the bladder to drain urine.
Central Venous Catheters: Tubes inserted into a large vein for administering medications, fluids, or blood products, or for measuring central venous pressure.
Ventriculoperitoneal Shunts (VP Shunts): Tubes used to drain excess cerebrospinal fluid (CSF) from the brain ventricles to the abdominal cavity, typically in cases of hydrocephalus.
Vascular Access Ports: Implanted devices that provide long-term access to a vein for repeated intravenous treatments, such as chemotherapy.
Jackson-Pratt Drain (JP Drain): A closed-suction drain commonly used after surgeries (e.g., mastectomy, abdominal surgery) to remove excess fluid from the surgical site. It consists of a soft bulb that creates suction and a tube that is placed in the wound.
Hemovac Drain: Another type of closed-suction drain, similar to the JP drain, used to remove blood and fluids from surgical sites. It uses a spring-loaded device to create suction.
Penrose Drain: A soft, flat, flexible rubber tube used as an open drain to allow fluid to drain passively from a wound onto a dressing.
Chest Tube: A tube inserted through the chest wall into the pleural space (the space between the lungs and the chest wall) to remove air (pneumothorax), fluid (pleural effusion), or blood (hemothorax).
Biliary Drainage Tube: A tube placed in the bile ducts to drain bile from the liver or gallbladder, usually when there is a blockage.
Ureteral Stent: A thin tube placed in the ureter (the tube connecting the kidney to the bladder) to maintain urine flow, often after urological procedures.
Gastrostomy Tube (G-tube): A tube inserted directly into the stomach through the abdominal wall, used for long-term feeding in patients who cannot eat normally.

Indications for Drain Use
Drains are used in various medical situations to remove fluids or air from the body. Here are some common indications for specific types of drains:
1. Nasogastric Tube (NG Tube):
Gastric Decompression: To remove air and fluids from the stomach, relieving distension and pressure (e.g., after surgery or in cases of bowel obstruction).
Enteral Feeding: To deliver liquid nutrition directly into the stomach when oral intake is not possible.
Gastric Lavage: To wash out the stomach contents (e.g., in cases of poisoning or drug overdose).
Medication Administration: To administer medications directly into the stomach when the oral route is not feasible.
2. Foley Catheter (Indwelling Urinary Catheter):
Urinary Retention: To relieve the inability to empty the bladder.
Urine Output Monitoring: To accurately measure urine output in critically ill or surgical patients.
Post-Surgical Drainage: To drain urine after surgeries involving the urinary tract.
Bladder Irrigation: To continuously or intermittently irrigate the bladder with fluids or medications.
Urological Procedures: For various diagnostic and therapeutic urological procedures.
3. Ventriculoperitoneal Shunt (VP Shunt):
Hydrocephalus: To drain excess cerebrospinal fluid (CSF) from the brain’s ventricles to the abdominal cavity, relieving pressure.
Normal Pressure Hydrocephalus (NPH): To manage CSF accumulation in older adults.
Traumatic Brain Injury: In some cases, to manage increased intracranial pressure after a head injury.
Meningitis: To relieve pressure caused by inflammation and fluid buildup.
4. Central Venous Catheter (CVC):
Fluid and Medication Administration: To deliver intravenous fluids, medications (including chemotherapy), and total parenteral nutrition (TPN) directly into a large central vein.
Hemodialysis Access: To provide access for hemodialysis in patients with kidney failure.
Frequent Blood Draws: To facilitate frequent blood sampling in critically ill patients or those with difficult peripheral vein access.
Cardiac Monitoring and Pacing: To monitor heart function and deliver pacing if needed.
Emergency Resuscitation: To provide rapid access for fluids and medications during emergencies.
5. Thoracostomy Tube (Chest Tube):
Pneumothorax: To remove air from the pleural space (the space between the lung and the chest wall), allowing the lung to re-expand.
Pleural Effusion: To drain fluid or blood from the pleural space.
Hemothorax: To remove blood from the pleural cavity after trauma or surgery.
Empyema: To drain pus from the pleural cavity caused by an infection.
Lung Abscess: To help drain a localized collection of pus within the lung.
Post-Thoracic Surgery: To prevent the accumulation of air or fluid after lung or heart surgery.
Trauma: To manage chest injuries that may result in pneumothorax or hemothorax.
Pulmonary Embolism: In some cases, to manage complications related to a pulmonary embolism.
Classifications of Drains
Drains are categorized based on their design and mechanism of action:
A. Open vs. Closed Drains
Open Drains:
Drain fluid onto a gauze pad or into a stoma bag.
Examples: Penrose drain (a soft, flat rubber tube).
Advantages: Simpler design, less expensive.
Disadvantages: Increased risk of infection, less precise measurement of drainage.
Closed Drains:
Drain fluid into a sealed bag or bottle, creating a closed system.
Examples: Jackson-Pratt (JP) drain, Hemovac drain, chest tubes.
Advantages: Reduced risk of infection, more accurate measurement of drainage, less risk of leakage, can be connected to suction.
Disadvantages: More complex, potentially more expensive.
B. Active vs. Passive Drains
Active Drains:
Maintained under suction (low or high pressure) to actively remove fluids.
Can be either open (e.g., some sump drains) or closed (e.g., JP drain, Hemovac drain).
Advantages: More efficient drainage, can handle larger volumes, helps keep the wound dry, may reduce infection risk, allows for assessment of fluid volume and type.
Disadvantages: More complex and expensive, higher risk of malfunction, may require specialized knowledge to manage, potential for tissue injury with high negative pressure, risk of clogging.
Passive Drains:
Do not use suction; rely on gravity, pressure differentials, or overflow to drain fluids.
Can be either open (e.g., Penrose drain, corrugated drain) or closed (e.g., some NG tubes, Foley catheters, T-tubes).
Advantages: Simpler design, less expensive, lower risk of complications, easier to manage, allows for assessment of fluid volume and type, helps eliminate dead space.
Disadvantages: Less efficient drainage, especially with large volumes, may have a higher risk of infection (especially with open drains), drainage volume may be difficult to measure accurately, location may be affected by gravity, risk of clogging.
Types of Drains
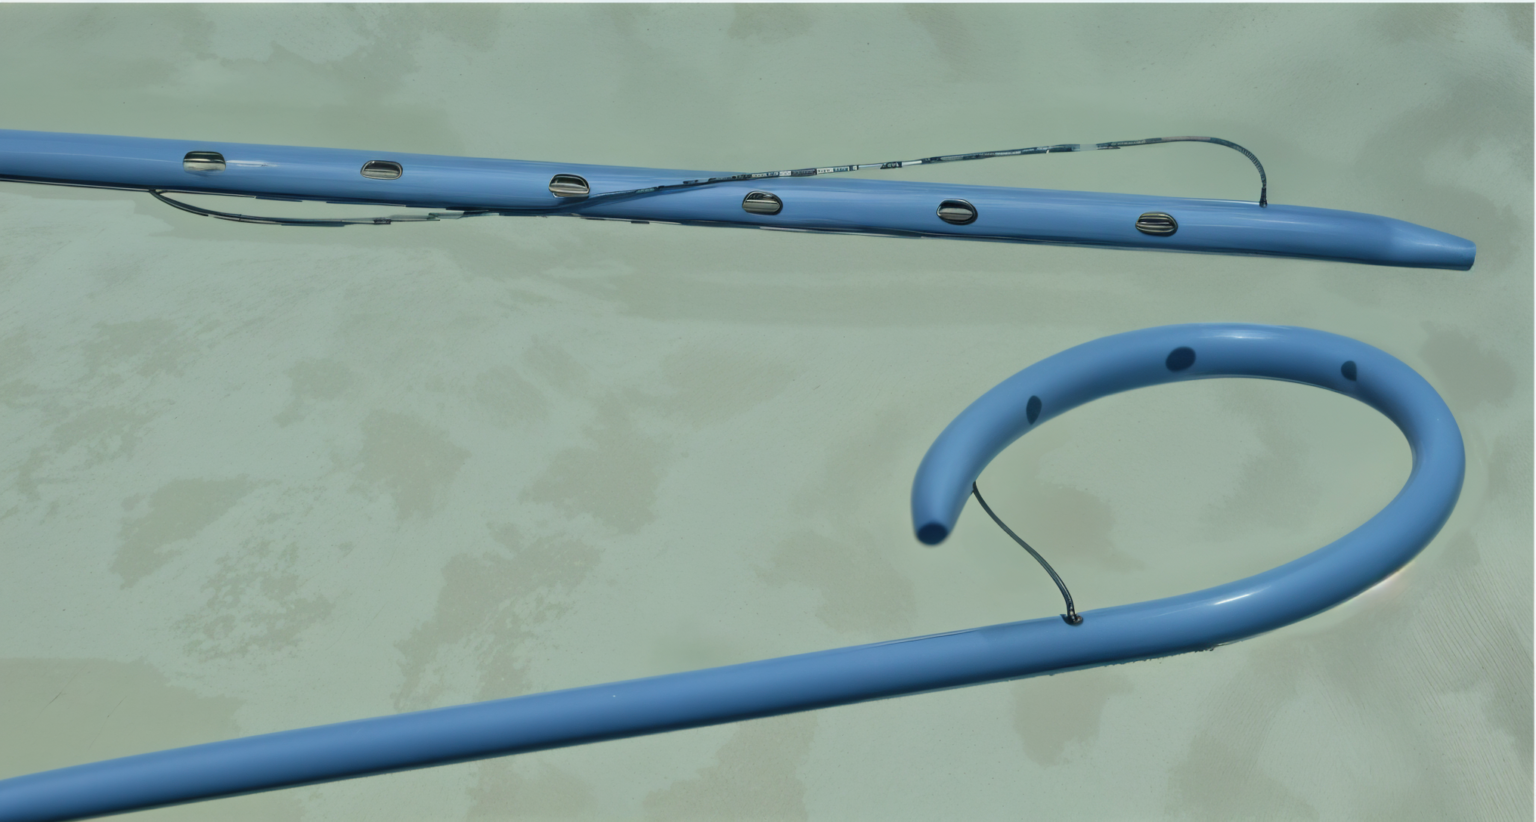
Pigtail Drain:
- Inserted under radiological guidance: This ensures precise placement and minimizes complications.
- Used to remove unwanted body fluids from organs, ducts, or abscesses: This includes fluids like pus, bile, blood, or urine.
- The tip forms a pigtail shape, facilitating drainage: This shape helps prevent the drain from getting clogged and ensures efficient removal of fluids.
Advantages:
1. Can be placed in difficult-to-reach areas.
2. Low risk of tissue damage due to its flexibility.
3. Effective in draining thick, viscous fluids.
Disadvantages:
1. May be prone to blockage.
2. Requires radiological expertise for insertion and maintenance.

Hemovac Drain:
A fine tube with multiple holes at the end: Allows for efficient collection of fluids from a larger area.
Attached to an evacuated glass bottle for suction: Provides continuous suction, promoting rapid drainage.
Drains blood under the skin: Often used for post-operative drainage following surgery or trauma.
Advantages:
1. Efficient in removing blood and other fluids.
2. Provides constant drainage, reducing the risk of blood clots forming.
Disadvantages:
1. Risk of suction malfunction or breakage.
2. May cause discomfort or pain if placed incorrectly.
3. Requires regular emptying and monitoring

Penrose Drain (Open Drain):
A soft, flexible drain: Easy to insert and adapt to various anatomical structures.
Empties into absorptive dressing material passively: Relies on gravity and capillary action for drainage.
Prevents fluid from moving from areas of greater pressure to areas of lesser pressure: Helps control fluid accumulation and reduce swelling.
Advantages:
1. Simple design and low cost.
2. Can be used for short-term drainage.
3. Minimal risk of mechanical complications.
Disadvantages:
1. Less efficient drainage than closed systems.
2. Increased risk of infection due to the open design.
3. Not suitable for large volume drainage or high-risk areas.
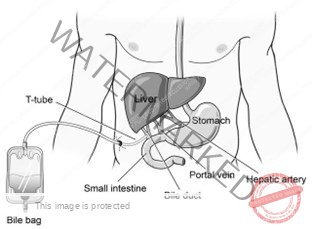
T-Tube:
Placed into the common bile duct: Allows for drainage of bile after biliary surgery.
Connected to a small pouch (bile bag):Collects and allows for easy monitoring of bile drainage.
Used for temporary post-operative drainage of the common bile duct removed once the bile duct is healed.
Advantages:
1. Helps prevent bile duct obstruction.
2. Facilitates healing by allowing bile to drain.
3. Allows for monitoring of bile drainage.
Disadvantages:
1. Can cause discomfort or pain.
2. Requires regular emptying and monitoring.
3. May be prone to blockage or leakage.

Chest Tube (Closed Drain):
Used to drain hemothorax, pneumothorax, pleural effusion, chylothorax, and empyema: Effective for removing fluid and air from the chest cavity.
Inserted into the pleural space in the 4th intercostal space above the upper border of the rib below (4th to 6th): Requires careful placement to ensure effectiveness and minimize complications.
Advantages:
1. Efficient in removing fluids and air from the chest cavity.
2. Reduces pressure on the lungs, allowing for better breathing.
3. Minimizes the risk of infection due to the closed system.
Disadvantages:
1. Requires specialized training and equipment for insertion and management.
2. Can cause pain or discomfort.
3. May be prone to kinking or blockage.
4. Complications to assess for include arterial thrombosis, air embolism, hematoma, bleeding, and infection.
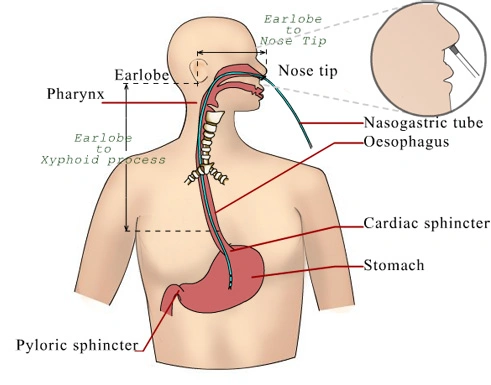
Nasogastric Tube (NGTube):
Passed through the nostrils to the stomach: Allows for access to the stomach for various procedures.
Indications include gastric juice aspiration, lavage in cases of poisoning, overdose medication, and feeding: Versatile tool for managing stomach contents and providing nutritional support.
Advantages:
1. Provides access to the stomach for various procedures.
2. Relatively safe and easy to insert.
3. Can be used for short-term or long-term management.
Disadvantages:
1. Can cause discomfort or irritation.
2. May cause nausea or vomiting.
3. Complications include epistaxis, aspiration, and erosions in the nasal cavity and nasopharynx.
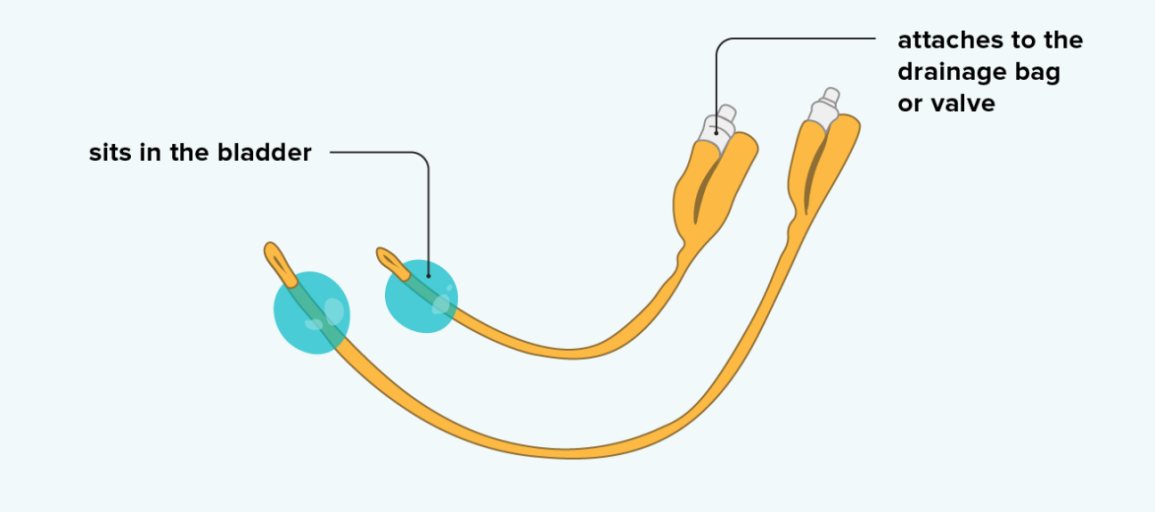
Urinary Catheters:
Hollow, flexible tubes used to collect urine from the bladder: Provides a way to drain urine from the bladder.
Indications include relieving urinary obstructions, managing bladder weakness or nerve damage, draining the bladder during and after surgery, and treating urinary incontinence: Essential for managing urinary issues and ensuring bladder health.
Catheter materials can include rubber, silicone, or latex
Advantages:
1. Allows for effective urine drainage.
2. Reduces urinary tract infections.
3. Provides a way to monitor urine output.
Disadvantages:
- Can cause discomfort or pain.
- Risk of infection if not properly maintained.
- May be associated with bladder stones or urinary retention.
PROCEDURE FOR SHORTENINGAND REMOVAL OF DRAINS
🧰 Stitch Removal Requirements
Top Shelf: Stitch Removing Pack Contents
- Stitch Scissors
- Non-toothed dissecting forceps
- 2 dressing forceps
- Cotton wool swabs
- Gauze
- Sterile gloves
- Sterile safety pin
- Sterile dressing towel
- Receiver
Bottom Shelf
- Bottle of antiseptic solution
Let me know if you’d like this formatted into a checklist, training sheet, or inventory guide — whatever fits your workflow best!
Procedure
Removal of a Drain
Step | Action | Rationale |
|---|---|---|
| 1 | First clean the wound as for surgical dressing. | To reduce the risk of spreading infections. |
| 2 | Cut and remove the stitch between the drain and the skin. | To loosen the drain. |
| 3 | Take out the drain and place it in a receiver. | To prevent cross-infection. |
| 4 | Gently compress the area, clean the wound, and apply a dressing. | Compression is done to drain the wound. |
| 5 | Finish up as for simple dressing. | To protect against the invasion of microorganisms. |
| 6 | Document the procedure. | For follow-up care. |
Shortening of a Drain
Step | Action | Rationale |
|---|---|---|
| 1 | Clean the wound as for surgical dressing. | To prevent cross-infection. |
| 2 | Pull the drainage tube with the dissecting forceps. If it’s the first dressing post-operatively, cut the stitch between the drain and the skin before adjusting to the prescribed length. | To loosen the drainage. |
| 3 | Use sterile forceps or gloves to insert the safety pin across the drain and close the pin. | To secure the drain in position and prevent infection. |
| 4 | Dress the wound and finish as for a simple dressing. | To prevent the invasion of microorganisms. |
| 5 | Document the procedure. | For easy continuity of care. |
Hospital standard Procedues
Emptying a Drain
Step | Action | Rationale |
|---|---|---|
| 1 | Perform hand hygiene. | Hand hygiene is crucial to minimize the risk of infection. |
| 2 | Gather necessary equipment. | Having all supplies ready ensures an efficient and smooth procedure. |
| 3 | Put on non-sterile gloves and personal protective equipment (PPE) such as goggles or a face shield if needed. | PPE helps reduce the transmission of microorganisms and protects against exposure to body fluids. |
| 4 | Using aseptic technique, remove the plug from the drain’s pouring spout as indicated. | Aseptic technique prevents contamination, and removing the plug away from the face reduces the risk of splashing. |
| 5 | Tilt the reservoir and pour the contents into a measuring container, noting the drainage characteristics such as color, consistency, odor, and amount. | Tilting away from yourself prevents exposure, and documenting the drainage characteristics is essential for patient care. |
| 6 | Swab the pouring spout and plug with an alcohol swab, compress the drain to flatten it, and then close the drain. | Alcohol swabbing maintains cleanliness, and compressing the drain ensures efficient functioning. |
| 7 | Reinsert the plug into the pour spout while maintaining asepsis. | Reinserting the plug aseptically reestablishes vacuum suction in the drainage system. |
| 8 | Secure the drain onto the patient’s gown with a safety pin, ensuring that there is enough slack in the tubing. | Securing the drain minimizes the risk of accidental removal and accommodates patient movement. |
| 9 | Dispose of the drainage according to policy. | Proper disposal protects against exposure to blood and body fluids. |
| 10 | Remove gloves and perform hand hygiene again. | Hand hygiene after glove removal minimizes the risk of contamination. |
| 11 | Document the procedure and findings accurately. Report any unusual findings to the appropriate healthcare professional. | Accurate documentation is essential for record-keeping and patient care. Reporting any significant changes or concerns ensures timely intervention. |
Removal of Drains
Step | Action | Rationale |
|---|---|---|
| 1 | Confirm the prescriber’s order and ensure it aligns with the recent drainage amounts. | Ensuring the order aligns with drainage amounts prevents premature removal. |
| 2 | Explain the procedure to the patient, offer analgesia if needed, and provide an opportunity for a bathroom visit. | Educating the patient and offering analgesia reduces anxiety and ensures comfort during the procedure. |
| 3 | Assemble supplies at the bedside, including a dressing tray, sterile suture scissors or blade, cleansing solution, tape, garbage bag, and outer dressing. | Having supplies ready ensures efficiency and readiness for the procedure. |
| 4 | Apply a waterproof drape or mackintosh to set the removed drain onto. | This prevents contamination and maintains cleanliness. |
| 5 | Perform hand hygiene before starting the procedure. | Hand hygiene reduces the risk of introducing microorganisms to the patient. |
| 6 | Put on non-sterile gloves and appropriate PPE. | Wearing gloves and PPE reduces the transmission of microorganisms and provides added protection. |
| 7 | Release the suction on the reservoir and empty it, measuring and recording volumes greater than 10 ml. Remove the dressing. | Releasing suction ensures safe removal, and documenting the drainage volume is crucial for patient care. |
| 8 | Clean and dry the incision and drain site using aseptic techniques. | Aseptic cleaning minimizes the risk of infection. |
| 9 | Carefully cut and remove the securing suture using aseptic techniques. | Removing the suture safely avoids complications and ensures smooth removal of the drain. |
| 10 | Hold sterile gauze in the non-dominant hand to stabilize the skin and ask the patient to take a deep breath and exhale slowly. Remove the drain as the patient exhales. | Patient cooperation and timed removal reduce discomfort, and stabilizing the skin minimizes pain. |
| 11 | Place the removed drain onto a waterproof pad or into a garbage bag. | Proper disposal prevents environmental contamination. |
| 12 | Clean and dry the wound if needed, and dress it with a sterile dressing. | Keeping the wound clean and dry prevents infections, and dressing it ensures protection. |
| 13 | Dispose of the drain and garbage according to policy. | Proper disposal reduces the risk of exposure to blood and body fluids. |
| 14 | Perform hand hygiene after completing the procedure. | Hand hygiene minimizes the risk of contamination. |
| 15 | Assess the dressing 30 minutes after removal and ask the patient to call if they notice any increased drainage. | Monitoring for changes in drainage ensures patient safety and early detection of complications. |
| 16 | Document the procedure, including drain removal, output characteristics, patient tolerance, and dressings applied. Report any unusual findings to the appropriate healthcare professional. | Accurate documentation and reporting are essential for patient care and safety. |
Care of Wounds with Drainage
Step | Action | Rationale |
|---|---|---|
| 1 | Keep the end of the tube from the wound below the water level in the drainage bottle. | Prevents air from passing back up the tube into the wound. |
| 2 | Seal the tubing with clips or artery forceps before emptying the bottle. | Prevents air entry into the lungs. |
| 3 | Measure and subtract the amount of water or antiseptic in the drainage bottle from the total drainage. | Ensures accurate measurement of fluid drained from the wound. |
| 4 | Observe for any abnormal deposits, color, and odor in the drainage. | Helps in diagnosis and follow-up of the patient’s condition. |
| 5 | Keep a clip or artery forceps at the bedside in case of an accident to the tubing. | Allows immediate action to prevent air entry into the lungs in case of tubing accident. |
| 6 | Maintain sterility of the drainage bottle and never lift it above bed level or higher. | Prevents contamination and backflow of fluid from the drainage chamber to the pleural cavity. |
Join Our WhatsApp Groups!
Are you a nursing or midwifery student looking for a space to connect, ask questions, share notes, and learn from peers?
Join our WhatsApp discussion groups today!
Join NowRelated Topics
Foundations of Nursing (III)
- Apply Nursing process to the management of patients
- Administer prescribed medicine appropriately
- Instilling medication (general)
- Blood transfusion
Specialized Nursing Care Procedures
- Perform Shortening and removal of drains
- Perform Colostomy Care
- Prepare Abdominis Paracentesis (Abdominal Tapping)
- Prepare Lumbar Puncture
- Perform Gastrostomy Feeding
- Carry out gastric Lavage
- Perform Tracheostomy Care
- Ophthalmological Care
- Care of the patient`s ears
- Pre-Operative Eye Care
- Ear Care
- Peri-Operative Care:
- Orthopedic Nursing Care
- Prepare for Neurological Assessment
We are a supportive platform dedicated to empowering student nurses and midwives through quality educational resources, career guidance, and a vibrant community. Join us to connect, learn, and grow in your healthcare journey
Quick Links
Our Courses
Legal / Policies
Get in Touch
(+256) 790 036 252
(+256) 748 324 644
Info@nursesonlinediscussion.com
Kampala ,Uganda
© 2026 Nurses online discussion. All Rights Reserved