Specialized Nursing Care Procedure
Subtopic:
Care of the patient's eyes

Learning Objectives
- Identify appropriate techniques for cleaning the eyes, including equipment and safety protocols.
- Demonstrate correct procedures for instilling eye drops and ointments with minimal contamination risk.
- Explain the indications for various eye care interventions such as irrigation and compresses.
- Perform effective eye care for special patient groups, including postoperative, unconscious, and allergic cases.
- Describe the purposes of eye care in preventing infection, promoting healing, and preserving vision.
- Prepare and manage the required materials and documentation for ophthalmic procedures.
Care of the patient’s eyes
Care of the patient’s eyes encompasses a variety of actions and protocols focused on preserving the cleanliness, comfort, and overall health of their eyes.
It Involves:
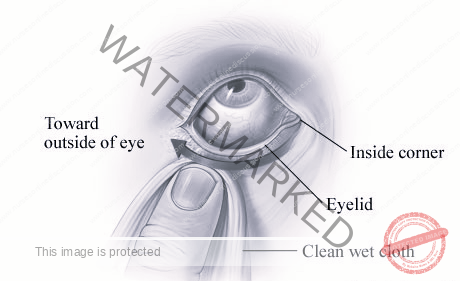
- Cleaning of the Eye: This procedure involves the removal of debris, such as dried secretions, discharge, and crusting, from the eyelids and eyelashes. This is typically performed using sterile wipes or cotton balls that have been gently moistened with warm water.
- Instillation of Eye Drops/Ointment: This method is used to administer medication directly to the eye, targeting various conditions. These conditions can include infections, inflammation, dryness, or diseases like glaucoma.
- Cold and Warm Compresses: These therapeutic applications utilize temperature to achieve different effects. Cold compresses are applied to reduce inflammation and swelling, often following injuries. Warm compresses can help to soothe irritation, such as in cases of dry eye, or to help open clogged tear ducts.
- Eye Irrigation: This procedure involves flushing the eye with a sterile solution. The purpose is to remove foreign objects, irritating substances, or excessive build-up of discharge.
Indications of Cleaning the eye
- Patients with Eye Discharge: The presence of discharge can indicate an underlying issue such as an infection, inflammation, or general irritation. Cleaning the eye, followed by the instillation of appropriate eye drops, and occasionally irrigation, can be essential steps in managing the discharge and supporting the healing process.
- Postoperative Care for Patients Following a Cataract Operation: After undergoing cataract surgery, diligent eye care is critical. This includes gentle cleaning of the eye, the consistent instillation of prescribed eye drops, and careful monitoring for any signs of infection or other potential complications.
- Eye Care for the Unconscious Patient: For patients who are unconscious, providing regular eye care is vital. This helps to prevent infections and maintain overall eye health. Key aspects include cleaning the eye, ensuring the eyelids remain closed to prevent drying, and generally making sure the eyes are protected from potential injury.
- To Be Performed Prior to Instilling Eye Drops or Ointment: Cleaning the eye beforehand is a standard practice to optimize medication delivery. This ensures that the medication can be absorbed effectively and helps to avoid contamination of the eye or the medication itself.
- Patients with Dry Eye Syndrome: Specific eye care practices can significantly help manage the uncomfortable symptoms of dry eye syndrome. These practices aim to promote tear production, provide lubrication to the eye surface, and ultimately protect the cornea from damage due to dryness.
- Patients with Eye Allergies: For individuals experiencing eye allergies, cleaning the eye to remove allergens and subsequently instilling antihistamine eye drops can be effective in managing common symptoms like itching, redness, and excessive tearing.
- Patients with Foreign Body in the Eye: If a foreign object is present in the eye, prompt action is needed. Eye irrigation using a sterile solution is a primary method to safely remove the foreign object and help prevent damage to the delicate cornea.
Aims/Purposes of Eye Care:
- To prevent and treat infections: Maintaining cleanliness in and around the eye through regular cleaning and disinfection plays a crucial role in reducing the risk of infections.
- To alleviate symptoms and discomfort: Various eye care procedures are designed to provide relief from bothersome symptoms. Cold compresses, warm compresses, and eye irrigation are examples of interventions that can help reduce pain, soothe itching, and address dryness.
- To promote healing and recovery: Following eye surgery or instances of trauma to the eye, appropriate cleaning and the administration of prescribed medications are essential steps to facilitate healing and recovery.
- To maintain optimal eye health: Consistent and appropriate eye care practices are fundamental in the long-term effort to prevent eye diseases and help preserve vision.
Cleaning of the Eye
Objectives
Identify the requirements for cleaning the eyes.
Prepare the requirements for cleaning the eyes.
Demonstrate the ability to clean the eyes.
Requirements
Tray containing:
Gallipot of cotton balls
Receiver
Clean/disposable gloves
Mackintosh and towel
Plastic apron
Gallipot of normal saline 0.9% or cooled boiled water
At the bedside:
Hand washing equipment
Screen
Steps | Action | Rationale |
|---|---|---|
| 1. | Observe fundamental hygiene protocols. | This ensures adherence to established safety and care standards. |
| 2. | Position the patient upright in a seated position. | This posture prevents the cleaning solution from inadvertently flowing into the healthy eye, minimizing the risk of cross-contamination. |
| 3. | Carefully place the protective mackintosh and towel. | These measures are crucial to prevent the patient’s clothing from becoming soiled or wet during the procedure. |
| 4. | Thoroughly wash and dry your hands, then don clean gloves. | This critical step prevents the transmission of microorganisms, ensuring a safe environment for both the patient and the caregiver. |
| 5. | Position yourself on the patient’s right-hand side. | This is a standard positioning for procedures, often offering better access and control. |
| 6. | Immerse the swabs/cotton balls in the prepared solution and meticulously cleanse the eye in a specific sequence: – Begin with the unaffected, healthy eye. – Wipe gently from the inner aspect near the nose (nasal) outwards towards the temple (temporal), using each swab only once before disposal. – Utilize fresh, dry swabs to carefully dry the cleansed eye area. – Perform the identical cleansing process for the other eye. – Continue this swabbing sequence until all visible discharge has been effectively removed from the eyes. | Starting with the healthy eye minimizes the risk of transferring any potential contamination to it from the affected eye. The unidirectional wiping action prevents the reintroduction of removed debris or pathogens back into the eye. |
| 7. | Gently dab away any residual fluid with a fresh, dry swab. | This step is important to prevent the potential spread of any remaining discharge or contaminants. |
| 8. | Express gratitude to the patient and ensure their comfort before leaving. | This promotes a positive and supportive patient experience and contributes to their overall well-being. |
| 9. | Remove and dispose of all used materials appropriately, and clean the work area. | This action is essential to maintain a clean and safe environment, preventing the spread of infection. |
| 10. | Accurately document the completed procedure. | This provides a clear record of the care provided, facilitating communication among healthcare providers and ensuring continuity of care. |
NSTILLATION OF EYE DROPS/ OINTMENT.
Instillation Of Eye Drops/ Ointment refers to the procedure of applying medication directly into a patient’s eyes.
Objectives
Identify the necessary equipment and supplies for instilling eye drops/ointment.
Gather and organize the required materials for the eye drop/ointment instillation.
Perform the correct technique for administering eye drops/ointment into the eyes.
Indications:
For Eye Drops:
To treat infections: Antibiotic eye drops are frequently prescribed to fight bacterial infections, such as conjunctivitis (commonly known as pink eye).
To keep eyes moist: Artificial tears or normal saline drops are used to provide lubrication to the eye, offering relief from dryness, and are often prescribed following procedures like cataract surgery.
To anaesthetize the eye: Anaesthetic drops work to numb the surface of the eye, which is necessary for certain procedures like cataract surgery or the removal of foreign bodies.
To dilate the pupil: Mydriatic drops cause the pupil to widen, making it easier to conduct thorough eye examinations or to assist in the treatment of specific eye conditions.
To reduce inflammation: Steroid eye drops are used to decrease inflammation within the eye, often prescribed after an eye injury or surgical procedure.
To lower intraocular pressure: Medications for glaucoma are commonly administered as eye drops to help control the pressure inside the eye and prevent further damage.
For Eye Ointment:
To protect the vision of neonates: Prophylactic antibiotic ointment is a standard practice, routinely applied to the eyes of newborns to prevent potential infections.
To treat infections: Antibiotic ointments can be used to treat bacterial eye infections, and are sometimes favored for overnight treatment because of their longer-lasting effect.
To lubricate and soothe dry eyes: Ointments can provide a more sustained lubricating effect compared to eye drops, making them particularly beneficial for cases of severe dryness.
To treat certain eye allergies: Steroid ointments can be used to help reduce inflammation caused by allergic reactions.
Requirements
Patient’s medication chart.
Tray containing:
Prescribed eye drops/eye ointment
Gallipot of cotton balls
Receiver
Gloves
Eye pad in a sterile bowl
Strapping
At the Bedside:
Hand washing equipment
Screen
Procedure for eye drop
Steps | Action | Rationale |
| 1. | Refer to fundamental hygiene and safety protocols. | Ensures adherence to established safety and care guidelines, creating a safe environment for the patient. |
| 2. | Verify the medication prescription against the patient’s chart. | Confirms the correct medication, dosage, frequency, and route of administration are being used, preventing medication errors. |
| 3. | Position the patient comfortably, either seated or lying down. | Facilitates easier access to the eye for medication instillation and promotes patient relaxation. |
| 4. | Perform thorough hand hygiene and don clean, non-sterile gloves. | Prevents the transmission of microorganisms to the patient’s eye, minimizing the risk of infection. |
| 5. | Cleanse the patient’s eyelids and eyelashes as per the eye cleaning procedure. | Removes any debris, discharge, or crusts that could introduce microorganisms into the eye or interfere with medication absorption. |
| 6. | Place a clean, folded swab or tissue on the patient’s cheekbone, just below the lower eyelid margin. | Collects any excess medication that may escape from the eye during or immediately after instillation, preventing it from running down the patient’s face. |
| 7. | Instilling Eye Drops: Gently pull down the lower eyelid of the affected eye with your non-dominant hand. | Creates a small pouch, the lower conjunctival sac, where the eye drops can be instilled. |
| 8. | Instruct the patient to look upwards towards the ceiling; hold the dropper tip close to the eye, but without touching it, and instill the prescribed number of drops into the lower conjunctival sac. | Looking up minimizes the risk of the patient blinking or the cornea being directly touched by the dropper. Maintaining a distance prevents contamination of the dropper tip. Delivering the medication into the sac ensures it comes into contact with the eye. |
| 9. | Release the lower eyelid gently after the eye drops have been instilled. | Allows the eyelid to return to its normal position. |
| 10. | Instruct the patient to gently close their eye(s) for a short period (e.g., 1-2 minutes). Avoid squeezing the eyelids tightly. | Minimizes drainage of the medication from the eye and allows for better absorption. Squeezing can force the medication out. |
| 11. | Apply gentle pressure with a clean tissue or finger over the inner canthus (the corner of the eye closest to the nose) for approximately 30-60 seconds. | Occluding the nasolacrimal duct helps to prevent the eye drops from draining into the nasal passages, which can lead to systemic absorption and potential side effects, as well as reduced therapeutic effect in the eye. |
| 12. | Administering Eye Ointment: Gently pull down the lower eyelid of the affected eye. | Exposes the inner surface of the lower eyelid and the conjunctival sac, where the ointment will be applied. |
| 13. | Squeeze a small ribbon of ointment (approximately 1-1.25 cm or as prescribed) along the inside of the exposed lower conjunctival sac, moving from the inner canthus outwards. Avoid touching the eye or eyelid with the tip of the tube. | Applying the ointment to the sac ensures contact with the eye. Avoiding contact prevents contamination and potential injury. |
| 14. | Instruct the patient to gently close their eyes. | The warmth of the eye helps to liquefy the ointment, allowing it to spread more evenly over the eye’s surface. Keeping the eye closed also prevents contamination and the entry of microorganisms. |
| 15. | Instruct the patient to gently move their eyeball around under their closed eyelids. The patient should keep the eye closed for a few minutes. | This helps to distribute the medication evenly across the surface of the eye. |
| 16. | Thank the patient for their cooperation and ensure they are comfortable. | Promotes a positive patient experience and addresses their immediate needs. |
| 17. | Discard all used supplies appropriately, remove gloves, and perform hand hygiene. | Maintains a clean and safe environment and prevents the spread of infection. |
| 18. | Document the medication administration, including the name of the medication, the strength, the number of drops or amount of ointment administered, the time of administration, and the eye(s) treated, on the patient’s medication chart. | Provides a clear and accurate record of the treatment given, ensuring continuity of care and facilitating appropriate follow-up. |
General Principles – Application of Eye Ointment
- When ointment and eye drops are both prescribed, it’s crucial to administer the eye drops first. Allow a 3-minute interval to pass before applying the ointment. This timing ensures the eye drops have sufficient contact time with the eye’s surface before the ointment’s viscosity potentially hinders their absorption.
- The prescription for ointment may extend beyond direct application to the eye itself. It could be intended for use on wounds located on the eyelids, the face surrounding the eye, or within the eye socket. Always carefully check the intended site of application.
- The application of ointment might be scheduled for a period after the initial dressing. For instance, in certain oculoplastic surgery cases, this might mean waiting up to a week before commencing ointment application. Follow the specific instructions provided by the medical team.
- If there’s a request to measure the patient’s visual acuity, this should be done before applying any ointment. The inherent thickness of the ointment will inevitably cause clouding of vision, making an accurate assessment impossible afterward. Any residual ointment present from previous applications should be gently removed prior to taking the visual acuity measurement.
- For direct application to the eye, a 5-mm strip of ointment is typically the appropriate amount. This should be carefully applied to the inner edge of the lower fornix (the space between the lower eyelid and the eyeball) of the designated eye.
- After application, instruct the patient to close their eye. Any excess ointment that squeezes out can be gently removed with a clean swab.
- It’s important to inform the patient that the ointment will likely cause blurring of their vision. This is a normal side effect due to the ointment’s thick, viscous nature. Reassurance about the temporary nature of this blurring can alleviate patient anxiety.
- In instances where the ointment is prescribed for wounds on the eyelids, face, or eye socket, the ointment should be squeezed directly onto the wound. To ensure even distribution, it can be gently spread using a moistened swab. If specifically requested by the ophthalmic surgeon, a gentle massage of the wound or scar with the ointment may be indicated to aid in healing and prevent excessive scarring.
Procedure of Instillation of eye ointment
Steps | Action | Rationale |
| 1. | Wash hands thoroughly and prepare the trolley and equipment in accordance with Aseptic Non-Touch Technique (ANTT) principles. | Promotes adherence to strict hygiene standards, minimizing the risk of introducing infection during the procedure. |
| 2. | Check the patient’s identification band against the eye ointment medication chart. | Ensures correct patient identification and that the medication is intended for the right individual, preventing medication errors. |
| 3. | Prepare the patient for the procedure, obtain verbal consent, and provide a clear explanation of the procedure, including any potential side effects of the medication. | Ensures informed consent and promotes patient understanding and cooperation, reducing anxiety. |
| 4. | Assess the patient’s current eye condition, ensuring that there are no contraindications for the prescribed ointment. Review allergies and medical history. | Ensures the medication is safe and appropriate for the patient’s specific situation, minimizing the risk of adverse reactions or complications. |
| 5. | Position the patient comfortably in a seated position. | Provides easy access to the eye for ointment application and allows for better control during the procedure. |
| 6. | Wash hands thoroughly or use an alcohol-based hand rub. | Prevents the spread of microorganisms to the patient’s eye. |
| 7. | Prepare the equipment and arrange it on the tray, paying particular attention to protecting key parts that must remain sterile, such as the tip of the ointment tube. | Maintains aseptic technique to prevent contamination of the medication and the patient’s eye. |
| 8. | Double-check the prescribed eye ointment against the medication chart. | Ensures the correct medication is being prepared for administration, preventing errors. |
| 9. | Verify the correct strength (%) of the ointment against the prescription. | Ensures the correct dosage is administered. |
| 10. | Check the ointment’s expiration date. Examine the ointment for any signs of discoloration or change in consistency. | Ensures the medication is safe and effective for use. Expired or compromised medication should not be used. |
| 11. | Confirm that the packaging or tube seal is intact, especially for first-time use. | Ensures the sterility and safety of the medication has not been compromised. |
| 12. | Ask the patient about any known allergies to topical eye medications. | Prevents potential adverse allergic reactions. |
| 13. | Confirm that the ointment is intended for the correct eye (right, left, or both). | Ensures correct administration site, particularly important when only one eye is to be treated. |
| 14. | Briefly examine the eye to be treated for any concerning signs or symptoms, such as: redness not attributed to a known cause (like recent surgery), unusual stickiness or pain, or any reported deterioration of vision. Also, re-confirm allergies. | Assesses the condition of the eye to identify any potential issues that might contraindicate or require delaying ointment application. |
| 15. | Check if the patient is wearing contact lenses. Unless specifically instructed otherwise by a doctor, contact lenses should be removed before applying eye ointment. | Prevents interference with medication absorption and minimizes the risk of lens contamination or irritation. |
| 16. | Remove gloves, clean hands with alcohol-based hand rub, and reapply new, non-sterile gloves. | Prevents contamination from handling the patient or environment and maintains good hygiene. |
| 17. | Open the ointment packaging, being careful to maintain aseptic technique and avoid touching the tip of the tube. If eye cleaning is required prior to ointment application, perform that procedure first using separate supplies. | Maintains aseptic technique to prevent contamination. |
| 18. | Instruct the patient to slightly tilt their head back and ask them to look up towards the ceiling. | Facilitates easy access to the lower fornix of the eye for ointment application. |
| 19. | Gently pull down the lower eyelid to expose the conjunctival sac. Squeeze a small ribbon of ointment (approximately 5 mm) along the inside of the lower fornix, moving from the inner canthus towards the outer canthus. Ensure that the tip of the tube does not touch the eye. | Ensures correct medication application to the intended area. Avoiding contact prevents injury and contamination. |
| 20. | Ask the patient to gently close their eyes and keep them closed for approximately 60 seconds. | Minimizes systemic absorption of the medication through the tear ducts. |
| 21. | Gently wipe away any excess ointment that may have squeezed out, being careful not to dab or wipe so vigorously that you remove the medication from the eye. | Maintains patient comfort and ensures the intended dose remains in contact with the eye. |
| 22. | If additional eye drops are also prescribed, wait a minimum of 3 minutes before instilling them. Apply alcohol-based hand rub to hands before instilling any other eye medication. | Prevents the dilution or washing away of one medication by the other and ensures each can be effective. Maintains hygiene. |
| 23. | Make the patient comfortable. Offer a tissue for dabbing their cheeks, as some tearing or leakage is common. | Ensures patient comfort and addresses a common side effect of eye medication administration. |
| 24. | Dispose of all clinical waste in the appropriate containers, remove gloves, and cleanse hands. Clean and disinfect the tray and any reusable equipment according to facility policy. | Maintains a clean and safe environment and prevents the spread of infection. |
| 25. | Cleanse hands once more and accurately document the procedure in the patient’s case notes and/or medication administration record, including the date, time, medication name, strength, amount administered, route, and the eye treated. Note any observations or patient comments. | Ensures proper record-keeping, facilitates communication among healthcare providers, and contributes to patient safety and continuity of care. |
WARM EYE COMPRESS.
A warm eye compress involves the application of a warm, moist cloth or specialized compress to the delicate eye area. This simple yet effective therapy offers several benefits:
Soothe and relax the eye muscles: The gentle warmth encourages the relaxation of the intraocular and extraocular muscles, which can be particularly beneficial in alleviating eye strain and reducing feelings of fatigue around the eyes.
Increase blood flow to the area: The application of warmth causes vasodilation, the widening of blood vessels. This increased blood flow to the eye area delivers more oxygen and nutrients, which can promote healing processes and effectively reduce inflammation.
Loosen eye secretions: The warm, moist environment provided by the compress helps to soften and loosen mucus, crusts, and other secretions that may accumulate in the eye area, making their natural removal easier.
Indications for Warm Eye Compresses
Pain Relief: Warm compresses can be a comforting and effective method for reducing discomfort and pain associated with various eye conditions.
Reduce Inflammation: The therapeutic warmth helps to decrease inflammation and swelling affecting the eye and surrounding tissues.
Improve Medication Absorption: Applying a warm compress prior to the administration of eye drops or ointments can help to enhance their absorption into the eye tissues by increasing local blood flow and tissue permeability.
Promote Drainage: The warmth assists in loosening and draining secretions, proving beneficial in managing superficial eye infections and clearing blocked ducts.
Dry eye: Applying a warm compress can stimulate the production of tears and improve the quality of the tear film, thus effectively lubricating the eye surface and alleviating symptoms of dryness.
Stye (hordeolum): A stye is a localized, painful red bump on the eyelid resulting from a bacterial infection of an oil gland. Warm compresses are a primary treatment, helping to bring the stye to a head and encourage natural drainage of the infection.
Blepharitis: This common condition involves inflammation of the eyelids. Warm compresses are a key component of managing blepharitis, as they help to loosen crusts and debris accumulated on the eyelids and reduce inflammation of the lid margins.
Conjunctivitis (Pink eye): This is an infection of the conjunctiva, the transparent membrane lining the eyelid and covering the white of the eye. Warm compresses can offer soothing relief by helping to calm inflammation and promote drainage of discharge associated with certain types of conjunctivitis.
Eye strain: For individuals experiencing eye strain due to prolonged visual tasks like computer use or reading, warm compresses can help to relax the tired eye muscles and relieve the associated discomfort.
Meibomian Gland Dysfunction (MGD): This condition arises from a blockage of the meibomian glands, the oil glands in the eyelids responsible for producing the oily layer of tears, leading to dry eye and other irritating symptoms. Warm compresses are a cornerstone of MGD management, helping to liquefy and drain the blocked oil glands, restoring proper tear film function.
Requirements | Bedside |
| Bowl with warm water | Screen |
| Sterile water or normal saline | Hand washing apparatus |
| Mackintosh cape and towel/dressing mackintosh | |
| Sterile bowl | |
| Cotton swabs | |
| Receiver |
Procedure
Steps | Action | Rationale |
| 1. | Identify the specific eye to be treated. | This crucial step ensures the correct eye receives the treatment, preventing errors. |
| 2. | Adhere to fundamental hygiene and safety protocols. | Promotes adherence to established standards of care, ensuring patient safety and preventing infection. |
| 3. | Position the patient comfortably, either seated or lying down. | This ensures patient comfort during the application of the compress. |
| 4. | If using a separate bowl for the solution, place it within a larger bowl of warm water to maintain temperature. | Using a solution that is too cold can be very uncomfortable for the patient and reduce the therapeutic effect. |
| 5. | Wash and dry hands thoroughly and then don clean gloves. | This action is vital to prevent the chance of cross-infection between the caregiver and the patient. |
| 6. | Immerse a cotton swab in the warmed solution (maintained at a comfortable temperature, typically between 37°C and 41°C). | The warmth helps to improve circulation, relax eye muscles, and relieve pain. |
| 7. | Gently squeeze out any excess solution from the swab. | This step is essential to reduce the risk of scalding the patient with excessively hot water and to prevent wetting the patient’s clothes. |
| 8. | Instruct the patient to gently close the affected eye. Carefully and gently apply the warm swab on top of the closed eyelid of the affected eye. | Closing the eye promotes patient safety and prevents potential damage to the cornea. |
| 9. | Change the warm compress (swab) every 2 minutes, or as prescribed, for the designated length of time. | Regular changes help to maintain a consistent therapeutic temperature throughout the duration of the therapy. |
| 10. | Use a fresh, dry swab to gently clean and dry the eye area after the warm compress application. | This step promotes patient comfort and removes any excess moisture. |
| 11. | If prescribed, administer any eye drops or ointment following the warm compress. | The warm compress can help to improve the absorption of topical eye medications. |
| 12. | Thank the patient for their cooperation and ensure they are comfortable before leaving. | This action promotes the patient’s well-being and fosters a positive therapeutic relationship. |
COLD EYE COMPRESS
A cold eye compress involves applying a cold compress or pack to the affected eye area to alleviate discomfort.
Indications of Cold compress
Reduce inflammation: Cold compresses cause blood vessels to constrict, which helps in reducing inflammation and swelling in the eye area.
Relieve pain: The cold temperature has a numbing effect, helping to reduce pain and discomfort in the affected eye.
Reduce bleeding: By constricting blood vessels, cold compresses can be effective in helping to stop minor bleeding around the eye.
Control bruising: Applying cold compresses immediately after an injury can significantly help reduce bruising by minimizing blood pooling under the skin.
To reduce swelling or bleeding: Cold compresses are beneficial for reducing swelling and bleeding in the eye area due to their vasoconstrictive properties.
To ease periorbital discomfort: They can effectively ease pain and discomfort in the periorbital area, the region surrounding the eye.
To relieve itching: The coolness of the compress can provide a soothing sensation, helping to reduce itching in the eye area.
Requirements
Tray
Ice cubes/chips
Solution: sterile water or normal saline solution
Mackintosh and towel/Dressing mackintosh
Strapping
Cotton swabs
Clean gloves
At the bedside
Screen
Hand washing apparatus
Procedure for applying a cold eye compress
Steps | Action | Rationale |
| 1. | Follow established fundamental nursing procedure protocols. | Ensures adherence to standardized, safe practices during the procedure. |
| 2. | Identify the specific eye to be treated. | This is essential to prevent errors and ensure the correct eye receives the cold compress. |
| 3. | Position the patient comfortably in a lying down position. | This position helps prevent the cold solution from running over the nose and potentially into the untreated eye. |
| 4. | Position the mackintosh and towel appropriately to protect the patient’s clothing. | This step is crucial to prevent the cold solution from wetting the patient’s clothes, ensuring their comfort. |
| 5. | Place a cotton swab in the bowl containing ice chips (temperature range typically between 18-27°C). | Using ice chips makes the compress easy to apply and provides a comfortable level of cold for therapeutic effect. |
| 6. | Wash and dry hands thoroughly and then put on clean gloves. | This is a critical step to prevent infection and maintain a sterile environment for the procedure. |
| 7. | Place the moistened cold swab gently over the patient’s closed affected eye. | The moist swab acts as a conduit to effectively transfer the cold temperature from the ice pack to the eye. |
| 8. | After 15-20 minutes, carefully remove the cold compress. | This time limit is important to prevent potential skin changes that can occur due to prolonged vasoconstriction (narrowing of blood vessels). |
| 9. | Use a fresh, dry swab to gently clean and dry the patient’s face around the treated eye. | This step is done to ensure patient comfort by removing any moisture or condensation. |
| 10. | If required, apply any prescribed eye drops or ointment after the cold compress application. | Applying medication afterwards allows the reduced swelling from the cold compress to potentially improve absorption or treat underlying conditions. |
| 11. | Thank the patient for their cooperation and ensure they are comfortable before leaving the bedside. | This action promotes patient comfort and well-being. |
| 12. | Clear away all used equipment and document the procedure accurately in the patient’s record. | This ensures proper record-keeping and allows for monitoring of the treatment’s effectiveness. |
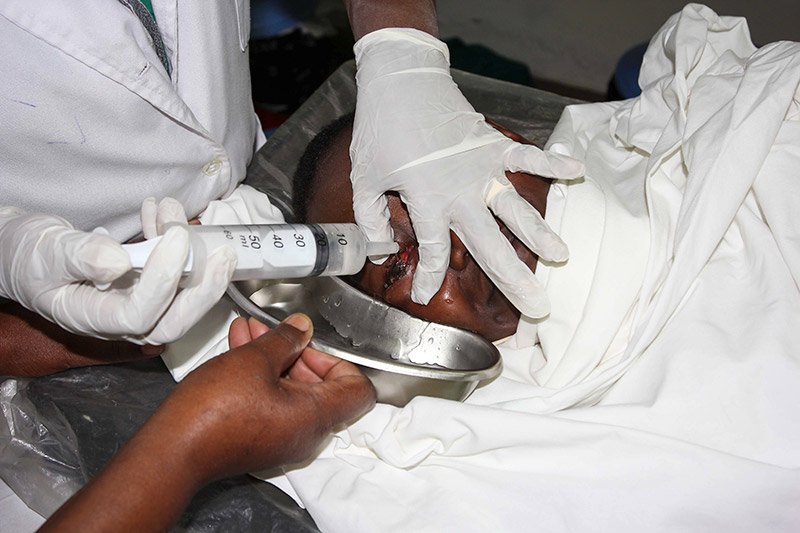
Eye Irrigation
Eye irrigation refers to the procedure of gently flushing the eye with a sterile solution. This technique is used to effectively remove foreign bodies, irritating substances, or accumulated discharge. This cleansing action helps to alleviate discomfort, reduce inflammation, and ultimately contribute to improved visual clarity.
Essentially, eye irrigation involves washing out the conjunctival sac with a gentle stream of fluid, typically water or saline. This controlled flow of the irrigation solution mechanically dislodges and washes away any unwanted material from the eye’s surface. To minimize any further irritation, the solution used is usually sterile and isotonic, meaning it has a similar salt concentration to the body’s fluids.
Purpose/Aims of Eye Irrigation:
To remove foreign bodies from the eye: This is a primary aim, targeting substances like dust, dirt, minute particles, or even small insects that may have entered the eye and are causing discomfort or potential damage.
To remove chemicals which have been accidentally splashed into the eye(s): In emergency situations, irrigation is crucial for flushing out harmful substances such as chemicals, smoke particles, fumes, or allergens that can cause significant irritation or injury to the ocular tissues.
To washout discharge: Irrigation helps to eliminate accumulated mucus, pus, or other types of secretions that can be associated with infections or inflammatory conditions.
Reduce inflammation: The physical flushing action can help to physically remove inflammatory mediators and reduce localized inflammation and swelling within the eye.
Improve visual clarity: By removing obstructions like foreign objects or discharge, irrigation can directly lead to an improvement in the patient’s vision.
Before administration of medication: Irrigation can prepare the eye to better receive topical medications by removing debris that could hinder absorption or cause contamination.
In preparation for eye operations: As part of pre-operative preparation, irrigation helps to thoroughly cleanse the eye, reducing the risk of infection during the surgical procedure.
Indications for Eye Irrigation:
Foreign body sensation: A common indication is when a patient reports a persistent feeling of “something in my eye,” suggesting the presence of a speck of dust, a stray eyelash, or a small insect.
Chemical or irritant exposure: Immediate irrigation is necessary if the eye has come into contact with a potentially harmful chemical or other irritating substance.
Discharge or secretions: Excessive or abnormal discharge or secretions from the eye, which can indicate infection or inflammation, are another indication for irrigation.
Eye infections: In certain eye infections, particularly those causing significant discharge, eye irrigation can assist in removing infectious material and reducing the overall inflammatory burden.
Requirements
Tray – sterile
Irrigating solution: Normal saline warmed to approximately 37°C to improve patient comfort, or plain boiled water that has been cooled and remains sterile.
Sterile gloves: To maintain a sterile field and prevent infection.
Patient’s towel: To protect the patient’s clothing.
Lid retractor: May be necessary to gently hold the eyelids open, particularly if the patient is unable to do so themselves.
Litmus paper: Used to check the pH of the eye after chemical exposure to ensure complete removal of the irritant.
Undine or any small container with a pouring spout: Examples include a feeding cup, a bulb syringe, or a commercially available sterile irrigation set, used to deliver the irrigating solution.
Eye pad/waterproof pad: To absorb any runoff and protect the surrounding area.
Gallipot of cotton balls or facial tissues: For drying the area after irrigation.
2 receivers: One to collect the used irrigation fluid and another for soiled swabs.
Mackintosh cape and towel/dressing mackintosh: Extra protection to prevent the patient’s clothing from getting wet.
Boric acid 2 to 4 %: May be used as a specific irrigating solution in certain situations, as directed.
Gallipot of cotton: For general use and cleaning.
At the bedside
Wash hand equipment: To ensure proper hand hygiene before and after the procedure.
Screen: To provide privacy for the patient during the procedure.
Procedure for eye irrigation
Steps | Action | Rationale |
| 1. | Follow established fundamental nursing procedure protocols. | Promotes adherence to standardized and safe practices throughout the procedure. |
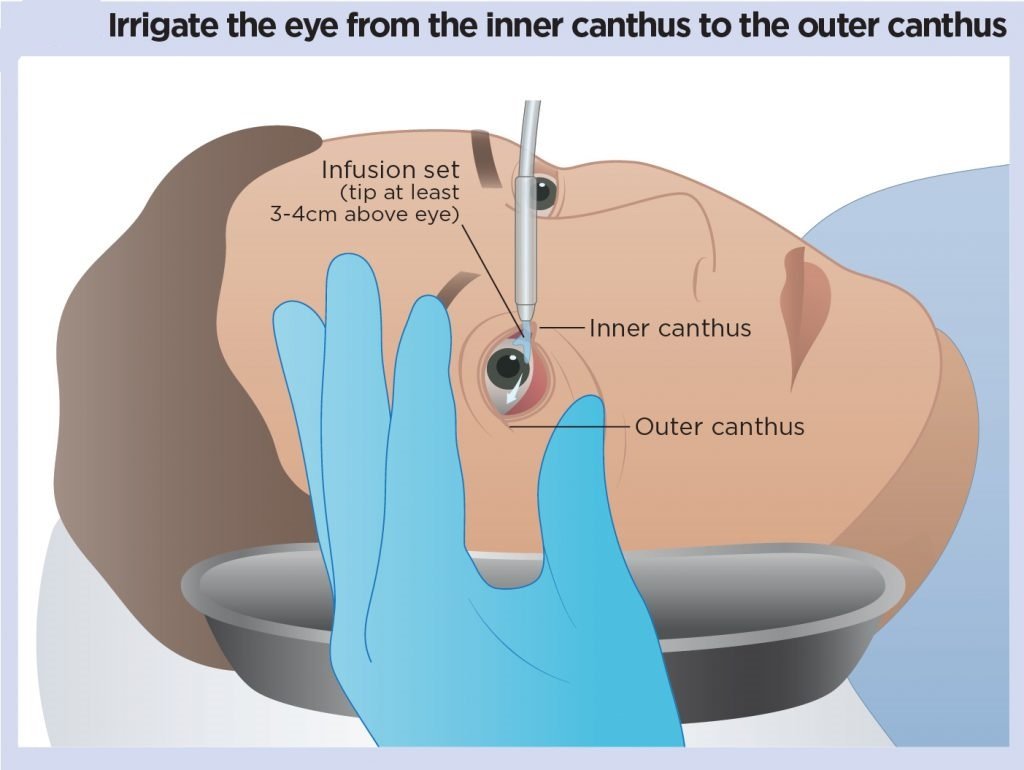
| 2. | Position the patient either sitting or lying down, with their head gently tilted towards the side of the affected eye. Protect the patient and the bed linens by placing a dressing mackintosh or waterproof pad and a towel. | Gravity assists the flow of the irrigating solution away from the unaffected eye and directs it from the inner canthus of the affected eye towards the outer canthus, preventing cross-contamination and ensuring effective removal of debris. |
| 3. | Don clean, non-sterile gloves. If indicated by the presence of infection or risk of exposure to hazardous material, sterile gloves may be necessary. Clean the eyelids and eyelashes of the affected eye using a sterile technique, as described previously. | Prevents the introduction of microorganisms into the eye during the irrigation process. |
| 4. | Position the curved basin of the receiver against the patient’s cheek on the side of the affected eye to collect the outflowing irrigating solution. If the patient is able to sit upright, instruct them to hold the receiver themselves. | The concave shape of the receiver facilitates the efficient collection of the irrigating solution, preventing it from running down the patient’s face and clothing. |
| 5. | Gently expose the lower conjunctival sac by pulling down the lower eyelid with your non-dominant hand. If necessary to fully visualize the area or if the patient tends to blink, gently hold the upper eyelid open using your fingers or a lid retractor. | Provides access to the conjunctival sac, the area to be irrigated, and prevents involuntary blinking which could interrupt the procedure or cause injury. |
| 6. | Hold the tip of the irrigator (undine, syringe, or irrigation set nozzle) approximately 2.5 cm (1 inch) away from the eye. Direct a gentle, steady flow of the irrigating solution from the inner canthus (near the nose) towards the outer canthus (towards the temple) along the conjunctival sac. | This technique minimizes the risk of injury to the cornea by avoiding direct pressure. Directing the flow from inner to outer canthus helps to prevent the spread of potential infection from the conjunctival sac to the lacrimal sac, nasolacrimal duct, and nose. |
| 7. | Continue to irrigate until the outflowing solution is clear and free of debris, or until the prescribed amount of solution has been used. Apply only sufficient gentle force to effectively remove secretions without directly touching any part of the irrigating equipment to the eye structures. | This ensures thorough removal of the foreign material or discharge. Avoiding direct contact prevents injury to the delicate eye tissues, including the conjunctiva and cornea, and enhances patient comfort. |
| 8. | Instruct the patient to close their eye and move their eyeball gently in various directions periodically throughout the irrigation. | These eye movements help to dislodge and move secretions from the upper to the lower conjunctival sac, facilitating their removal by the irrigating solution. |
| 9. | After the irrigation is complete, gently dry the area around the eye with clean cotton balls or tissues. If the patient’s face and neck are wet, offer them the towel to dry themselves. | This provides comfort to the patient by removing excess moisture. |
| 10. | Remove and discard the gloves in the appropriate receptacle. Perform hand hygiene. | Prevents the spread of microorganisms. |
| 11. | Ensure the patient is comfortable and has everything they need within reach. | Promotes patient well-being and satisfaction. |
| 12. | Document the procedure in the patient’s chart, including the date, time, the type and amount of irrigating solution used, the patient’s tolerance of the procedure, the appearance of the irrigation return, and any relevant findings or observations. | Ensures accurate record-keeping and facilitates communication among healthcare providers. |
| 13. | Clean and disinfect or dispose of all used equipment according to facility policy. | Maintains a clean and safe environment and prevents cross-contamination. |
Points to remember:
For chemical burns, irrigate each affected eye continuously for at least 15-20 minutes using copious amounts of normal saline solution. This prolonged irrigation is crucial to effectively dilute and wash out the harsh chemical.
If the specific chemical involved in a burn is unknown, use litmus paper to check the pH of the eye after initial irrigation. Continue irrigating until a neutral pH is achieved to confirm adequate removal of the irritant. When irrigating both eyes simultaneously, instruct the patient to tilt their head towards the side being irrigated to prevent cross-contamination of the unaffected eye.
The irrigation fluid may be commercially pre-packaged in a disposable irrigation set for single use, or a sterile 50ml syringe (without a needle) can be used to deliver the solution.
Join Our WhatsApp Groups!
Are you a nursing or midwifery student looking for a space to connect, ask questions, share notes, and learn from peers?
Join our WhatsApp discussion groups today!
Join NowRelated Topics
Foundations of Nursing (III)
- Apply Nursing process to the management of patients
- Administer prescribed medicine appropriately
- Instilling medication (general)
- Blood transfusion
Specialized Nursing Care Procedures
- Perform Shortening and removal of drains
- Perform Colostomy Care
- Prepare Abdominis Paracentesis (Abdominal Tapping)
- Prepare Lumbar Puncture
- Perform Gastrostomy Feeding
- Carry out gastric Lavage
- Perform Tracheostomy Care
- Ophthalmological Care
- Care of the patient`s ears
- Pre-Operative Eye Care
- Ear Care
- Peri-Operative Care:
- Orthopedic Nursing Care
- Prepare for Neurological Assessment
We are a supportive platform dedicated to empowering student nurses and midwives through quality educational resources, career guidance, and a vibrant community. Join us to connect, learn, and grow in your healthcare journey
Quick Links
Our Courses
Legal / Policies
Get in Touch
(+256) 790 036 252
(+256) 748 324 644
Info@nursesonlinediscussion.com
Kampala ,Uganda
© 2026 Nurses online discussion. All Rights Reserved