Introduction to Midwifery
Normal First Stage of Labour
Table of Contents
PHYSIOLOGY OF THE FIRST STAGE OF LABOUR:
Learning Objectives
Explain the physiology of the first stage of labour, including uterine action, polarity, contraction, and retraction.
Describe cervical changes during labour, including effacement, dilatation, and the appearance of show.
Identify mechanical factors influencing labour progress, such as forewaters, general fluid pressure, rupture of membranes, and fetal axis pressure.
Outline the descent of the presenting part through the pelvic inlet, cavity, and outlet, and interpret fetal station.
State the aims of managing the first stage of labour, including monitoring progress, preventing exhaustion, infection, and complications, and providing comfort and pain relief.
Demonstrate knowledge of admission procedures, maternal assessment, abdominal and vaginal examinations, and their indications, contraindications, and complications.
1. UTERINE ACTION
Fundal Dominance:
Uterine contractions originate in the upper portion of the uterus, near the fallopian tube attachments (cornua), and then spread throughout and downwards. The contraction is most intense and lasts longest at the fundus (the top of the uterus). Although the contraction intensity peak is reached simultaneously across the entire uterus, it is in the fundus where the action is most pronounced, effectively driving the labor process. The relaxation phase also begins uniformly across the uterus. This pattern is crucial as it facilitates cervical dilation and allows the forceful fundal contractions to push the fetus down.Polarity:
Polarity refers to the coordinated neuromuscular relationship between the upper and lower segments of the uterus throughout labor. This harmony ensures that the uterus works effectively as a whole. During a contraction, the upper uterine segment contracts strongly and undergoes retraction to expel the fetus, while the lower uterine segment relaxes slightly and dilates, creating an opening for the baby to pass through. If this coordination is disrupted (disorganized polarity), the progress of labor can be hindered or stalled.Contraction and Retraction:
Unlike typical muscle contractions that fully relax afterward, uterine muscle fibers in labor retain some degree of shortening even after a contraction ends. This residual shortening is called retraction. This is a unique characteristic of the uterine muscle. Due to retraction, the upper segment of the uterus progressively becomes shorter and thicker over the course of labor. This process reduces the volume of the uterine cavity, which aids in pushing the fetus downwards.Formation of the Upper and Lower Uterine Segments:
Towards the end of pregnancy, the uterus differentiates into two distinct sections:The upper uterine segment, primarily located in the fundus and body of the uterus, is mainly responsible for forceful contractions. It is more muscular and thicker to generate the power needed for labor.
The lower uterine segment, developing from the isthmus (the narrow section connecting the body of the uterus to the cervix), is designed to stretch and dilate. It becomes thinner and more distensible to accommodate the descending fetus and facilitate its passage. It typically measures about 8-10cm in length at term.
Retraction Ring:
A retraction ring is a boundary line that forms between the thicker, contracting upper uterine segment and the thinner, dilating lower uterine segment. This ring is a physiological feature of labor. As the upper segment contracts and retracts, and the lower segment stretches to make room for the baby, the retraction ring gradually moves upwards. Under normal circumstances, this ring is not visibly prominent and ceases to ascend further once the cervix is fully dilated, allowing the fetus to descend from the uterus. However, in obstructed labor, the retraction ring can become excessively pronounced and visible on the abdomen above the pubic bone. This abnormally high and visible retraction ring is known as a Bandl’s ring and is a sign of impending uterine rupture.
2. CERVICAL ACTION
Cervical Effacement:
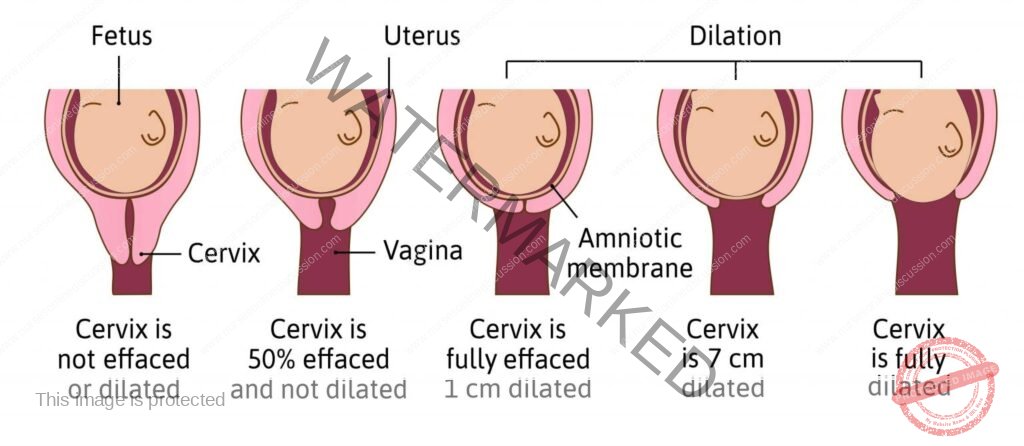
Cervical effacement is the process where the cervical canal effectively shortens and thins out, becoming integrated into the lower uterine segment. The muscle fibers around the internal opening of the cervix (internal os) are pulled upwards as the upper uterine segment retracts. This process results in the cervix losing its length and essentially merging into the lower part of the uterus. Effacement is often described in percentages, from 0% (uneffaced, cervix is still long) to 100% (fully effaced, cervix is paper-thin).Cervical Dilatation:
Cervical dilatation refers to the opening of the cervical os, expanding from a closed state to an opening large enough to allow the passage of the fetal head. This is measured in centimeters (cm). Full dilatation, the point at which the cervix is wide enough for the baby to pass through during birth, is defined as approximately 10cm at term. The pressure exerted by the amniotic sac (bag of forewaters) and a well-flexed fetal head, pressed firmly against the cervix, promotes efficient cervical dilation.Show:
Show is the term for blood-tinged mucus that is often observed just before or at the beginning of labor. During pregnancy, a thick mucus plug (operculum) forms in the cervical canal, acting as a barrier against infection. As the cervix begins to dilate and efface in early labor, this mucus plug is expelled. The blood component of the show comes from the rupture of small capillaries in the cervix as the chorion (outermost fetal membrane) separates slightly from the dilating cervix.
3. MECHANICAL FACTORS
Formation of Forewaters:
As the lower uterine segment stretches and thins, the chorion membrane starts to detach from it. The increasing pressure inside the uterus during contractions causes the detached, lower part of the amniotic sac to bulge downwards into the dilating internal cervical opening. When the fetal head is well-flexed and positioned snugly within the cervix, it effectively separates the amniotic fluid into two compartments. The fluid situated in front of the fetal head is termed the forewaters, while the fluid surrounding the baby’s body behind the head is called the hindwaters.General Fluid Pressure:
When the amniotic membranes are intact, the force of uterine contractions is distributed across the amniotic fluid. Because amniotic fluid is virtually incompressible, the pressure generated by contractions is evenly distributed throughout the uterus and over the entire fetal body. This is known as general fluid pressure. If the membranes rupture prematurely and a significant amount of amniotic fluid is lost, the fetus, placenta, and umbilical cord can become compressed between the uterine wall and the fetal body during contractions. This compression can compromise the oxygen supply to the fetus.Rupture of Membranes:
The optimal physiological timing for the amniotic membranes to rupture is towards the end of the first stage of labor, ideally when the cervix is fully dilated and can no longer provide support to the bag of forewaters. At this stage, uterine contractions are also generating increasing expulsive forces. However, membranes can sometimes rupture days prior to the onset of labor (pre-labor rupture of membranes or PROM) or at various points during the first stage of labor, particularly if the presenting part of the fetus is not well-engaged in the pelvis. In some instances, the membranes may remain intact even into the second stage of labor and may be seen bulging at the vulva as a fluid-filled sac encasing the fetal head during birth. This is referred to as a caul (sometimes written as “caul birth”).Fetal Axis Pressure:
During uterine contractions, the uterus tilts forward. The force of the contraction, originating predominantly from the fundus, is directed downwards along the longitudinal axis of the fetus. This force is then transmitted to the cervix via the presenting part (the part of the fetus closest to the pelvic inlet). Fetal axis pressure becomes more significant after the membranes rupture and throughout the second stage of labor as the direct pressure of the contracting uterus on the fetus intensifies the downward force.Descent of the Presenting Part:
Descent refers to the downward and outward progression of the presenting part of the fetus through the mother’s pelvis. In a normal labor with a vertex (head-first) presentation, the well-flexed fetal head undergoes a series of movements (twisting, turning, flexion, and extension) to navigate the different planes and bony structures of the pelvis. There are three key pelvic planes, or potential points of obstruction, that the presenting part must traverse during descent:Pelvic Inlet/Brim: The pelvic inlet is the upper opening of the true pelvis. When the widest diameter of the fetal head has passed through the pelvic inlet, the head is considered “engaged.” Clinically, engagement is often assessed by palpation in relation to the ischial spines. When the presenting part reaches the level of the ischial spines, which are bony prominences on the pelvic sidewalls, it is designated as Station 0. This signifies that the largest diameter of the fetal head has negotiated the pelvic inlet.
Pelvic Cavity: The pelvic cavity is the mid-portion of the pelvis between the inlet and outlet. As the presenting part descends further to reach the perineum (the tissue between the vagina and anus), it indicates that the largest portion of the head has passed beyond the ischial spines. The head is then considered to be at Station +2 (stations below the ischial spines are positive numbers, indicating further descent).
Pelvic Outlet: The pelvic outlet is the lower opening of the true pelvis. Delivery of the fetal head signifies that it has successfully passed the final pelvic obstacle, the pelvic outlet. This involves movement under the pubic arch, between the ischial tuberosities, and over the coccyx (tailbone).
NB: Fetal station describes the relationship between the lowest point of the presenting part and an imaginary line drawn between the ischial spines of the maternal pelvis. Stations are measured in centimeters above (negative numbers) or below (positive numbers) the ischial spines (Station 0).
MANAGEMENT OF THE FIRST STAGE OF LABOUR
Aims:
To Monitor Labour Progress: Regular assessment is essential to ensure labor is progressing normally and to identify any deviations or potential problems early on.
To Prevent Maternal Exhaustion: Labor is physically demanding, and prolonged exhaustion can negatively impact the mother’s ability to cope and push effectively in the second stage.
To Prevent Infections: Maintaining hygiene and adhering to aseptic techniques are critical to minimize the risk of infection for both mother and baby.
To Provide Comfort to the Mother and Maintain Patient Morale: Labor can be a stressful and anxious time. Providing emotional and physical comfort, and maintaining a positive and supportive environment is crucial.
To Relieve Pain: Effective pain management strategies are important to help the mother cope with labor pain and have a more positive birth experience.
To Prevent Complications: Proactive management and vigilance are essential to identify and prevent potential complications of labor for both mother and fetus.
Admission of a Mother in Labour:
When a woman arrives in labor, the initial steps are crucial for establishing a positive and supportive environment.
Welcome the mother and her accompanying relatives warmly to help reduce fear and anxiety and build rapport.
Obtain a comprehensive medical history, including obstetric history, and review her antenatal record (pregnancy notes) while she is seated or lying comfortably.
The history taking should include:
Demographic data (basic patient information).
Date and time of admission.
When contractions started and their pattern.
Frequency and strength of contractions.
Whether the membranes have ruptured, and if so, when and what the amniotic fluid looked like.
Obtain informed consent from the mother for care and procedures. Ensure she receives sufficient information to make an informed decision and documents her consent.
Vital Observations: Regular monitoring of vital signs is crucial to assess the mother’s overall condition and identify potential issues.
Pulse: Monitor pulse rate every 30 minutes (½ hourly). A pulse rate greater than 100 beats per minute may indicate pain, anxiety, infection, dehydration/ketosis, or hemorrhage, among other issues.
Blood Pressure: Check blood pressure every 2 hours.
Temperature: Measure temperature every 4 hours.
Respiration: Assess respiratory rate every 4 hours (normal range is typically 16-20 breaths per minute).
Investigations: Routine investigations and further tests may be performed based on individual needs.
Urinalysis: Perform urine testing to check for ketones (indicating dehydration or inadequate calorie intake), glucose (to rule out gestational diabetes), and protein (which may be a sign of pre-eclampsia).
Blood Tests: Blood tests, such as Hemoglobin (Hb) estimation, blood grouping, and cross-matching, may be ordered depending on the mother’s condition and risk factors, to prepare for potential blood loss or transfusion needs.
General Examination: A thorough physical examination is conducted to assess the mother’s overall health status.
The midwife conducts a head-to-toe examination, paying particular attention to:
General appearance: Assess if she appears healthy or unwell.
Body size and build.
Any physical deformities.
Signs of anemia (pallor), jaundice (yellowing of skin/eyes), edema (swelling), dehydration, or infections.
Presence of varicose veins, enlarged glands, or swollen neck veins.
Examine the breasts and nipples to assess their suitability for breastfeeding.
Abdominal Examination: This is a systematic assessment of the abdomen to evaluate the pregnancy and labor progress.
Ensure the mother’s bladder is empty before starting the abdominal examination. The examination is typically done in three steps:
Inspection: Visually examine the abdomen for size, shape, scars from previous surgeries, and any visible signs related to pregnancy (e.g., linea nigra, striae gravidarum).
Palpation: Use hands to feel and assess:
Tenderness or pain in the abdomen.
Height of the uterine fundus (top of the uterus).
Fetal presentation (part of the fetus entering the pelvis).
Fetal lie (orientation of the fetal spine relative to the mother’s spine).
Fetal position (location of the fetal back relative to the mother’s pelvis).
Descent of the presenting part into the pelvis.
Uterine contractions: assess frequency, duration (length), and strength of contractions.
Auscultation: Listen to the fetal heart rate using a fetal stethoscope or Doppler device to assess:
Fetal heart rate (beats per minute).
Regularity of the fetal heart rhythm.
Volume and clarity of fetal heart sounds.
Vaginal Examination (VE):
A vaginal examination is a sterile procedure performed to assess the progress of labor and identify any obstetrical or gynecological issues.
Indications for Vaginal Examination:
During Pregnancy (Antenatal):
To confirm pregnancy (though less common now with readily available urine and blood tests).
To rule out gynecological abnormalities such as fibroids.
For pelvic assessment to evaluate pelvic shape and size.
To determine the condition of the cervix (e.g., cervical length, consistency).
To confirm the type of abortion (in cases of miscarriage).
To investigate abnormal vaginal discharge.
During Labour (Intrapartum):
First Stage of Labour:
To determine cervical dilatation (how open the cervix is).
To check for umbilical cord prolapse when membranes rupture (to ensure the cord isn’t preceding the baby).
To confirm full cervical dilatation when the mother feels the urge to push (bearing down).
Before induction of labor to assess cervical readiness (Bishop score).
In prolonged labor to rule out obstructed labor (and assess progress).
To positively identify the fetal presentation (vertex, breech etc.).
To determine if the presenting part is engaged (how far down in the pelvis the baby is).
Second Stage of Labour:
To confirm full cervical dilatation (if uncertain based on maternal signs).
When there is lack of descent of the fetal head to investigate the cause of delay (e.g., malposition like face-to-pubis).
After the delivery of the first twin in a multiple pregnancy to determine the presentation of the second twin.
Third Stage of Labour:
In delayed third stage of labor (delayed placental delivery) to check if the placenta is in the birth canal where it can be removed manually if necessary.
To rule out vaginal or cervical lacerations and to remove any blood clots from the birth canal after placental delivery.
In emergency situations, such as manual removal of the placenta.
During Puerperium (Postpartum Period):
To assess perineal healing approximately 6 weeks postpartum.
To evaluate whether reproductive organs have regained their normal muscle tone and position after childbirth.
To collect a vaginal specimen for examination (e.g., for infection).
To investigate persistent or abnormal vaginal discharge in the postpartum period.
Contraindications of Vaginal Examination: Situations where a vaginal examination should be avoided or performed with extreme caution.
Active Vaginal Bleeding (Antepartum Hemorrhage – APH): If there is current vaginal bleeding, a VE is contraindicated as it could worsen the bleeding, especially in cases of placenta previa or placental abruption.
Recent Pelvic Surgery or Trauma: VE should be avoided if the patient has had recent pelvic surgery or trauma due to the risk of damaging healing tissues.
Suspected or Confirmed Pregnancy with Threatened Miscarriage or Ectopic Pregnancy: VE may increase the risk of complications in these conditions.
Known or Suspected Cervical Incompetence: VE can potentially trigger cervical dilation or rupture of membranes in women with cervical incompetence, increasing the risk of preterm labor or miscarriage.
Active Pelvic Infection or History of Pelvic Inflammatory Disease (PID): VE might spread infection or cause further complications in the presence of active pelvic infection.
Severe Pain or Discomfort: If the patient experiences severe pain during attempted VE, the procedure should be stopped.
Patient Refusal or Lack of Consent: The patient has the right to refuse any medical procedure, including VE.
In APH (Antepartum Hemorrhage) and Elective Cesarean Section: VE is generally avoided in cases of known APH and is usually unnecessary if a planned cesarean section is scheduled and labor has not begun.
Complications of Vaginal Examination: Although generally safe, VE has potential risks.
Discomfort or Pain: VE can cause discomfort or mild pain, particularly if the woman is anxious or tense.
Vaginal Bleeding: Light spotting or minimal bleeding after VE is common and usually resolves quickly. However, heavy or persistent bleeding, especially accompanied by abdominal pain, is abnormal and requires further investigation. Trauma or lacerations to the vaginal walls are rare but possible.
Infection: There is a small risk of introducing bacteria into the vagina, potentially leading to infection, although sterile technique minimizes this risk.
Premature Rupture of Membranes (PROM): In rare cases, VE can inadvertently cause the amniotic membranes to rupture prematurely, which can lead to preterm labor.
Requirements for Vaginal Examination:
Tray containing sterile supplies:
Galipot (small container) for antiseptic swabs.
Two receivers (small kidney dishes or similar).
Sterile gloves (appropriate size).
Vaginal speculum (usually not required for VE in labor, but may be needed in some situations).
Sterile bowl for antiseptic solution or lubricant.
Perineal pads or clean absorbent pads.
Sheet and mackintosh (waterproof sheet protector).
Clean gloves (non-sterile gloves for initial setup).
Lubricant (sterile, water-based lubricant).
At the bedside:
Screen or curtain for privacy.
Hand washing facilities (soap, water, and paper towels or hand sanitizer).
Bedpan (to ensure bladder is empty).
PROCEDURE OF VAGINAL EXAMINATION:
Welcome and Explain: Greet the mother warmly, introduce yourself, and explain the vaginal examination procedure clearly and simply to her, ensuring she understands what will happen and why it is necessary. Answer any questions she may have to alleviate anxiety.
Empty Bladder and Privacy: Ask the mother to empty her bladder (offer a bedpan or assist her to the bathroom). Ensure privacy by drawing curtains or closing the door and screening the bed appropriately.
Assemble VE Tray: Gather all necessary equipment and arrange them on the sterile tray, maintaining asepsis.
Relaxation Encouragement: Reassure the mother and encourage her to relax as much as possible throughout the examination. Explain that relaxing her muscles will make the examination more comfortable.
Positioning: Instruct the woman to lie on her back in the dorsal position (lying on her back with knees bent and legs apart). Ensure her arms are relaxed by her sides or across her abdomen to prevent tensing abdominal muscles.
Draping: Assist her into the dorsal position and drape her with a sheet to maintain modesty while exposing the perineal area.
Clean Gloves: Put on clean, non-sterile gloves.
Sheet and Mackintosh: Place the mackintosh (waterproof sheet protector) and draw sheet under the woman’s buttocks to protect the bed linen.
Hand Hygiene and Sterile Gloves: Remove the clean gloves and perform thorough hand washing using soap and water or an alcohol-based hand rub. Put on sterile gloves carefully, maintaining sterility.
Observe External Genitalia: Before cleaning, visually inspect the external genitalia (vulva and perineum). Note the following:
Hygiene level.
Labia for signs of varicosities (swollen veins).
Presence of edema (swelling).
Vulval warts or sores.
Any old scars on the perineum from previous tears, episiotomy (surgical incision to widen the vaginal opening), or female circumcision.
Any vaginal discharge from the vaginal opening: note presence, color, and consistency (e.g., blood, ruptured membranes, amniotic fluid). Assess the smell of any fluid; foul odor may suggest infection. If the amniotic fluid is green or meconium-stained, it indicates potential fetal distress.
Vulval Swabbing: Using the non-dominant (usually left) hand, gently separate the labia. Using sterile swabs held in forceps, cleanse the vulva with antiseptic solution using a downward motion from front to back (from the clitoris towards the rectum) to prevent contamination from the anal area. Use a fresh swab for each stroke, if needed.
Insertion of Fingers: Apply a small amount of sterile lubricant to the index and middle fingers of the dominant (usually right) hand. Gently insert these two fingers into the vagina. Guide the fingers downwards and backwards into the vagina at an angle. Hold the labia majora apart using the fingers of the non-dominant hand during insertion. Direct the fingers along the anterior vaginal wall (towards the woman’s abdomen). Avoid withdrawing the fingers until all necessary information has been obtained from the examination. NB: Be careful not to touch the clitoris during insertion as it is very sensitive and can cause discomfort.
Findings during Vaginal Examination:
Condition of the Vagina:
The normal vagina should feel warm and moist. A hot and dry vagina is an abnormal finding and may be a sign of obstructed labor (though very rare in settings with good obstetric care).
If the mother has a fever, the vagina may feel warm but not dry.
Note any presence of previous perineal scar, cystocele (bulge of the bladder into the vagina), or rectocele (bulge of the rectum into the vagina).
The Cervix:
A normal cervix in labor should feel thin and elastic and be closely applied to the presenting part of the fetus.
A spongy feeling cervix might suggest undiagnosed placenta previa (placenta located low in the uterus). This is an important abnormal finding that requires immediate attention.
Sweep the examining fingers from side to side to locate the cervical os (opening). The os is typically felt centrally, but in early labor, it may be positioned more posteriorly.
Assess the length of the cervical canal. A long cervical canal with a tightly closed cervix indicates labor has likely not yet started or is in very early latent phase.
In a primigravida (first pregnancy), the cervix may be fully effaced (100% effaced or taken up) but still closed (0 cm dilated). In this state, the thin, effaced cervix is closely applied to the presenting part and can sometimes be mistaken for a fully dilated cervix if dilatation is not assessed properly. If the cervix is not well applied to the presenting part (poorly applied), it may suggest a poorly fitting presenting part or malposition.
Assess Cervix for:
Effacement: Degree of cervical thinning (expressed as a percentage: 0% to 100%).
Dilatation: Diameter of the cervical opening (measured in centimeters: 0 cm to 10 cm).
Consistency: Describe the feel of the cervix (e.g., firm, soft, spongy).
Membranes:
If membranes are intact, they can often be felt through the dilating cervical os. Intact membranes typically feel like a bulging bag of fluid, and they may feel tenser during a uterine contraction.
If the forewaters are shallow (very little fluid in front of the head), it may be difficult to feel intact membranes distinctly.
If the presenting part is not well-engaged or fitting tightly into the cervix, some of the amniotic fluid from the hindwaters (behind the baby’s head) can sometimes leak into the forewaters, causing the membranes to bulge or protrude excessively through the cervix. This situation makes the membranes more prone to early rupture.
Level or Station of Presenting Part:
The presenting part is the portion of the fetus that is leading the way into the birth canal and lies over the internal cervical os during labor.
To assess fetal descent in labor, determine the station or level of the presenting part in relation to the maternal ischial spines. Stations are measured in centimeters above or below the ischial spines (station 0). Negative numbers are above the spines, positive numbers are below.
Position:
By palpating the features of the presenting part (typically the fetal head in vertex presentation), determine the fetal position. Vertex presentation is the normal and most common presentation. The midwife should be very familiar with identifying vertex presentation features.
Commonly, the first palpable feature of the fetal head, even in early labor, is the sagittal suture (the suture line running between the parietal bones of the skull). Trace the sagittal suture with a finger until a fontanel (soft spot) is reached.
If the fetal head is well-flexed (chin tucked to chest), the posterior fontanel (small, triangular soft spot) will be felt. Assess the degree of flexion. Palpating the amount of overlapping of the skull bones (molding) can provide additional information about position and potential cephalopelvic disproportion. In vertex presentation, the parietal bones may slightly override the occipital bone (posterior bone) to reduce the presenting diameter of the head.
Pelvic Capacity (Pelvic Assessment):
Although a formal pelvic assessment is ideally done during antenatal care, take the opportunity during VE to reassess and reassure yourself about the adequacy of the pelvic capacity for vaginal delivery as you complete the examination.
Completion and Recording:
Upon completion of the vaginal examination, gently withdraw fingers from the vagina. Note any blood or amniotic fluid on the glove or fingers. Clean the perineal area if necessary and remove sterile gloves.
Record all findings of the vaginal examination, as well as all other observations made on admission, accurately on a partograph (labor monitoring chart) and in the patient’s observation chart.
Sample Questions and Answers
1. Formulate 3 actual and 2 potential nursing diagnoses for a mother in the first stage of labour.
2. Outline 10 nursing interventions for this mother, giving a rationale for each.
Answer:
Actual Nursing Diagnoses:
Acute Pain related to uterine contractions and cervical dilation as evidenced by patient verbal reports of pain, facial grimacing, and restlessness.
Anxiety related to the labor process, unknown outcomes, and potential pain as evidenced by patient verbalization of fear and uncertainty, increased heart rate, and verbal questioning about the delivery process.
Risk for Deficient Fluid Volume related to increased insensible fluid loss (sweating, respiration) and potential restricted oral intake during labor.
Potential Nursing Diagnoses:
Risk for Fetal Distress related to potential uteroplacental insufficiency secondary to uterine contractions and maternal physiological changes during labor.
Risk for Ineffective Coping related to the stress of labor pain, emotional stress, and unfamiliar labor environment.
Ten Nursing Interventions and Rationales:
Assess and monitor the mother’s pain level using a validated pain assessment scale (e.g., numerical rating scale – NRS):
Rationale: Regular pain assessment provides objective data to quantify the mother’s pain intensity, allowing for effective pain management strategies and evaluation of interventions.
Encourage and guide the mother in using non-pharmacological pain relief techniques such as deep breathing exercises, relaxation techniques, massage, and position changes:
Rationale: Non-pharmacological methods can empower the mother to actively participate in pain management, reduce anxiety, promote relaxation, and potentially decrease the need for pharmacological interventions, especially in early labor.
Provide comprehensive information and education about the stages of labor, expected sensations, and coping strategies for the first stage of labor:
Rationale: Knowledge and understanding can reduce anxiety and fear of the unknown. Education empowers the mother to feel more in control and prepared for the labor process, promoting a more positive birth experience.
Offer continuous emotional support, reassurance, and encouragement throughout labor:
Rationale: Emotional support from healthcare providers and loved ones can significantly reduce anxiety, increase the mother’s sense of security and self-efficacy, and improve her overall coping ability during labor.
Encourage frequent changes in maternal position and ambulation (if not contraindicated):
Rationale: Position changes and walking can promote maternal comfort, improve blood circulation, facilitate fetal descent by utilizing gravity, and potentially enhance the progress of labor. Upright positions can also lead to stronger, more efficient contractions.
Promote and facilitate adequate hydration by encouraging frequent sips of clear fluids (if oral intake is permitted):
Rationale: Maintaining hydration is essential to prevent fluid volume deficit, combat fatigue, support physiological processes in labor, and maintain maternal energy levels. Dehydration can lead to electrolyte imbalances and negatively impact labor progress.
Monitor maternal vital signs regularly (blood pressure, pulse, temperature, respiration rate):
Rationale: Regular monitoring of vital signs enables early detection of deviations from normal physiological parameters, allowing for timely identification of potential complications such as infection, pre-eclampsia, or dehydration, and prompt intervention.
Continuously assess fetal well-being through regular fetal heart rate monitoring (using continuous electronic fetal monitoring or intermittent auscultation as appropriate):
Rationale: Fetal heart rate monitoring is critical for evaluating fetal oxygenation status and detecting signs of fetal distress (e.g., bradycardia, tachycardia, late decelerations). Early detection of fetal distress allows for timely interventions to optimize fetal outcomes.
Administer pharmacological pain relief measures as indicated and per patient preference, in collaboration with the healthcare provider (e.g., epidural analgesia, systemic opioids):
Rationale: Pharmacological pain relief should be offered as part of a comprehensive pain management plan, respecting maternal choices and clinical indications. Effective pain relief can enhance maternal comfort, reduce exhaustion, and improve the labor experience, particularly if non-pharmacological methods are insufficient.
Actively collaborate and communicate with the interdisciplinary healthcare team (physicians, midwives, nurses) to ensure coordinated care and timely decision-making regarding potential medical interventions, such as augmentation of labor or cesarean delivery, if necessary:
Rationale: Effective teamwork and communication are essential for ensuring optimal maternal and fetal outcomes. Collaboration allows for shared decision-making, timely responses to changing clinical situations, and the implementation of necessary medical interventions when labor is not progressing appropriately or complications arise.
Join Our WhatsApp Groups!
Are you a nursing or midwifery student looking for a space to connect, ask questions, share notes, and learn from peers?
Join our WhatsApp discussion groups today!
Join NowWe are a supportive platform dedicated to empowering student nurses and midwives through quality educational resources, career guidance, and a vibrant community. Join us to connect, learn, and grow in your healthcare journey
Quick Links
Our Courses
Legal / Policies
Get in Touch
(+256) 790 036 252
(+256) 748 324 644
Info@nursesonlinediscussion.com
Kampala ,Uganda
© 2026 Nurses online discussion. All Rights Reserved