
Diploma in Midwifery

Normal Third Stage of Labour
Table of Contents
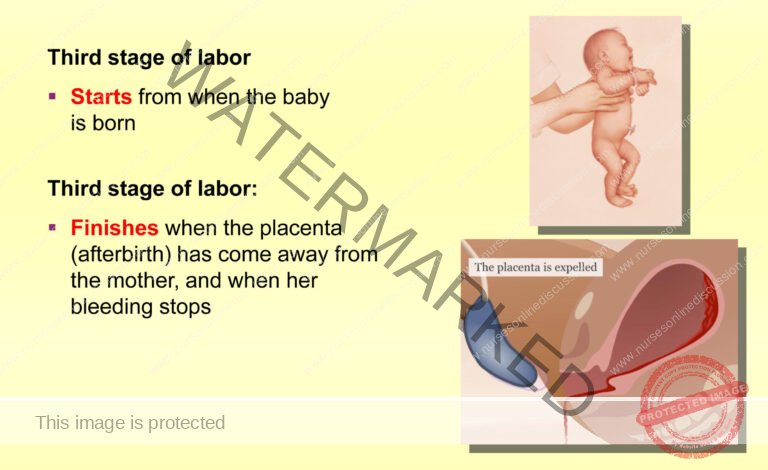
The third stage of labor is a vital period focused on the detachment, movement, and expulsion of the placenta and fetal membranes, and is crucial for preventing excessive blood loss (hemorrhage).
Physiology of the Third Stage of Labour:
Uterine Contraction and Retraction:
Placental separation begins with the continued contractions and retraction of the uterine muscle after the baby’s birth. These contractions cause the uterine walls to thicken and the upper part of the uterus to reduce in volume, consequently shrinking the area where the placenta was attached.
This separation process typically initiates from the center of the placenta. As the blood vessels (sinuses) at the placental site tear due to the shrinking area, a blood clot forms behind the placenta (retroplacental clot). This clot acts to further assist in detaching the placenta from the uterine wall.Placental Descent:
The placenta moves downwards within the uterus primarily due to gravity. The retroplacental clot acts like a weight or piston, pushing the placenta from the upper part of the uterus into the lower uterine segment, closer to the cervix.Membrane Separation:
As the placenta descends, its weight pulls on the attached fetal membranes, causing them to peel away from the uterine lining (decidua). While the placenta is separating and descending within the uterus, the membranes might remain attached around the cervical opening until the placenta is fully expelled from the vagina.Haemostasis (Prevention of Postpartum Hemorrhage):
Effective and rapid control of blood flow from the placental site is essential after placental separation to prevent serious postpartum hemorrhage. Several natural physiological mechanisms contribute to achieving haemostasis:a. Uterine Muscle Retraction and “Living Ligatures”: The oblique muscle fibers within the uterine wall retract (shorten and thicken), constricting the blood vessels that supplied the placenta. This muscle retraction effectively acts as “living ligatures,” clamping down and compressing the torn blood vessels to reduce blood flow.
b. Uterine Wall Apposition: Sustained and strong uterine contractions following placental separation bring the uterine walls together. This close apposition exerts significant pressure directly on the placental attachment site, further compressing the blood vessels and aiding in hemostasis.
c. Fibrin Mesh Formation: A network of fibrin, a clotting protein, rapidly forms over the placental site after separation. This fibrin mesh utilizes a significant portion (5-10%) of the mother’s circulating fibrinogen to create a biological “seal” and promote clot formation. This clot helps to physically block the open blood vessels and effectively control bleeding from the placental site.
d. Oxytocin Release and Breastfeeding: The act of breastfeeding or nipple stimulation triggers the release of oxytocin, a hormone that strongly stimulates uterine contractions. These enhanced uterine contractions further assist in clamping down blood vessels at the placental site and promoting effective haemostasis.
Separation of the Placenta
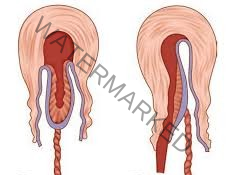
Placental separation in the third stage of labor typically occurs through one of two mechanisms: the Schultze method or the Matthew Duncan method.
Schultze Method:
Central Separation: Separation usually starts in the center of the placenta, directly beneath the baby.
Retroplacental Clot Formation: This central separation leads to the formation of a blood clot behind the placenta (retroplacental clot).
Central Pressure and Lateral Stripping: The retroplacental clot exerts pressure from the center of the placental attachment, aiding in the separation process. This pressure helps to strip the placenta away from the uterine wall, starting centrally and progressing outwards towards the edges.
Membrane Enclosure: The increasing weight of the separating placenta also assists in peeling the fetal membranes away from the uterine lining. The separating placenta and membranes often fold inwards, creating a membranous sac-like structure that encloses the retroplacental clot.
Fetal Surface Presentation: As the placenta is expelled, the fetal surface (the side that faced the baby) typically emerges first from the vagina.
Advantages: The Schultze method is generally associated with:
More complete and efficient separation of both the placenta and fetal membranes from the uterus.
Less fluid blood loss during placental delivery.
Often considered a quicker and “cleaner” method of placental expulsion due to reduced bleeding and membrane remnants.
Matthews Duncan Method:
Marginal (Lateral) Separation: Placental separation begins at the edges or sides of the placenta, rather than centrally.
Marginal Bleeding: As separation begins from the edges, blood tends to escape from the sides of the placenta during the separation process. Unlike the Schultze method, a significant retroplacental clot does not typically form to assist in separation.
Sideways Descent and Maternal Surface Presentation: The placenta descends and is expelled slipping out sideways. As a result, the maternal surface (the side that was attached to the uterus) is the first part to emerge from the vagina.
Disadvantages: The Matthews Duncan method is often associated with:
A longer duration for placental expulsion compared to the Schultze method.
More ragged and incomplete expulsion of the fetal membranes. Membranes may be retained in the uterus more frequently.
Potentially higher fluid blood loss during placental delivery due to ongoing marginal bleeding and less efficient separation.
After placental separation, regardless of the method, the uterus continues to contract strongly. These contractions exert force that pushes the detached placenta and membranes downwards, moving them from the upper uterine segment into the lower uterine segment and eventually into the vagina for expulsion.
Signs of Placental Separation (Indicating Placenta is Ready to Deliver):
Uterine Changes: The uterus becomes noticeably firmer (hard), more rounded in shape, and freely mobile in the abdomen.
Fundal Height Rise: The fundus (top of the uterus) rises in the abdomen, often reaching to the level of or even slightly above the umbilicus. This is due to the placenta descending into the lower uterine segment, pushing the fundus upwards.
Cord Lengthening (Cord Sign): The visible portion of the umbilical cord outside the vagina lengthens or appears to elongate. This is a classic sign indicating that the placenta has descended lower in the uterus.
Gush of Blood: There may be a sudden gush of blood from the vagina as the placenta separates from the uterine wall and descends.
Palpable Placenta on Vaginal Exam: On vaginal examination, the placenta may be felt in the lower uterine segment or upper vagina, indicating its descent.
Placenta Visible at Vulva: The placenta may become visible at the vaginal opening (vulva), indicating it is ready to be delivered.
Suprapubic Pressure Test (Ahlfeld’s Sign): If gentle pressure is applied just above the pubic bone (suprapubic pressure), the umbilical cord does not recede back into the vagina. If the placenta is still high in the uterus (not separated), applying suprapubic pressure would cause the cord to retract upwards.
Mechanism of Placental Separation (Physiological Process):
Placental separation is a dynamic process driven by a combination of uterine contractions and uterine involution (shrinkage).
Post-Delivery Uterine Activity: After the baby is born, the uterus continues to contract rhythmically, typically every 3-4 minutes.
Uterine Involution and Placental Site Shrinkage: These ongoing uterine contractions, combined with the process of involution (the uterus returning to its non-pregnant size), cause the area where the placenta was implanted on the uterine wall to shrink and contract.
Placental Detachment: Within approximately 10-15 minutes after the baby’s birth, the majority of the placenta becomes detached from the uterine wall due to this shrinkage and contractile activity.
Vaginal Bleeding Sign: Placental detachment results in an increase in vaginal bleeding. This bleeding originates from the exposed blood vessels at the placental implantation site and serves as a signal that placental delivery is imminent.
Uterine Contraction and Haemostasis: As the placenta is expelled, the uterus continues to contract vigorously. These sustained contractions are crucial for compressing the spiral arteries at the placental site, effectively clamping them down and minimizing blood flow. This ongoing uterine contraction is a primary mechanism for preventing excessive blood loss after placental delivery (postpartum hemorrhage).
N.B.: It’s important to remember that the average amount of blood loss during a normal vaginal delivery is typically around 250-300 milliliters (mls).
Management of the Third Stage of Labour
There are two primary methods for managing the third stage of labor to deliver the placenta:
Controlled Cord Traction (CCT) – Active Management: This is the recommended active approach for managing the third stage.
Maternal Efforts – Physiological/Passive Management: This is a more hands-off, expectant approach, relying on the mother’s own body to expel the placenta.
1. Active Management – Controlled Cord Traction (CCT):
Pre-Procedure Palpation: Before starting CCT, gently palpate the mother’s abdomen to rule out the possibility of undiagnosed twin pregnancies (to avoid attempting to deliver a placenta before a second baby is identified).
Oxytocin Administration: Administer 10 International Units (IU) of oxytocin intramuscularly (IM) to the mother, typically into the thigh or upper arm. Oxytocin is a uterotonic drug that stimulates strong uterine contractions, aiding in placental separation and reducing postpartum hemorrhage risk.
Cord Clamp Grip: Extend the cord clamp slightly outwards towards the vulva to ensure a firm and secure grip on the umbilical cord. Place your non-dominant hand (usually the left hand) on the mother’s abdomen, positioning it over the fundus (top) of the uterus.
Counter-Traction and Traction: During the next uterine contraction:
Counter-Traction: Place the palm of your non-dominant hand facing downwards towards the fundus and apply gentle, steady counter-traction upwards and inwards, just above the mother’s pubic bone. This counter-traction stabilizes the uterus in the abdomen.
Controlled Cord Traction: Simultaneously, use your dominant hand (usually the right hand) to grasp the cord clamp firmly. Apply steady, controlled downward and outward traction along the line of the birth canal. Maintain gentle, continuous traction – avoid forceful pulling.
Placenta at Vulva: Continue traction until the placenta becomes visible at the vulva (vaginal opening). Then, change traction direction to upwards to guide the placenta out and receive it in a cupped hand.
Membrane Delivery: Carefully rotate the placenta as it delivers to gently “roll” the membranes out. This rolling technique helps to prevent the membranes from tearing and ensures complete removal. Deliver the membranes with gentle upward and downward movements, following the curve of the birth canal.
Note Delivery Time: Record the exact time of placental and membrane delivery.
Uterine Massage: Immediately after placental delivery, firmly massage the fundus of the uterus through the abdomen. Fundal massage stimulates further uterine contractions and helps to maintain uterine tone, reducing the risk of postpartum hemorrhage.
Placenta Examination: Quickly but thoroughly examine the delivered placenta and membranes to ensure they are complete and intact, with no missing fragments remaining in the uterus. Place the placenta in a designated receiver or container for disposal or further examination if needed.
Vulvar Cleaning and Perineal Assessment: Clean the mother’s vulva to remove any blood or secretions. Carefully examine the cervix and vagina for any lacerations (tears) or extensions of an episiotomy if one was performed.
Laceration Repair: If any perineal lacerations or tears are identified, repair them appropriately using suturing techniques.
Apply Pad and Comfort: Place a clean perineal pad on the mother for hygiene and comfort. Ensure the mother is positioned comfortably and is recovering well.
2. Passive Management – Maternal Efforts (Physiological Third Stage):
Restriction: Passive management is ONLY appropriate if the placenta has already separated from the uterine wall spontaneously. It is not used to actively separate the placenta.
Wait for Separation Signs: Observe for clinical signs of placental separation (uterine changes, cord lengthening, gush of blood – as described earlier). Do not proceed with passive management until placental separation is confirmed.
Maternal Pushing: Once placental separation is evident, encourage the mother to push spontaneously during uterine contractions.
Abdominal Resistance: Place a flat palm on the mother’s abdomen over the uterus to provide gentle counter-pressure and resistance for her to push against, which can aid in placental expulsion.
Placenta Reception: Receive the placenta in both hands as it delivers spontaneously with maternal pushing efforts. Ensure complete delivery of the placenta and membranes.
Oxytocin Administration: After spontaneous placental delivery, administer 10 IU of oxytocin intramuscularly. Even in passive management, routine oxytocin is recommended after placental birth to minimize postpartum hemorrhage risk.
Important Note: Regardless of the method used (active or passive), it is crucial to keep the mother warm throughout the third stage. She has experienced significant physical exertion during labor, leading to potential heat loss and increased risk of feeling cold. Maintaining maternal warmth is a basic comfort measure and helps prevent maternal shivering and discomfort.
We are a supportive platform dedicated to empowering student nurses and midwives through quality educational resources, career guidance, and a vibrant community. Join us to connect, learn, and grow in your healthcare journey
Quick Links
Our Courses
Legal / Policies
Get in Touch
(+256) 790 036 252
(+256) 748 324 644
Info@nursesonlinediscussion.com
Kampala ,Uganda
© 2026 Nurses online discussion. All Rights Reserved