Integrated Management of Childhood Illnesses (IMCI)
Subtopic:
Assessing and classifying a sick young infant (0-2 months)
Infants in the first two months of life have unique physiological characteristics that require special consideration when assessing and classifying illnesses. They are particularly vulnerable and can rapidly become critically ill and even succumb to severe bacterial infections. These serious infections may sometimes present with non-specific or general signs, such as reduced activity, temperature irregularities (fever or hypothermia), or feeding difficulties.
IMNCI PROCESS SPECIFICALLY FOR YOUNG INFANTS
1. INITIAL INTERACTIONS
GREET CAREGIVER: Establish a welcoming and respectful interaction with the infant’s caregiver.
CONFIRM AGE: Specifically ask for and confirm the infant’s age to ensure appropriate assessment protocols are followed for this age group.
ELICIT CONCERNS: Ask “What problems has the infant been experiencing?” to understand the caregiver’s primary concerns.
VISIT TYPE: Determine if this is the first (initial) visit for the current problem or a return (follow-up) visit.
BASIC MEASUREMENTS: Measure the infant’s weight and body temperature as essential initial data.
2. EVALUATE FOR POTENTIAL SERIOUS CONDITIONS
Possible Serious Bacterial Infection (PSBI) or Very Severe Disease: Immediately assess for indicators of PSBI, a major threat in this age group, and other signs of very severe illness requiring urgent action.
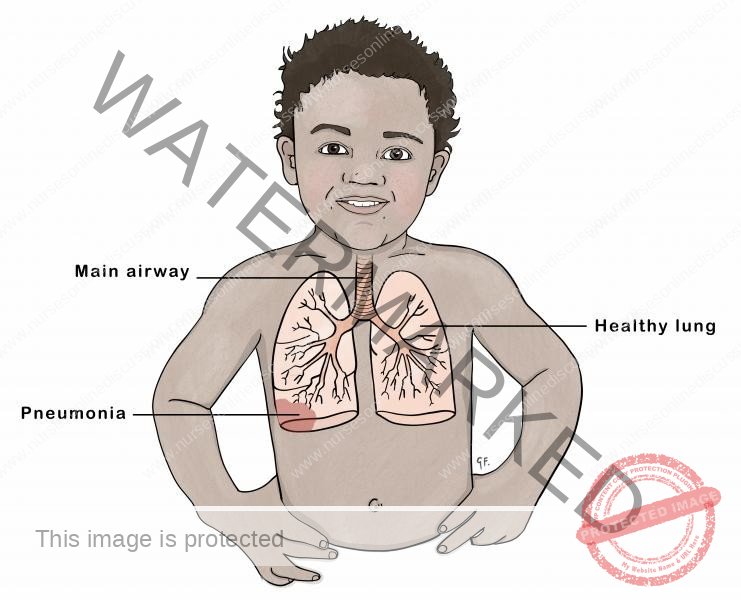
Pneumonia Assessment: Specifically evaluate for signs and symptoms of pneumonia, a common and dangerous respiratory infection in young infants.
Local Infection Check: Examine for any localized infections, such as skin or umbilical infections, which can rapidly become systemic in neonates and young infants.
Urgent Referral Priority: Recognize that all young infants classified with severe disease require IMMEDIATE REFERRAL for specialized care.
3. ASSESS MAIN SYMPTOMS
Systematically assess for the following key symptoms which are frequently encountered in sick young infants:
Jaundice: Evaluate for the presence and severity of jaundice (yellowing of the skin and eyes), which can indicate various underlying conditions, including neonatal jaundice or liver problems.
Diarrhea: Assess for diarrhea, noting frequency and consistency of stools, as dehydration from diarrhea is a significant risk in young infants.
Feeding Problems or Low Weight for Age: Inquire about feeding difficulties (e.g., poor suckling, refusing feeds) and assess for low weight for age, indicators of nutritional issues and potential underlying illness.
Possible HIV Infection and TB Exposure: Consider risk factors for HIV infection and inquire about any known Tuberculosis (TB) exposure, as both can have significant implications for infant health.
4. CLASSIFICATION OUTCOMES
Based on the assessment, classify the infant into one of the following categories to guide appropriate action:
URGENT REFERRAL REQUIRED:
ACTION: Promptly IDENTIFY the classification, provide any necessary PRE-REFERRAL TREATMENT immediately.
ACTION: URGENTLY REFER the infant to a higher level healthcare facility capable of managing severe illness in young infants.
TREAT IN CLINIC:
ACTION: IDENTIFY the specific classification requiring clinic-based treatment.
ACTION: Implement the appropriate TREATMENT protocol within the clinic setting.
ACTION: Provide thorough COUNSELING to the caregiver on the infant’s condition and treatment plan.
ACTION: Schedule appropriate FOLLOW-UP CARE appointments to monitor progress.
TREAT AT HOME:
ACTION: IDENTIFY the classification suitable for home-based management.
ACTION: Determine and advise on the appropriate TREATMENT that can be safely administered at home.
ACTION: Provide comprehensive COUNSELING to the caregiver on how to administer home treatments, recognize warning signs, and when to seek urgent care.
ACTION: Establish a plan for FOLLOW-UP CARE to ensure the infant recovers as expected and to address any complications promptly.
Signs Indicating Severe Disease in Young Infants:
These are critical warning signs that necessitate urgent intervention and referral:
Not Feeding: Inability to breastfeed or take any feeds orally.
Severe Chest In-drawing or Fast Breathing: Marked retraction of the lower chest wall during inspiration or significantly increased respiratory rate.
Convulsions: Any history of or current seizures or fits.
No Movement/Lethargy: Lack of spontaneous movement, excessive drowsiness, or unresponsiveness (lethargy).
Temperature Instability: Body temperature that is excessively high (fever) or dangerously low (hypothermia).
INITIATING ASSESSMENT:
QUICK ASSESSMENT FOR ALL SICK YOUNG INFANTS (BIRTH UP TO 2 MONTHS)*
BEGIN BY ASKING THE MOTHER/CAREGIVER ABOUT THE INFANT’S PROBLEMS.
DETERMINE IF THIS IS THE FIRST (INITIAL) VISIT OR A RETURN (FOLLOW-UP) VISIT FOR THE CURRENT PROBLEM.
IF IT IS AN INITIAL VISIT, IMMEDIATELY PROCEED WITH ASSESSMENT AND CLASSIFICATION AS DETAILED BELOW.
CHECK FOR POSSIBLE SERIOUS BACTERIAL INFECTION OR VERY SEVERE DISEASE, PNEUMONIA AND LOCAL INFECTION
ASSESS:
ASK
Inquire if the baby struggles to feed.
Check for a history of seizures (fits) or body jerks.
LOOK, LISTEN AND FEEL
Observe breathing pattern: Is the infant gasping for air or not breathing even after stimulation?
Measure respiratory rate for one minute. Re-count if the rate is high.
Assess for significant chest recession during breathing.
Listen for abnormal respiratory sounds like grunting or wheezing.
Check for flared nostrils.
Identify central cyanosis. If available, use pulse oximetry.
Palpate the anterior fontanelle to check for bulging.
Inspect the umbilical area for redness or pus discharge. Assess for significant abdominal swelling.
Take axillary temperature to determine if there is fever or hypothermia.
Examine the skin for pustules.
Listen for a high-pitched cry.
Observe the infant’s spontaneous movements.
(Ensure the infant is calm during assessment)
ASK and LOOK
Inquire if the infant is unable to feed, including breastfeeding.
Check for blood in the infant’s stool.
CLASSIFY AND IDENTIFY TREATMENT
| SIGNS | CLASSIFY AS | IDENTIFY TREATMENT |
| Any of the following signs: | POTENTIAL SERIOUS BACTERIAL ILLNESS OR VERY SEVERE ILLNESS | • Initiate resuscitation using a bag and mask if the baby: – Is gasping or not breathing – Respiratory rate below 20 breaths per minute. |
| • Respiratory rate under 20 breaths/min | • If actively convulsing, administer Phenobarbitone. | |
| • Active Convulsions | • Administer initial dose of Benzylpenicillin AND Gentamicin. | |
| • Unable to feed/breastfeed | • Address potential low blood sugar. | |
| • Rapid breathing (over 60 breaths/min) | • IMMEDIATELY admit to or refer to a hospital. | |
| • Significant chest in-drawing | • Educate the caregiver on maintaining infant warmth during transport. | |
| • Audible grunting or wheezing | • Investigate for TB risk factors and conduct HIV screening. | |
| • Nasal flaring | • Initiate oxygen therapy and refer/admit if oxygen saturation is less than 90%. | |
| • Bulging fontanelle | • If referral is not an option. | |
| • Ear discharge (pus) | ||
| • Elevated temperature (37.5°C or higher, or reported hot) | ||
| • Reduced temperature (below 35.5°C, or reported cold) | ||
| • Moves only when stimulated | ||
| • Absence of movement | ||
| • Blood present in stool | ||
| • Significant abdominal swelling | ||
| • High-pitched cry | ||
| • Oxygen saturation below 90% | ||
| Redness of the umbilicus or pus drainage or Skin pustules. Without any indications of a very severe disease. | LOCAL BACTERIAL ILLNESS | • Administer Flucloxacillin Syrup. |
| • Educate the mother to treat local infections at home. | ||
| • Educate the mother to give home care for the young infant. | ||
| • Schedule follow-up appointment in 2 days | ||
| • Screen for TB risk factors and conduct HIV screening. | ||
| • Advise mother when to return immediately | ||
| Rapid breathing (60 breaths/min or more) in infants aged 7-59 days. | PNEUMONIA | • Administer amoxicillin for 7 days |
| • Advise mother to give home care for the young infant | ||
| • Schedule follow-up on day 4 of treatment | ||
| Temperature between 35.5°C and 36.4°C | LOW BODY TEMPERATURE | • Re-warm the infant and reassess after 1 hour (kangaroo care). |
| • Manage possible low blood sugar. | ||
| • Educate the mother to give home care for the young infant | ||
| • Advise mother when to return immediately. | ||
| Absence of Very Severe Illness or Local Bacterial Infection signs. | INFECTION UNLIKELY | • Advise mother to give home care for the young infant. |
| • Screen for TB risk factors and conduct HIV screening. | ||
| • Advise mother when to return immediately. |

THEN CHECK FOR JAUNDICE
Understanding Jaundice in Newborns:
Jaundice, a yellowish discoloration of the skin and whites of the eyes, is a common condition in newborns. It’s important to distinguish between typical newborn jaundice and more serious forms.
Physiological Jaundice (Typical Newborn Jaundice):
Timing of Onset: Usually appears between 48 to 72 hours after birth.
Peak Intensity: Yellowing typically reaches its most noticeable point around days 4-5 for babies born at term (full gestation) and around day 7 for premature infants.
Duration: Typically resolves and disappears by approximately 14 days of life.
Severity: In physiological jaundice, the yellow color generally does not extend to the palms of the hands or soles of the feet.
Treatment Need: Generally, physiological jaundice is a normal adaptation and does not require medical treatment.
When to Suspect Severe Jaundice (Potentially Pathological):
Certain characteristics suggest a more serious form of jaundice requiring prompt medical evaluation:
Early Onset: If jaundice is noticeable within the first 24 hours (day one) of life, it is a concerning sign.
Prolonged Duration: Jaundice that lasts for 14 days or longer in babies born at term, or extends beyond 21 days in premature infants is considered prolonged and needs investigation.
Spread to Palms and Soles: If the yellowish discoloration is observed on the palms of the hands and the soles of the feet, this indicates a deeper and potentially more severe level of jaundice.
Fever Association: Jaundice occurring alongside a fever is a red flag and warrants immediate medical attention.
Pathological Jaundice (Serious Jaundice):
Early Appearance: Jaundice that develops within the first 24 hours of birth is classified as pathological.
Extended Duration: Lasts for a longer period than physiological jaundice; beyond 14 days in term infants and beyond 21 days in preterm infants.
Fever as a Complication: The presence of fever alongside jaundice is a significant warning sign of a more serious underlying issue.
Deep Yellow Coloration: A deep yellow hue, especially when it involves the palms and soles, signals a potentially dangerous condition.
Alright, here’s the refined content for jaundice assessment and management.
ASSESS JAUNDICE
| ASK | LOOK |
| • Is there yellow discoloration of the eyes, palms, or soles? | • Observe for jaundice (yellow eyes or skin). |
| • If yes, how long has the yellowing been present, in days or in hours? | • Examine the palms and soles for a yellowish discoloration. |
Classify Jaundice
| SIGNS | CLASSIFY AS | IDENTIFY TREATMENT |
| • Jaundice present at less than 24 hours of life. | SEVERE JAUNDICE | • Manage to prevent low blood sugar. |
| • Yellowish discoloration of the eyes, palms, and/or soles at any age. | • IMMEDIATELY refer to a hospital. | |
| • Visible yellowing in a premature infant, regardless of the time of appearance. | • Instruct the caregiver on keeping the infant warm during transport. | |
| • Check for TB risk factors | ||
| • Yellowing appearing after the first day of life. | JAUNDICE | • Provide guidance on general home care for the infant. |
| • Yellowing of the eyes and skin. | • Advise on immediate return if the infant’s eyes, palms, or soles become yellow. | |
| • Palms and soles are not yellow. | • If the infant is older than 14 days, refer to the hospital for additional evaluation. | |
| • Schedule a follow-up visit in 1 day. | ||
| • Absence of jaundice. | JAUNDICE UNLIKELY | • Provide guidance on general home care for the infant. |

THEN ASSESS FOR DIARRHOEA
| ASK | LOOK |
| DOES THE INFANT HAVE DIARRHEA OR SIGNS OF DEHYDRATION? IF YES, INQUIRE: | Observe Infant Movements: |
| • Duration of diarrhea (in days). | • Does the infant move spontaneously? |
| • Presence of vomiting. | • Does stimulation elicit movement, or does the infant remain still? |
| • Infant’s ability to feed. | • Is the infant alert, restless, or irritable? |
| Assess signs, such as sunken eyes | |
| *Diarrhea Definition: Altered stool consistency and frequency, resulting in loose, watery stools beyond the infant’s typical pattern. | Evaluate Skin Elasticity: Pinch the abdominal skin. Does it return: -Very Slowly: (longer than 2 seconds)? -Slowly -Immediately -Assess Infant’s Ability to Feed -Assess Urine Output |
Classify for DEHYDRATION
| SIGNS | CLASSIFY AS | IDENTIFY TREATMENT |
| Presence of any two of the following: | SEVERE DEHYDRATION | If no other classification of severe disease: • Administer fluids for severe dehydration (Plan C). |
| • Reduced or absent movement (only with stimulation). | or If in addition the infant has another severe classification: • IMMEDIATELY admit/refer the infant, advising frequent, small sips of oral rehydration solution (ORS) during transport. | |
| • Sunken eyes. | • Encourage continued breastfeeding. | |
| • Very slow skin recoil (longer than 2 seconds). | • If the infant is unable to pass urine | |
| • Inability to pass urine | • If the infant is unable to feed | |
| • Inability to feed. | ||
| Presence of any two of the following: | SOME DEHYDRATION | • Administer fluids for some dehydration, and breastfeeding. (Plan B) |
| • Restlessness and irritability. | • Instruct the caregiver on when to seek immediate return. | |
| • Sunken eyes. | • Schedule a follow-up visit in 2 days if no improvement. | |
| • Slow skin recoil. | • If the infant meets the criteria for a VERY SEVERE classification | |
| • IMMEDIATELY admit/refer the infant, advising frequent, small sips of oral rehydration solution (ORS) during transport. | ||
| • Absence of enough signs to classify as some or severe dehydration. | NO DEHYDRATION | • Educate the caregiver on home management for diarrhea, continue breastfeeding (Plan A). |
| • Administer zinc supplements if diarrhea. | ||
| • Instruct the caregiver on when to seek immediate return. | ||
| • Schedule a follow-up visit in 2 days if no improvement. |

CHECK FOR HIV EXPOSURE AND INFECTION
| ASK |
| • Has the mother and/or infant undergone HIV testing? If yes: |
| • What is the mother’s HIV status: |
| • Antibody test result: Positive or Negative |
| For HIV-positive mothers without a positive infant DNA PCR result, determine: |
| • Is the mother on Antiretroviral Therapy (ART), and is the infant receiving antiretroviral (ARV) prophylaxis? |
| If testing is unavailable: |
| • If the mother’s and infant’s status is unknown, test the mother for HIV. A positive result prompts infant DNA PCR testing. |
| • If the mother is unavailable, conduct an antibody test on the infant; a positive result necessitates DNA PCR testing. |
CLASSIFY HIV STATUS
| SIGNS | CLASSIFY AS | IDENTIFY TREATMENT |
| • Positive infant DNA PCR test | CONFIRMED HIV INFECTION | • Initiate ART. |
| • Offer counseling and address existing infections. | ||
| • Begin Cotrimoxazole prophylaxis. | ||
| • Evaluate the infant’s feeding practices and provide relevant counseling. | ||
| • Provide information about home care. | ||
| • Offer routine monitoring for growth, nutrition, and development. | ||
| • Emphasize adherence to medication protocols. | ||
| • Screen for TB at all visits. | ||
| • If TB is absent, start Isoniazid preventive therapy (IPT) and continue screening. | ||
| • Administer immunizations according to the schedule. | ||
| • Offer monthly follow-up. | ||
| • Offer comprehensive management, referring to national ART guidelines. | ||
| • Mother HIV-positive, infant DNA PCR negative OR Mother HIV-positive, infant testing pending OR Positive infant antibody test, mother unavailable | HIV EXPOSED | • Manage infections. |
| • Initiate Cotrimoxazole prophylaxis. | ||
| • Start or continue PMTCT* prophylaxis according to national guidelines. | ||
| • Assess feeding and offer counseling. | ||
| • Advise mother on home care. | ||
| • Offer routine monitoring. | ||
| • Screen for TB at all visits. | ||
| • Immunize as per schedule. | ||
| • Follow-up monthly, referring to national ART guidelines. | ||
| • Negative maternal antibody test | HIV NEGATIVE | • Manage current health issues using standard protocols. |
| • Offer postpartum care. | ||
| • Advise on infant feeding and maternal self-care. |
THEN CHECK FOR TB
| ASK | LOOK AND FEEL |
| For indicators of possible Tuberculosis: | Observe for signs suggestive of TB |
| • Known contact with a person diagnosed with Pulmonary Tuberculosis, or persistent cough. | • Assess infant’s weight. Is it: |
| • Persistent fever lasting 14 days or more? | • Below 1.5kg? |
| • Pneumonia unresponsive to standard treatments? | • Significantly below expected weight for their age (below -3 Z score)? |
| • Cough lasting for 14 days or more? |
| SIGNS | CLASSIFY AS | IDENTIFY TREATMENT |
| Presence of ANY symptoms or signs suggestive of TB, OR weight under 1.5kg or below -3 Z score in combination with any symptom. | PRESUMPTIVE TB | • Refer to a facility with expertise for further evaluation and proper care. |
| • Inquire about the caregiver’s health and initiate treatment accordingly. | ||
| Absence of TB-related signs/symptoms in a sick infant. | NO PRESUMPTIVE TB | • Treat and manage any existing infections. |
| • Provide counseling. | ||
| • Inquire about the caregiver’s health and initiate treatment accordingly. |

THEN CHECK FOR FEEDING PROBLEM OR LOW WEIGHT FOR AGE IN BREASTFED INFANTS
| ASK | LOOK AND FEEL |
| Is the infant breastfed? If so, how many times in 24 hours? | Check Infant’s Weight |
| Does the infant regularly consume any other foods or fluids? | – Infant’s weight is less than 1.5kg? |
| If yes, how often? If yes, what is used to feed the infant? | – Weight for age less than -3 Z score? |
| Inspect the Mouth | |
| – for sores or white patches (thrush). | |
| Assess Breastfeeding: | Check Breast Feeding Technique |
| Has the infant breastfed in the past hour? | If the infant has not fed in the previous hour, ask the mother to put her infant to the breast. Observe the breastfeeding for 4 minutes. |
| – if infant fed previously, ask the mother if she can wait for the infant to want to feed again | |
| – Evaluate: Is the infant properly attached and sucking effectively? | |
| Check Breast Feeding Technique | |
| To ensure correct positioning and attachment, | |
| – More of the areola is visible above the infant’s upper lip than below the lower lip. | |
| – Mouth is wide open. | |
| – Lower lip is turned outward. | |
| – Chin is touching the breast. | |
| – All these signs should be present if the attachment is good. | |
| Is the infant suckling effectively (that is, slow, deep sucks, sometimes pausing)? If a blocked nose interferes with breastfeeding, clear it. |
Classify all FEEDING
| SIGNS | CLASSIFY AS | IDENTIFY TREATMENT |
| • Weight less than 1.5 kg, or Weight for age less than -3 Z score | VERY LOW WEIGHT | • Address potential low blood sugar. |
| • IMMEDIATELY admit the infant to a hospital. | ||
| • Educate the caregiver on keeping the infant warm during transport. | ||
| • Investigate for TB risk factors | ||
| Not well-positioned at the breast, ineffective suckling, less than 8 breastfeeds daily, supplementation with other foods or fluids, low weight for age, or oral thrush. | FEEDING PROBLEM and/or LOW WEIGHT FOR AGE | • If attachment and suckling are incorrect, educate the caregiver. |
| • If good attachment is immediately unachievable, teach expressed breast milk feeding by cup. | ||
| • If breastfeeding frequency is low, promote increased feeding “on demand,” both day and night. | ||
| • If other foods or fluids are given, counsel the caregiver, promoting exclusive breastfeeding or reduced supplementation (cup feeding). | ||
| • Referral for lactation support may be required. | ||
| • If there is thrush teach the mother how to treat thrush at home. | ||
| • In addition to the points above, TB risk and mother to give home care for the young infant | ||
| • Follow up FEEDING | ||
| • Follow up LOW WEIGHT FOR AGE on day 14. | ||
| Absence of low weight or other feeding-related issues. | NO FEEDING PROBLEM | • Instruct the caregiver on general home care for the infant. |

THEN CHECK THE YOUNG INFANT’S IMMUNIZATION STATUS
| Age | Vaccine |
| Birth* | BCG |
| bOPV-0 | |
| 6 Weeks | bOPV-1 |
| DPT / HepB / Hib -1 | |
| PCV 10-1 | |
| ROTA 1 |
Provide any missed vaccine doses during the visit.
Administer vaccines to sick infants unless they are being transferred for other care.
Ensure that infants, including sick ones and those whose mothers lack health records, receive vaccinations.
Issue a new vaccination record if the child’s original record is unavailable.
Inform the caregiver of the date for the next vaccination.
Additional assessments:
Infant’s Growth and Developmental Progress:
Record infant’s weight on the appropriate growth chart.
Enquire about current movement, communication and interaction skills.
Early Childhood Development (ECD) & Potential Congenital Issues:
Inquire about any known health problems.
Assess for potential malformations.
Refer to hospital for further evaluation of any suspected condition.
Mother’s Health Status:
Verify completion of the tetanus toxoid vaccine series, providing an appointment if needed.
If the mother is pregnant, schedule a prenatal appointment.
If needed, offer family planning education.
If the mother is an adolescent, connect her with relevant support services.
TREAT THE YOUNG INFANT
1. Administer Initial Doses of Antibiotics (Intramuscular)
Gentamicin Administration:
Standard Dosage: Give 5 mg per kilogram of body weight per day as a single intramuscular injection.
Low Birth Weight Dosage (Infants under 2.5kg): Administer a reduced dose of 4 mg per kilogram of body weight per day as a single intramuscular injection.
Gentamicin Solution Preparation (for 20 mg/ml strength): Take 1 ml of gentamicin solution from a 2 ml vial containing 40 mg/ml concentration and mix it with 1 ml of sterile distilled water to achieve the desired concentration of 20 mg/ml. This dilution is necessary to ensure accurate and safe dosing for infants.
Ampicillin Administration:
Dosage: Administer 50 mg per kilogram of body weight intramuscularly.
Extended Treatment (If Referral Not Possible): In situations where immediate referral to a higher-level facility is not feasible, continue this combined antibiotic treatment regimen for a total of seven days to provide ongoing therapeutic coverage.
2. Prevent Hypoglycemia (Low Blood Sugar)
If Infant Can Breastfeed: Encourage immediate breastfeeding by the mother. Direct skin-to-skin contact can also help stimulate feeding.
If Infant Cannot Breastfeed but Can Swallow: Administer 20–50 ml (approximately 10 ml per kilogram of body weight) of expressed breast milk orally before transfer. If expressed breast milk is unavailable, use 20–50 ml (approximately 10 ml per kilogram of body weight) of sugar water solution instead. (Preparation of Sugar Water: Dissolve 4 level teaspoons of granulated sugar (20 grams) in a 200 ml cup of clean, safe water. Ensure sugar is fully dissolved.)
If Infant Cannot Swallow: Administer 20–50 ml (approximately 10 ml per kilogram of body weight) of expressed breast milk or sugar water using a nasogastric tube. This method ensures delivery of glucose directly into the stomach for absorption.
3. Maintain Infant’s Body Temperature During Hospital Transfer
Skin-to-Skin Contact: Prioritize continuous skin-to-skin contact between the infant and the mother or caregiver during transport to provide natural warmth regulation.
Adequate Warmth and Clothing: Ensure the young infant remains consistently clothed and well-covered throughout the journey, especially in cooler environments. Implement layered clothing, including essential items such as a hat, gloves, and socks to minimize heat loss. Wrap the infant in a soft, dry cloth and then further cover with a blanket to provide insulation and warmth.
4. Urgent Referral Process
Prepare Referral Note: Complete a formal referral note to accompany the mother when she takes the infant to the hospital. This note should detail the infant’s condition, assessments, and pre-referral treatments provided.
Oral Rehydration for Dehydration (If Applicable): If the infant exhibits signs of SOME DEHYDRATION OR SEVERE DEHYDRATION and is able to drink fluids orally, provide the mother with pre-prepared Oral Rehydration Solution (ORS). Instruct her to give frequent, small sips of ORS to the infant during transit. Reinforce the importance of continuing breastfeeding alongside ORS administration.
Apply Appropriate Dehydration Management Plan: In cases of dehydration, refer to and initiate the recommended rehydration therapy as per established protocols (Plans A, B, or C) depending on the severity of dehydration.
5. Guidance on Administering Oral Medications at Home
Maternal/Caregiver Education: Follow these steps to thoroughly educate the mother/caregiver on administering each prescribed oral medication at home. Always refer to specific instructions accompanying each medicine’s dosage chart.
Determine Correct Medication and Dosage: Accurately identify the appropriate medication(s) and precise dosage based on the infant’s age and/or weight, referring to standardized dosage guidelines.
Explain Medication Purpose: Clearly communicate to the mother/caregiver the reason for giving each medicine to the infant, detailing its therapeutic purpose.
Demonstrate Dose Measurement: Show the mother/caregiver exactly how to measure a single dose of the medication using the appropriate measuring device (e.g., syringe, measuring spoon).
Observe Return Demonstration: Watch as the mother/caregiver practices measuring a dose independently to ensure they understand the correct procedure and dosage.
Supervise First Dose Administration: Ask the mother/caregiver to administer the first dose to the infant under direct observation to confirm proper technique.
Provide Detailed Administration Instructions: Explain in detail how to give the medicine effectively. Clearly label each medication and package them separately if multiple medications are prescribed.
Separate Packaging for Multiple Medicines: If more than one medication is prescribed, count out the correct number of doses for each, and package each medicine separately with its label to avoid confusion.
Emphasize Completing Full Treatment Course: Stress the critical importance of completing the entire course of each medication as prescribed—all tablets or syrup must be used, even if the infant’s condition improves before the medication is finished. Premature discontinuation can lead to treatment failure and antibiotic resistance.
Verify Understanding: Before the mother/caregiver leaves the clinic, confirm their full understanding of all instructions, medication dosages, administration techniques, and the importance of completing the treatment course. Address any remaining questions or concerns.
6. Administer Oral Amoxicillin (for Specific Conditions)
Local Infection Treatment: For localized infections, prescribe oral amoxicillin to be given twice daily for a duration of 5 days.
Pneumonia Treatment (Fast Breathing in Infants 7–59 days old): For pneumonia characterized by fast breathing alone in infants aged 7 to 59 days, prescribe oral amoxicillin to be given twice daily for a 7-day course.
Amoxicillin Dosage Guide (Twice Daily Administration)
| WEIGHT (kg) | Dispersible Tablet (250 mg) Per Dose | Dispersible Tablet (125 mg) Per Dose | Syrup (125 mg in 5 ml) Per Dose |
| 1.5 to 2.4 | 1/2 tablet | 1 tablet | 5 ml |
| 2.5 to 3.9 | 1/2 tablet | 1 tablet | 5 ml |
| 4.0 to 5.9 | 1 tablet | 2 tablets | 10 ml |
COUNSEL THE MOTHER/CAREGIVER
EDUCATE ON HOME MANAGEMENT OF LOCAL INFECTIONS
Instructions for Every Oral Drug: For every oral drug prescribed for home administration, follow these steps and refer to the specific dosage charts:
Explain Treatment Administration: Clearly explain to the mother/caregiver how to administer each treatment correctly.
Clinic-Based First Dose Observation: Observe the caregiver administering the first dose in the clinic setting to ensure correct technique.
Worsening Infection Warning: Instruct the caregiver to return to the clinic immediately if the infection appears to worsen at any point.
Confirm Understanding Before Discharge: Before the caregiver leaves the clinic, verify that they fully understand all instructions and when to seek further medical attention.
GUIDANCE FOR TREATING SPECIFIC LOCAL INFECTIONS:
TO TREAT SKIN PUSTULES OR UMBILICAL INFECTION:
Apply Gentian Violet solution twice daily for 5 days. Instruct the mother to:
Hand Hygiene: Wash hands thoroughly with soap and water before and after each application.
Gentle Cleaning: Gently clean the affected area to remove pus and crusts using mild soap and water.
Drying: Pat the area dry with a clean, soft cloth.
Gentian Violet Application: Apply Gentian Violet solution carefully to the pustules or umbilical area.
Post-Application Hand Washing: Wash hands again after applying the medication.
Oral Antibiotics (If Prescribed): Administer any prescribed oral antibiotics, such as Flucloxacillin or Ampicillin, as directed.
TO TREAT THRUSH (ORAL CANDIDIASIS) OR MOUTH ULCERS:
Instruct the mother to:
Hand Hygiene: Wash hands thoroughly before and after each mouth care session.
Oral Cleansing: Gently cleanse the infant’s mouth using a clean, soft cloth or gauze pad dampened with a saltwater solution.
Nystatin Administration: Apply Nystatin oral suspension directly to the affected areas inside the mouth as prescribed.
Hand Hygiene Again: Wash hands again after oral care.
Breastfeeding Mothers (Additional Advice): If the infant is breastfed, advise the mother to cleanse her breasts after each feeding and apply the same Nystatin medication to the areola area to treat potential yeast infection on the nipple and prevent re-infection.
TREAT EYE INFECTION WITH TETRACYCLINE EYE OINTMENT:
Clean both eyes three times daily for 5 days. Instruct the mother to:
Hand Hygiene: Wash hands thoroughly before and after each eye care session.
Gentle Eye Cleaning: Gently wipe away any pus or discharge from both eyes using a clean, soft cloth dampened with clean water, wiping from the inner to outer corner of the eye. Use a fresh part of the cloth for each wipe and each eye to prevent cross-contamination.
Tetracycline Ointment Application: Apply tetracycline eye ointment to both eyes three times a day, even if only one eye appears infected, to prevent spread and ensure effective treatment.
Ointment Application Technique: Gently open the infant’s eye. Squeeze a small ribbon of tetracycline eye ointment (approximately 0.5-1 cm) along the inside of the lower eyelid.
Post-Application Hand Washing: Wash hands again after applying the eye ointment.
Continue Full Course: Emphasize that treatment should be continued for the full 5-day course, even if redness seems to be resolving earlier.
Avoid Other Eye Medications: Advise against using any other eye ointments or drops unless specifically prescribed. Do not put anything else in the eye other than the prescribed tetracycline ointment.
TEACH MOTHER/CAREGIVER HOW TO GIVE ORAL DRUGS AT HOME:
Follow the instructions below for each oral drug prescribed for home administration. Also, always refer to the specific instructions accompanying each drug’s dosage table.
Determine Correct Drugs and Dosage: Accurately ascertain the appropriate oral medications and their precise dosages based on the child’s age or weight, as per established guidelines.
Explain the Reason for the Drug: Clearly and simply explain to the mother/caregiver the purpose of each drug and why it is being prescribed for the child’s condition.
Demonstrate Dose Measurement: Show the mother/caregiver how to measure each dose correctly. Use the appropriate measuring tool (syringe, spoon) and demonstrate precise filling to the correct mark.
Observe Practice Dose Measurement: Watch as the mother/caregiver practices measuring a dose to confirm their understanding and ability to measure accurately.
Supervise First Dose Administration: Ask the mother/caregiver to administer the first dose to the child while you observe, ensuring they are comfortable and competent in giving the medication.
Explain Administration and Package Drugs: Clearly explain how to administer each drug – for example, how to get the child to swallow syrup or how to give a dispersible tablet. Label each medication clearly and package them separately if more than one is prescribed.
Separate Packaging for Multiple Drugs: If multiple oral medications are prescribed, count out the correct number of doses for each, and package each medication separately in labeled containers to avoid confusion at home.
Emphasize Completing Full Course of Treatment: Stress the vital importance of administering all prescribed tablets or syrup until the entire course of treatment is finished, even if the child starts to feel better. Explain that stopping treatment early can lead to the illness returning or becoming harder to treat due to drug resistance.
Confirm Caregiver Understanding: Before the mother/caregiver leaves the clinic, thoroughly check their understanding of all instructions. Ask them to repeat back the instructions, dosage, and schedule for each medication to ensure comprehension and address any remaining questions or concerns.

TEACH CORRECT POSITIONING AND ATTACHMENT FOR BREASTFEEDING
Demonstration: How to Hold the Infant
Clearly demonstrate to the mother the correct way to hold her infant for breastfeeding, emphasizing these key points:
Straight Alignment: Ensure the infant’s head and body are in a straight line, from ear to shoulder to hip. Avoid twisting the infant’s neck.
Breast-Facing Position: Position the infant facing the mother’s breast, ensuring the infant’s nose is directly opposite her nipple to encourage natural latch.
Close Body Contact: Hold the infant snugly against the mother’s body to provide a sense of security and facilitate effective latch.
Full Body Support: Support the infant’s entire body, not just the neck and shoulders. Use arms and pillows to ensure the infant is stable and comfortable, allowing them to focus on feeding.
Demonstration: How to Help the Infant Attach to the Breast
Show the mother the following step-by-step technique to assist the infant in achieving a good latch:
Nipple-to-Lip Cue: Gently touch the infant’s lips with her nipple. This tactile cue encourages the infant to open their mouth wide.
Wait for Wide Mouth Opening: Be patient and wait until the infant’s mouth is opened very wide, like a yawn. A wide-open mouth is essential for a deep and effective latch.
Quick Breast Movement: Once the mouth is wide open, swiftly bring the infant towards her breast. Aim to position the infant’s lower lip well below the nipple, ensuring the nipple is directed towards the roof of the infant’s mouth.
Assessing Latch and Suckling:
After attachment, carefully observe for signs of good attachment (e.g., wide open mouth, deep latch, rounded cheeks, no clicking sounds) and effective suckling (e.g., slow, deep sucks, audible swallowing).
Re-attempt if Necessary: If a good latch is not achieved initially, gently detach the infant and try again, reiterating the positioning and attachment steps.
Cup and Spoon Feeding if Latch Unsuccessful: If effective latching continues to be challenging, instruct the mother to express breast milk. Demonstrate feeding the expressed breast milk to the infant using a cup and spoon in the clinic to assess the infant’s ability to feed using this alternative method.
Advise Continued Breastfeeding and Expressing (if Cup/Spoon Feeding Successful): If the infant successfully feeds with a cup and spoon, advise the mother to continue attempting breastfeeding and to express breast milk after each breastfeeding attempt to maintain milk supply and provide nourishment.
Hospital Referral if Cup/Spoon Feeding Fails: If the infant is unable to feed effectively even with a cup and spoon, refer to the hospital for further assessment and specialized feeding support.
TEACH THE MOTHER TO MANAGE BREAST OR NIPPLE PROBLEMS
Provide specific advice and guidance to mothers on managing common breastfeeding challenges:
Flat or Inverted Nipple: If the mother has a flat or inverted nipple, instruct her to:
Nipple Eversion Technique: Gently evert (draw out) the nipple several times with her fingers immediately before each breastfeeding session to make it easier for the infant to latch.
Immediate Breastfeeding Attempt: After everting the nipple, promptly position the baby at the breast to latch before the nipple retracts again.
Sore Nipple: For nipple soreness, advise the mother:
Breast Milk Application: Apply a few drops of her own breast milk to the sore nipple after each feeding. Breast milk has natural soothing and healing properties.
Correct Positioning and Attachment Review: Reiterate the importance of correct positioning and attachment techniques, as these are often the primary cause of nipple soreness. Re-demonstrate proper latch if necessary.
Expressed Breast Milk Feeding (Temporary Relief): If nipple discomfort persists despite addressing positioning and attachment, suggest temporarily feeding the infant expressed breast milk via cup and spoon to give the nipples a break from direct breastfeeding while maintaining milk supply and infant nourishment.
Breast Engorgement: If breasts become overly full and engorged, advise the mother:
Continue Breastfeeding: Encourage her to allow the baby to continue breastfeeding frequently and for as long as the infant is willing to suck, as this is the most effective way to relieve engorgement.
Milk Expression if Latch Ineffective: If the baby is unable to latch or suckle effectively due to engorgement, assist the mother in expressing some breast milk manually or with a pump to soften the areola and make it easier for the infant to latch. After expressing a small amount, immediately put the infant to the breast.
Warm Compresses: Applying warm compresses to the breasts before breastfeeding can sometimes help stimulate milk flow and ease discomfort from engorgement.
Breast Abscess: If a breast abscess develops (signs include localized pain, redness, swelling, and fever), advise the mother:
Feed from Unaffected Breast: Encourage her to continue breastfeeding, primarily from the unaffected breast, to maintain milk supply and nourish the infant.
Hospital Referral: Refer the mother to a healthcare facility or specialist for evaluation and management of the breast abscess. This may require drainage and antibiotic treatment.
Formula Supplementation (If Necessary): If the infant needs additional milk beyond what is available from the unaffected breast, provide appropriate infant formula as a temporary supplement, under healthcare guidance.

TEACH THE MOTHER HOW TO KEEP THE YOUNG INFANT WITH LOW WEIGHT OR LOW BODY TEMPERATURE WARM AT HOME:
When caring for a young infant at home who has low weight or low body temperature, emphasize these warming techniques:
Avoid Full Baths: Instead of immersing the infant in water for a full bath, gently cleanse the baby with lukewarm water using a sponge in a warm room to maintain body heat and prevent chilling.
Promote Skin-to-Skin Contact (Kangaroo Mother Care – KMC): Encourage frequent skin-to-skin contact, known as Kangaroo Mother Care, both during the day and night. This method is highly effective for warmth regulation and bonding.
Warm Environment and Layered Clothing (When Not in Skin-to-Skin Contact): If skin-to-skin contact isn’t continuous or feasible:
Room Temperature: Ensure the room is kept warm, ideally above 25°C (77°F), using a home heater if necessary.
Layered Dressing: Dress the infant in 3 to 4 layers of warm clothing. Include a hat to cover the head (essential for heat loss prevention), gloves for hands, and socks for feet. Wrap the infant in a soft, dry cloth first and then in a warm blanket or shawl for extra insulation.
Warm Bedding: Have the baby and mother lie together on a soft, thick bedding to retain warmth.
Keep Dry: Regularly check and change clothes, especially diapers or napkins, whenever they become wet to prevent heat loss due to dampness.
Regularly Check Foot Temperature: Periodically feel the infant’s feet to ensure they are consistently warm to the touch, indicating adequate warmth.
1. Correct Positioning and Attachment for Breastfeeding
Demonstrate and instruct the mother on how to position her infant effectively for breastfeeding:
Body Alignment: Hold the infant so that the head, neck, and body are aligned in a straight line, preventing neck strain.
Nipple Alignment: Position the infant so they are facing the breast with their nose directly opposite the nipple, encouraging natural latch initiation.
Body Closeness: Ensure the infant is held close to the mother’s body to provide security and facilitate proper latch.
Full Body Support: Support the infant’s entire body adequately, using arms and pillows as needed, rather than just supporting the neck and shoulders, for optimal comfort and stability.
Guide the mother on how to help her infant properly attach to the breast:
Nipple Cue: Gently touch the infant’s lips with the nipple to stimulate the rooting reflex and encourage mouth opening.
Wait for Wide Mouth: Patiently wait until the infant opens their mouth widely, resembling a yawn, which is necessary for a deep latch.
Swift Attachment: Quickly bring the infant to the breast, aiming to position the infant’s lower lip significantly below the nipple. This ensures a larger portion of the areola is in the infant’s mouth, resulting in a more effective latch.
Assess Attachment and Suckling: Observe for signs of good attachment and effective suckling. If latch or suckling is not effective, detach gently and repeat the positioning and attachment process.
2. How to Feed by a Cup
Instruct the mother on the proper technique for cup feeding:
Protect Clothing: Place a cloth or bib on the infant’s chest to protect clothing from spills, as cup feeding can be initially messy.
Semi-Upright Position: Hold the infant in a semi-upright position on your lap to aid swallowing and prevent choking.
Cup Placement: Hold the cup gently resting on the infant’s lower lip.
Controlled Milk Delivery: Slowly tip the cup just enough so that the milk barely touches the infant’s lips.
Infant-Led Feeding: Allow the infant to take the milk at their own pace. Avoid pouring milk directly into the infant’s mouth, let them lap and swallow naturally.
3. How to Express Breastmilk
Teach the mother the steps for manual breast milk expression:
Hand Hygiene: Emphasize the importance of washing hands thoroughly with soap and water before expressing milk.
Comfortable Position: Advise the mother to find a comfortable and relaxed position to facilitate milk let-down.
Container Placement: Hold a wide-mouthed, clean container close to the breast, directly under the nipple and areola to collect the expressed milk.
Hand Position: Place the thumb on top of the breast and other fingers underneath, opposing the thumb. Position fingers and thumb at least 4 cm (approximately 1.5 inches) back from the nipple tip, on the areola.
Compression Technique: Press inward towards the chest wall and then gently compress the breast tissue between the thumb and fingers. Release pressure, then repeat this compression-release cycle rhythmically.
Reposition if Milk Not Flowing: If milk is not flowing effectively, slightly reposition the thumb and fingers closer to or further from the nipple and repeat the compress-release motion.
Express Around the Breast: Systematically compress and release all around the areola, rotating the hand position while keeping the fingers and thumb at the same distance from the nipple throughout the process to ensure all milk ducts are emptied.
Avoid Nipple Squeeze or Skin Rub: Caution against squeezing or pulling on the nipple itself, or rubbing or sliding fingers on the skin, as this can cause discomfort and is less effective for milk expression.
Alternating Breasts: Express from one breast until the milk flow slows to just drips, then switch to the other breast and express until it also slows to a drip. Alternate between breasts 5 or 6 times during each expressing session.
Duration: Continue expressing for at least 20 to 30 minutes per session to stimulate adequate milk production.
End Point: Stop expressing when milk no longer drips readily from the start of each compression cycle, indicating the breast is effectively emptied.
4. How to Keep the Low Weight Infant Warm at Home
Provide specific instructions to mothers on keeping low weight infants warm at home:
Co-Sleeping: Advise keeping the young infant in the same bed as the mother to share body heat and allow for prompt response to infant cues.
Warm Room Environment: Maintain a consistently warm room temperature of at least 25°C (77°F) using a safe home heating device, ensuring the room is free from drafts.
Avoid Full Baths: Do not give full baths to low-weight infants to prevent chilling. For hygiene, use sponge baths with warm water in a warm room. Dry the infant thoroughly and immediately after washing, and dress them promptly in warm clothing.
Dryness is Key: Regularly check and change clothes, especially diapers, whenever they become wet to keep the infant dry and warm.
Skin-to-Skin Contact (Kangaroo Mother Care): Emphasize the importance of frequent skin-to-skin contact, day and night, for optimal warmth and bonding. For Kangaroo Mother Care:
Dress Infant Lightly: Dress the infant in a front-opening warm shirt, a diaper, hat, and socks.
Position on Chest: Place the infant directly onto the mother’s bare chest, between her breasts, ensuring skin-to-skin contact. Keep the infant’s head turned to one side for easy breathing.
Secure and Cover: Cover the infant with the mother’s clothing and add an extra warm blanket or shawl, especially in colder environments, to ensure warmth and security.
Clothing when Not in Skin-to-Skin: When skin-to-skin care is not possible, ensure the infant is consistently clothed and covered at all times to retain body heat. Dress the infant in extra layers, including a hat and socks, and loosely wrap in a soft, dry cloth before covering with a warm blanket.
Monitor Hand and Foot Warmth: Frequently check if the infant’s hands and feet feel warm. If they feel cold, immediately re-warm the baby using skin-to-skin contact to restore body temperature.
Frequent Feeding: Breastfeed the infant frequently (or give expressed breast milk by cup if breastfeeding is challenging) to provide energy for warmth and overall health.
5. How to Give Home Care for the Young Infant
Exclusive Breastfeeding (for Breastfeeding Mothers):
Advise mothers to exclusively breastfeed their young infants for the first six months of life, providing only breast milk, without any other foods or liquids unless medically indicated.
Encourage frequent breastfeeding on demand, day and night, whenever the infant shows signs of hunger, and to continue breastfeeding during illness as well as health.
Maintain Warmth Consistently:
Reinforce the importance of keeping the young infant warm at all times, especially in cool weather.
Advise covering the infant’s head and feet and dressing them in extra layers of clothing to prevent heat loss.
WHEN TO RETURN (Follow-up Visit Schedule)
Provide a clear schedule for follow-up visits based on the infant’s condition:
| Infant’s Condition | Follow-up Day |
| JAUNDICE | Day 2 |
| DIARRHOEA | Day 3 |
| FEEDING PROBLEM | Day 3 |
| THRUSH | Day 3 |
| LOCAL INFECTION | Day 3 |
| PNEUMONIA | Day 4 |
| SEVERE PNEUMONIA (referral refused or not possible) | Day 4 |
| LOW WEIGHT FOR AGE (infant not breastfed) | Day 7 |
| LOW WEIGHT FOR AGE (breastfed infant) | Day 14 |
| CONFIRMED HIV INFECTION or HIV EXPOSED/SUSPECTED INFECTION | Per national guidelines |
WHEN TO RETURN IMMEDIATELY (Danger Signs):
Advise caregivers to seek immediate medical attention if the young infant exhibits any of the following danger signs:
Poor breastfeeding or feeding difficulties
Reduced activity level or lethargy
Becoming increasingly sick or worsening condition
Development of fever (high temperature)
Feeling unusually cold to the touch
Rapid or fast breathing
Breathing difficulties or labored breathing
Yellowing of palms of hands or soles of feet
Follow-up Care for the Sick Young Infant where Referral is Refused or Not Feasible
For Sick Young Infant with Possible Serious Bacterial Infection or Very Severe Disease:
Clinical Severe Infection:
2-day Gentamicin Regimen:
Schedule follow-up visits on Day 2 and Day 4 of treatment.
At each follow-up, reassess the young infant’s condition comprehensively.
If the infant is showing improvement, complete the 2-day course of intramuscular gentamicin.
Continue oral amoxicillin treatment until all tablets are finished as prescribed.
7-day Gentamicin Regimen:
Schedule follow-up visits to coincide with each day of gentamicin injection administration.
Refer the infant to a higher level of care if any of the following occur:
Condition worsens after starting treatment.
Any new sign of clinical severe infection emerges.
Clinical signs of severe infection are still present after 8 days of treatment.
No noticeable improvement is seen by Day 4, which is after 3 full days of treatment.
Local Bacterial Infection:
After 2 Days Follow-up:
Examine the umbilical area for persistent redness or pus discharge.
Assess the severity of skin pustules and check if they are resolving.
Evaluate the eyes for continued pus discharge, swelling, or redness.
Treatment Decisions:
If issues with local infection persist or worsen, refer to the hospital for further management.
If the infection is improving, continue the prescribed 5-day course of oral antibiotics and home care treatments.
If pustules are severe, persist, or worsen, refer to the hospital.
Jaundice:
After 1 Day Follow-up:
Visually assess for jaundice.
If jaundice has spread to the palms of the hands or soles of the feet, or if the infant’s age is 14 days or older with jaundice, refer to the hospital for immediate evaluation.
If jaundice is not affecting palms or soles and the infant is under 14 days old, provide advice on continued home care and explain when to return for follow-up or if danger signs develop.
Eye Infection:
After 2 Days Follow-up:
Check for ongoing pus draining from the eyes.
Treatment Decisions:
If pus discharge persists, verify that the treatment is being administered correctly. If correctly administered and still persistent, refer to the hospital.
If there is no pus discharge, continue the prescribed tetracycline eye ointment treatment for the full 5-day course.
Diarrhoea (Some Dehydration):
After 2 Days Follow-up:
Ask the caregiver if the diarrhea has stopped.
Treatment Decisions:
If diarrhea has not stopped, conduct a full reassessment and manage dehydration and diarrhea appropriately.
If diarrhea has resolved, advise the mother to continue exclusive breastfeeding and continue Zinc supplementation for a total of 10 days.
When to Return Immediately (Reiteration of Danger Signs):
Reiterate advising caregivers to return immediately if the young infant develops any of the danger signs previously mentioned: poor feeding, reduced activity, becoming sicker, fever, feeling cold, fast breathing, breathing difficulty, or yellow palms/soles.
Follow-up Care for Specific Conditions:
Feeding Problem:
After 2 Days Follow-up: Reassess the infant’s feeding.
Inquire about any feeding problems that were identified during the initial visit and if they have changed.
Provide counseling to the mother on any new or ongoing feeding problems and offer practical solutions.
If significant changes to feeding practices were recommended, ask the mother to return for a follow-up again in 2 days to monitor implementation and infant response.
For infants diagnosed with low weight for age, instruct the mother to return 14 days after the initial visit specifically for weight measurement to assess weight gain.
Exception: If you believe that feeding is unlikely to improve with continued outpatient management, or if the infant has lost weight since the last visit, refer the child to the hospital for more intensive feeding support and evaluation.
Low Weight or Low Birth Weight:
After 2 Days Follow-up:
Weigh the young infant to reassess if they are still classified as low weight for age.
Reassess feeding practices and identify any ongoing issues.
If the infant is no longer classified as low weight for age, praise the mother for her efforts and encourage her to continue with the current care plan until the infant reaches a healthy weight range.
If the infant remains low weight for age but is feeding well, praise the mother’s efforts and advise her to return for weight re-measurement within one month or at their next scheduled immunization visit.
If the infant is still low weight for age and exhibits feeding problems, provide detailed counseling to the mother on optimizing feeding techniques and address any underlying feeding difficulties. Schedule a follow-up visit in 14 days (or coincide with the next immunization visit if it falls within 2 weeks). Continue follow-up every 2 weeks thereafter until feeding has improved, the infant shows regular weight gain, or is no longer classified as low weight for age.
Exception: If you determine that feeding is unlikely to improve with continued outpatient management, or if the infant has experienced weight loss, refer to the hospital for comprehensive assessment and intervention.
Thrush or Mouth Ulcers:
After 2 Days Follow-up: Examine the infant’s mouth again, looking for persistent mouth ulcers or white patches indicative of thrush.
Reassess feeding practices, especially if oral discomfort is suspected to be impacting feeding.
If thrush or mouth ulcers have worsened, or if there are ongoing problems with infant attachment to the breast or effective sucking, refer to the hospital.
If thrush or mouth ulcers are stable or showing improvement, and the baby is feeding well, advise continuing the treatment with Gentian Violet or Nystatin for the full prescribed 5-day course to ensure complete resolution.
We are a supportive platform dedicated to empowering student nurses and midwives through quality educational resources, career guidance, and a vibrant community. Join us to connect, learn, and grow in your healthcare journey
Quick Links
Our Courses
Legal / Policies
Get in Touch
(+256) 790 036 252
(+256) 748 324 644
Info@nursesonlinediscussion.com
Kampala ,Uganda
© 2026 Nurses online discussion. All Rights Reserved