Manage of Women with Gynaecological Conditions
Subtopic:
History, Physical examination and investigation in gynaecology
History taking
Eliciting a comprehensive patient history is crucial for accurate diagnosis, guiding subsequent physical examinations and necessary investigations. Patient interviews should always be conducted in a confidential setting.
During history acquisition, commence with gathering patient demographics, followed by specific details as outlined below:
Personal History: This encompasses the patient’s biographical information, easily remembered using the mnemonic NAATRENREM:
Name: Patient’s full name.
AAge: Patient’s current age.
Address: Patient’s residential address.
Tribe: Patient’s tribal affiliation or ethnicity.
Religion: Patient’s religious beliefs.
Education: Patient’s highest level of education attained.
Next of kin: Name of the patient’s next of kin.
Relationship with the next of kin: Nature of the relationship (e.g., spouse, parent, sibling).
Occupation: Patient’s current profession or job.
Marital status: Patient’s marital status (e.g., single, married, divorced).
Presenting Complaints: Ask the patient to articulate their current health concerns. Record these issues in the order they occurred. Initially, allow the patient to speak uninterrupted to gain a full understanding of their perspective. Subsequently, explore each complaint in detail using the “DOPAPRA” framework:
Duration: How long has the problem persisted?
Onset: When did the problem begin, and was it sudden or gradual in appearance?
Progression: Has the problem worsened, improved, or remained stable over time?
Aggravation: What factors or activities make the problem worse?
Relieving: What factors or treatments provide relief from the problem?
Association: Are there any other symptoms or issues that occur alongside the main problem?
NOTE: If the presenting issue involves menstrual irregularities, a complete menstrual history is essential (see dedicated section below). For complaints of abnormal vaginal discharge, specifically inquire about its color, odor, and its timing relative to menstrual periods.
History of Abnormal Vaginal Discharge: Vaginal discharge can be classified as either normal or abnormal. Typical physiological discharge is usually whitish or clear, without associated itching or unpleasant odor.
Conversely, abnormal discharge is characterized by changes in volume, color, presence of irritation or foul smell, and may sometimes be accompanied by abdominal discomfort. Common causes of abnormal vaginal discharge include infections such as trichomoniasis, bacterial vaginosis, and vaginal candidiasis. It’s also important to note that advanced cervical cancer, particularly when complicated by secondary infection, can also manifest with abnormal vaginal discharge.
When taking a history of vaginal discharge, obtain the following details:
Quantity of the discharge (e.g., scant, moderate, profuse).
Length of time the discharge has been present.
Presence and nature of any odor (e.g., foul-smelling, fishy).
Changes in the color of the discharge (e.g., white, yellow, green, blood-stained).
Relationship of the discharge to the menstrual cycle (e.g., worse at certain times).
Presence of any associated lower abdominal pain or discomfort.
History of Pain (using SOCRATES): If pain, such as abdominal pain, is a presenting complaint, systematically evaluate it using the “SOCRATES” mnemonic:
Site: Precisely where is the pain located? Can the patient point to the area of maximal pain?
Onset: When did the pain start? Was it sudden and abrupt, or gradual in its development? Is the pain becoming progressively worse or improving?
Character: What is the nature of the pain sensation? (e.g., sharp, dull ache, stabbing, burning, cramping).
Radiation: Does the pain spread or move to any other areas of the body?
Associations: Are there any other symptoms that occur at the same time as the pain (e.g., nausea, vomiting, fever, changes in bowel habits)?
Time course: Does the pain follow any specific pattern or rhythm throughout the day or over time?
Exacerbating/Relieving factors: What activities, positions, or treatments make the pain worse? What makes it better?
Severity: How intense is the pain? (Often quantified using a pain scale of 0-10).
Menstrual History: Gather detailed information regarding the patient’s menstrual cycles:
Age at Menarche: Age when menstruation first began.
Cycle Regularity: Are the menstrual cycles predictable and consistent in length?
Duration of Flow: Number of days of menstrual bleeding each cycle.
Cycle Length: Number of days from the start of one period to the start of the next.
Amount of Bleeding: Subjective assessment of blood loss. Excessive bleeding may be indicated by the passage of blood clots or needing to use a large number of sanitary pads or tampons.
Last Menstrual Period (LMP): Date of the first day of the most recent menstrual period.
Menstrual history can be concisely documented using a format like 13/4/28, meaning menarche at age 13, bleeding for 4 days, and cycles every 28 days.
Past Gynaecology History: Inquire about any previous gynaecological conditions, such as uterine fibroids, rectovaginal fistula, vesicovaginal fistula, perineal tears sustained during childbirth, abortions (spontaneous or induced), etc. Also ask about any prior surgical procedures on the cervix, including dilation and curettage (D&C).
Past Medical History: Investigate for the presence of any relevant systemic medical conditions, metabolic disorders, or endocrine problems (e.g., diabetes mellitus, hypertension, hepatitis). The presence of these conditions is important to note, as they may require special consideration during surgical interventions. It is also pertinent to ask about a history of sexually transmitted infections (STIs). Furthermore, identify any chronic illnesses the patient may have, such as chronic lung disease or cardiovascular disease. Document any current medications, past hospitalizations, and the reasons for hospitalization.
Past Surgical History: Enquire about any prior surgical procedures, including general, obstetric, or gynaecological surgeries. For each surgery, obtain details regarding the type of operation, anaesthesia used, any bleeding or clotting complications experienced, and the course of postoperative recovery. If available, histopathology reports or results from investigations related to previous surgeries can be highly valuable.
Past Obstetric History: For women who have been pregnant, obtain information about the number of pregnancies, any miscarriages or abortions, types of deliveries (vaginal or caesarean), history of birth trauma, prolonged labor, and any complications during pregnancy or delivery. Reiterate menstrual cycle details (menarche, regularity, duration, cycle length, and blood loss volume).
Family History: While sometimes less direct, family history can offer clues. A family history of malignancies like breast, colon, ovarian, or endometrial cancer may raise suspicion for similar risks in the patient. A history of tuberculosis in family members can be relevant in the diagnosis of pelvic tuberculosis.
Past Social History: Explore relevant social factors including marital status, lifestyle habits (smoking, alcohol consumption), occupation, and living situation.
Contraceptive History: Determine if the patient is currently using any form of contraception. If so, document the method and any side effects experienced. If not using contraception, this information is important to consider in relation to pregnancy risk and to assess if the presenting complaint could be related to a prior contraceptive method.
Cervical Cancer Screening History: For women over the age of 35, specifically ask if they have undergone cervical cancer screening (e.g., Pap smear, HPV test). Record the date and results of the last screening if available.
Sexual History: Include a sexual history if it is relevant to the presenting complaints or the patient’s overall health concerns. Acknowledge that patients may feel uncomfortable discussing sexual matters, so approach this topic with sensitivity. Inquire about pain during sexual intercourse (dyspareunia) or difficulties with sexual activity. Note if dyspareunia is superficial (pain upon initial penetration) or deep (pain with deeper penetration). Superficial dyspareunia can be linked to insufficient vaginal lubrication or vaginismus. Deep dyspareunia may be caused by scarring, endometriosis, or pelvic masses.
EXAMINATION
Following history taking, a gynaecological examination is performed. This examination is essential to confirm or exclude potential pathologies suggested by the patient’s history.
Prior to commencing the gynaecological examination, ensure the following steps are taken:
Clearly explain to the patient the purpose and nature of the examination procedure.
Obtain informed verbal consent from the patient before proceeding.
If the examiner is male, a female chaperone (e.g., nurse, female colleague, or attendant) must be present throughout the examination.
Conduct the examination in a private room to maintain patient confidentiality and dignity.
Ensure the patient is appropriately draped and covered at all times, exposing only the necessary anatomical areas for examination.
Verify that the examination room has adequate lighting for clear visualization.
Instruct the patient to empty her bladder (void) before the examination begins.
Ensure all required instruments, supplies, and equipment are readily available and within reach before starting the examination.
Note: After completing the gynaecological examination, communicate the findings to the patient in clear, simple language. Use visual aids such as drawings or anatomical models to enhance understanding, if appropriate.
Physical Examination
The overall physical examination consists of two main components:
General and Systemic Examination (General Examination)
Gynaecological Examination which includes:
Breast examination
Abdominal examination
Pelvic examination
General Examination
Body Composition:
Built: Assess the patient’s overall body habitus, noting body weight and fat distribution.
Significance: Abnormalities in body composition, such as obesity or extreme thinness, can be indicators of endocrinopathies and may impact menstrual cycles and reproductive function.
Nutritional Status:
Nutrition: Evaluate the patient’s dietary habits and overall nutritional intake.
Significance: Nutritional deficiencies or imbalances can have a significant impact on reproductive health and hormonal balance, emphasizing the importance of a balanced diet.
Growth and Development:
Stature: Assess the patient’s height and evaluate the development of secondary sexual characteristics (e.g., breast development, pubic hair distribution).
Significance: Abnormal growth patterns or delayed/precocious puberty may suggest hormonal imbalances or underlying conditions affecting gynaecological health.
Systemic Indicators:
Pallor: Examine the conjunctivae and mucous membranes for paleness, which may indicate anaemia.
Jaundice: Inspect the skin and sclera (whites of the eyes) for yellowing, suggesting possible liver dysfunction.
Edema of Legs: Assess for swelling in the lower extremities, which could indicate fluid retention or cardiovascular issues.
Significance: Systemic conditions like anaemia or liver disease can have secondary effects on gynaecological well-being and may need to be addressed.
Oral Health:
Teeth, Gums, and Tonsils: Inspect the oral cavity for signs of infection, dental caries, or potential septic foci.
Significance: Poor oral health can contribute to systemic inflammation and may have implications for overall health, potentially influencing gynaecological conditions.
Neck Examination:
Thyroid Gland and Lymph Nodes: Palpate the thyroid gland for enlargement or nodules and palpate cervical and left supraclavicular lymph nodes for enlargement (Virchow’s node).
Significance: Thyroid disorders can affect hormonal balance and menstrual function. Lymphadenopathy may indicate infection or malignancy.
Cardiovascular and Respiratory Assessment:
Cardiovascular System: Auscultate heart sounds and assess for any cardiac murmurs or irregularities.
Respiratory System: Auscultate breath sounds and assess for any signs of respiratory distress or abnormalities.
Significance: Pre-existing cardiovascular or respiratory conditions are important to identify, especially if surgical intervention is being considered, as they may impact anaesthetic risk and perioperative management.
Vital Signs Monitoring:
Pulse: Measure the patient’s heart rate (pulse).
Temperature: Measure the patient’s body temperature.
Respirations: Count the patient’s breathing rate.
Blood Pressure: Measure the patient’s systemic blood pressure.
Significance: Vital signs provide essential information about the patient’s overall physiological status and are crucial for monitoring health and guiding clinical decisions in gynaecological care.
Gynaecology Examination
A gynaecological examination is a focused assessment designed to evaluate the health of the female reproductive system.
During this examination, a gynaecologist will carefully inspect both the external and internal reproductive organs, as well as the breasts, to identify any existing abnormalities, diseases, or pathological conditions.
Breast examination
Breast examination should be a routine component of gynaecological assessment, particularly for women over 30 years old, as it is a vital method for early detection of breast pathologies, most importantly breast cancer (carcinoma).
Performing the breast exam before the pelvic exam can help to reduce patient anxiety and promote relaxation.
The breast examination can be performed while the patient is seated on a chair or lying on an examination couch. First, visually inspect the breasts for any differences in size, shape, skin changes, or obvious abnormalities (e.g., nipple retraction, skin dimpling). Then, systematically palpate each breast and axillary region to identify any abnormal lumps, masses, or nipple discharge.
Breast examination also provides an opportunity to educate women on the technique of self-breast examination, empowering them to perform regular self-checks at home for ongoing breast health monitoring.
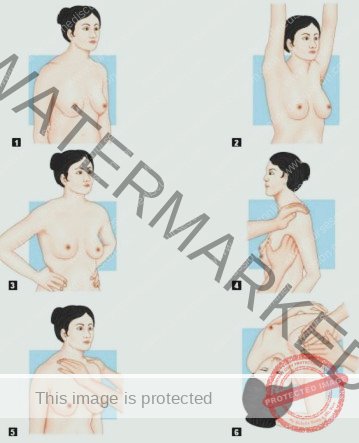
Examination of the Breasts
The breast examination is conducted through a series of systematic steps involving visual inspection and manual palpation. These steps are designed to thoroughly assess the breast tissue and surrounding areas for any abnormalities.
The examination process typically involves the following stages:
Initial Inspection (Arms at Sides): Begin with the patient standing or sitting with arms relaxed at their sides. Carefully observe the breasts for:
Symmetry: Note any differences in size, shape, or contour between the two breasts.
Skin Changes: Look for alterations in skin texture, such as redness, dimpling (like orange peel – peau d’orange), thickening, or prominent pores.
Nipple Abnormalities: Observe the nipples for position, discharge, retraction (inward turning), or any lesions.
Inspection with Arms Elevated: Ask the patient to raise both arms overhead. Repeat the visual inspection, paying attention to:
Contour Changes: Elevation of the arms can accentuate subtle changes in breast shape or contour that may not be apparent with arms at the sides.
Nipple Retraction: Arm elevation can sometimes make nipple retraction more noticeable.
Skin Dimpling or Puckering: This position can highlight skin dimpling or puckering as the underlying Cooper’s ligaments are placed under tension.
Inspection with Hands on Waist (Pectoral Muscle Contraction): Instruct the patient to press their hands firmly on their waist, contracting the pectoral muscles. Observe for:
Muscle Contraction Effects: Contraction of the pectoral muscles can reveal masses attached to the chest wall or subtle skin retractions that become more apparent with muscle tensing.
Asymmetry during Muscle Flexion: Note any asymmetry or distortion of the breasts or nipples during this maneuver.
Axillary Lymph Node Palpation: With the patient’s arm slightly abducted (away from the body) and supported, systematically palpate the axillary (armpit) region. Use the pads of your fingers in a rotary motion to feel for:
Enlarged Nodes: Assess for any palpable lymph nodes, noting their size, consistency (soft, firm, hard), mobility, and tenderness.
Node Characteristics: Healthy lymph nodes are usually small, soft, mobile and non-tender. Abnormal nodes may be enlarged, firm, fixed and tender or non-tender.
Supraclavicular Lymph Node Palpation: Palpate the supraclavicular fossa (the area above the clavicle or collarbone). Use gentle but firm pressure to feel for:
Enlarged Supraclavicular Nodes: Assess for any palpable lymph nodes in this region, which can be indicative of systemic spread in some cancers.
Virchow’s Node: Pay particular attention to the left supraclavicular node (Virchow’s node), as enlargement here can be associated with abdominal malignancies.
Breast Palpation (Outer Half): Position the patient supine (lying on their back). Place a small pillow or rolled towel under the shoulder on the side being examined. This flattens the breast tissue against the chest wall. Systematically palpate the outer half of the breast (and then repeat for the inner half, though not explicitly listed in the original notes, it’s a standard part of breast exam). Use the flat pads of the fingers in a circular, overlapping motion to systematically cover the entire breast tissue.
Systematic Palpation: Ensure all areas of the breast are examined, including the nipple and areola.
Tissue Consistency: Assess the texture and consistency of the breast tissue, noting any lumps, nodules, areas of thickening, or tenderness.
Mass Characteristics: If a mass is detected, carefully document its location, size, shape, consistency, mobility, tenderness, and whether it is fixed to underlying tissues.
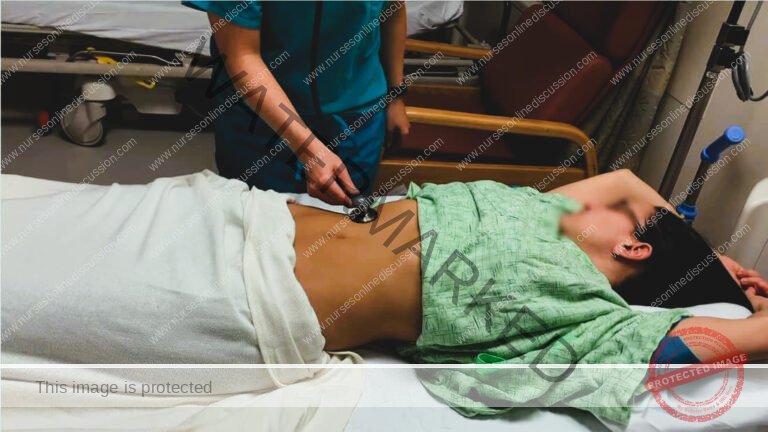
Abdominal Examination
The abdominal examination is performed with the patient lying comfortably on their back (supine) to ensure relaxation of the abdominal muscles. Proper positioning and preparation are key for an effective examination.
Patient Preparation and Position:
Supine Position: The patient should lie flat on their back with a pillow placed under their head for comfort.
Arms at Sides: The patient’s arms should rest comfortably at their sides to allow for full access to the abdomen.
Empty Bladder: It is essential that the patient empties their bladder before the examination. A full bladder can obscure abdominal findings and cause discomfort.
Exception: In cases where the history suggests stress incontinence, it may be necessary to examine the abdomen with a full bladder initially to assess for bladder distension and then after voiding. If chronic urinary retention is suspected, sterile catheterization may be necessary to empty the bladder under aseptic conditions, using a sterile, simple rubber catheter, before proceeding with the abdominal exam.
Examiner Position: The physician typically stands on the patient’s right side to facilitate examination techniques.
Steps of Abdominal Examination:
The abdominal examination proceeds in a logical sequence, starting with visual inspection followed by palpation.
INSPECTION: Visually assess the abdomen, noting the following characteristics:
Abdominal Shape/Contour: Observe the overall shape of the abdomen. Is it flat, rounded, protuberant, or scaphoid (sunken)? Note any asymmetry or unusual contours.
Distension or Masses: Look for any generalized abdominal distension (swelling) or localized bulges that might indicate underlying masses or organomegaly (enlarged organs).
Respiratory Movement: Observe the abdominal wall movement during respiration. Normally, the abdomen should move smoothly with breathing. Limited movement or paradoxical movement (abdomen retracting during inspiration) can suggest peritonitis or other abdominal issues.
Scars: Identify and describe any scars present on the abdomen. Note their location, size, shape, and appearance, as they may provide clues to previous surgeries or trauma.
Distended Veins: Inspect for any prominent or distended veins on the abdominal surface. Dilated veins (caput medusae) can be a sign of portal hypertension (increased pressure in the portal vein).
Striae: Observe for striae (stretch marks). Note their color (pink/purple – recent, silvery white – older) and distribution. Striae can be associated with pregnancy, weight changes, or Cushing’s syndrome.
Pubic Hair Distribution: Assess the pattern of pubic hair distribution. Abnormal patterns may be associated with hormonal imbalances.
Inguinal Orifices: Inspect the inguinal regions (groin areas) for any swelling or bulging, particularly around the inguinal canals. Ask the patient to cough and observe for:
Bulging or Swelling: Note any bulging or swelling in the inguinal region that might suggest a hernia.
Cough Impulse: Palpate the inguinal orifices while the patient coughs. A palpable impulse felt against your fingers during coughing is a positive sign for a hernia.
PALPATION: Systematically palpate the abdomen to assess for tenderness, organs, and masses. Divide the abdomen into nine regions for a structured approach:
Nine Abdominal Regions: Mentally divide the abdomen into nine regions to facilitate systematic palpation and documentation of findings. The regions are:
Right Hypochondrium (RH): Upper right region, beneath the ribs.
Epigastrium (E): Upper middle region, above the stomach.
Left Hypochondrium (LH): Upper left region, beneath the ribs.
Right Lumbar (RL): Middle right region, at waist level.
Umbilical (U): Central region, around the umbilicus (navel).
Left Lumbar (LL): Middle left region, at waist level.
Right Iliac (RI): Lower right region, near the hip bone (also known as right inguinal region).
Pubic/Hypogastric (P): Lower middle region, above the pubic bone.
Left Iliac (LI): Lower left region, near the hip bone (also known as left inguinal region).
Palpation Technique: Use gentle, light palpation initially to assess for tenderness and muscle guarding. Then, proceed to deeper palpation to evaluate organs and masses.
Assess for Tenderness: Palpate each of the nine regions, asking the patient to indicate any areas of pain or tenderness. Note the location and severity of tenderness.
Organ Palpation: Attempt to palpate the following organs in their respective regions:
Liver: Palpate in the Right Hypochondrium. Normally, the liver edge may be palpable just below the right costal margin during deep inspiration.
Spleen: Palpate in the Left Hypochondrium. The spleen is usually not palpable unless enlarged (splenomegaly).
Kidneys: Attempt to palpate the kidneys in the Lumbar regions (Right and Left). Kidneys are often difficult to palpate in normal individuals, particularly the right kidney.
Mass Palpation: Systematically palpate all nine regions to identify any abdominal masses. If a mass is found, characterize it based on:
Location: In which region is the mass located?
Size: Estimate the size of the mass.
Shape: Describe the shape of the mass (round, irregular, etc.).
Consistency: Is it soft, firm, hard, cystic, or solid?
Mobility: Is the mass mobile or fixed to surrounding tissues?
Tenderness: Is the mass tender to palpation?
Pulsatility: Does the mass pulsate?

Palpation should be done with the flat of the hand gently rather than the tips of the fingers.
If a mass is felt in the lower abdomen, its location, size above the symphysis pubis, consistency, feel, surface, mobility from side to side and from above to down, and margins are to be noted.
PERCUSSION
Percussion is done to assess for presence or absence of gas or fluid in the abdomen. Fluids could be blood or ascites.

AUSCULTATION
listen for bowel sounds or for fetal heart sounds and rate in case of pregnancy using a stethoscope or fetal stethoscope (fetoscope) respectively.
PELVIC EXAMINATION
The pelvic examination is conducted with the patient positioned on an examination table, lying on their back (supine). For optimal access and visualization, the patient’s knees and hips should be bent (flexed), with hips moved apart (abducted) and feet placed together.
The examiner can stand on either the patient’s right or left side, whichever is more comfortable and allows for better manipulation.
Adequate lighting is essential. An adjustable and bright light source is necessary for thorough visualization during the inspection of the vulva and the subsequent speculum examination.
Essential equipment and supplies must be prepared beforehand. This includes sterile gloves, a sterile, colorless, antiseptic-free lubricant, a speculum of appropriate size, sponge-holding forceps, and sterile swabs for sample collection if needed.
Indications for performing a pelvic examination are varied. It is typically indicated when a patient presents with symptoms such as lower abdominal pain, irregularities in menstruation, abnormal vaginal discharge, or when cervical cancer screening via a Pap smear is required.
A pelvic examination is a crucial part of gynecological assessment and should generally not be omitted unless the patient is confirmed to be a virgin (has never had vaginal intercourse).
For examinations involving minors or unmarried individuals, obtaining informed consent from a parent or legal guardian is a mandatory ethical and legal requirement.
Ideally, the lower bowel, specifically the rectum and pelvic colon, should be emptied prior to the pelvic examination to ensure patient comfort and optimize visualization and palpation of pelvic organs.
The pelvic examination is a multi-component assessment, encompassing the following key stages:
Inspection of the External Genitalia: A visual examination of the vulva and surrounding perineal area.
Vaginal Examination: This involves several steps:
Inspection of the Cervix and Vaginal Walls: Visualization using a speculum to assess the cervix and vaginal mucosa.
Palpation of the Vagina and Vaginal Cervix via Digital Examination: Manual examination using fingers to assess the vaginal canal and cervix.
Bimanual Examination of the Pelvic Organs: A combined internal and external palpation technique to assess the uterus, ovaries, and adnexa.
Rectal Examination: Examination of the rectum, which may be performed to assess the posterior pelvic structures.
Recto-vaginal Examination: A combined vaginal and rectal examination, often used to assess the rectovaginal septum and posterior pelvic pathology.
Positions during pelvic examination:

The lithotomy position is the gold standard for pelvic examinations. The patient is positioned supine with her legs elevated and secured in stirrups. This posture provides the best access and visualization for the examiner.
Vulvar Inspection:
Visual examination of the vulva is crucial to identify any departures from normal anatomy in the external genitalia. This systematic assessment encompasses:
General Vulvar Assessment: Observe the overall appearance of the vulvar region, including pubic hair distribution, clitoris, labia majora and minora, and the perineum. Note any structural variations.
Palpation for Abnormalities: Gently palpate the vulvar tissues to identify any unusual masses, swellings, tenderness, or hardened areas.
Assessment of Visible Vaginal Discharge: Observe the external characteristics of any vaginal discharge present before instrumentation. Document features such as color, consistency, and quantity.
Detailed Inspection with Labial Separation:
Using the non-dominant hand to gently separate the labia, visualize the external urethral meatus and the expected location of the Bartholin’s gland duct openings (usually only visible if inflamed or blocked). Evaluate the hymen’s appearance.
Evaluation for Stress Incontinence & Pelvic Organ Prolapse: Instruct the patient to strain or bear down as if defecating. Observe for:
Stress Urinary Incontinence: Note any involuntary urine leakage from the urethral meatus during straining, which might indicate stress incontinence.
Pelvic Organ Prolapse: Identify any protrusion of pelvic organs into the vaginal opening. Determine the prolapsed structure(s) – anterior vaginal wall (cystocele), uterus (uterine prolapse), posterior vaginal wall (rectocele), or combinations.
Perineal & Anal Area Check: Finally, visually examine the perineum and anal region for signs of haemorrhoids, anal fissures, anal fistulae, or evidence of perineal tears (often from previous deliveries).
Vaginal Examination:
The vaginal examination is a multi-component assessment to thoroughly evaluate the vagina, cervix, and surrounding pelvic organs. It includes:
Visual Inspection of Cervix & Vaginal Walls
Digital Palpation of Vagina & Cervix
Bimanual Palpation of Pelvic Organs
Visual Inspection of Vagina & Cervix (Speculum Exam):
Visualization of the vagina and cervix is achieved through speculum examination. Two common speculum types are used: the Cusco bivalve speculum and the Sims speculum.
The Cusco speculum is frequently utilized when the patient is in the dorsal lithotomy position. The Sims speculum may be preferred when the patient is in the lateral position, offering specific advantages in that posture.
Insertion of Cusco’s Speculum: (Further steps on Cusco speculum insertion would follow).
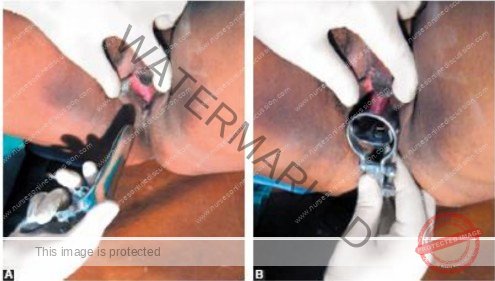
(A) The transverse diameter of the closed blades is placed in the anteroposterior position and inserted slightly obliquely to minimize pressure on the urethra;
(B) Blades are inserted in a downward motion and then rotated. Rotate to 90° and then open up the blades. Inspection is then made using good light. The
cervix is best visualized with Cusco’s variety. But while the vaginal fornices are only visualized by Cusco, the anterior vaginal wall is to be visualized by Sims’
variety. Sims’ speculum is advantageous in cases of genital prolapse. Speculum examination should preferably be done prior to bimanual examination.
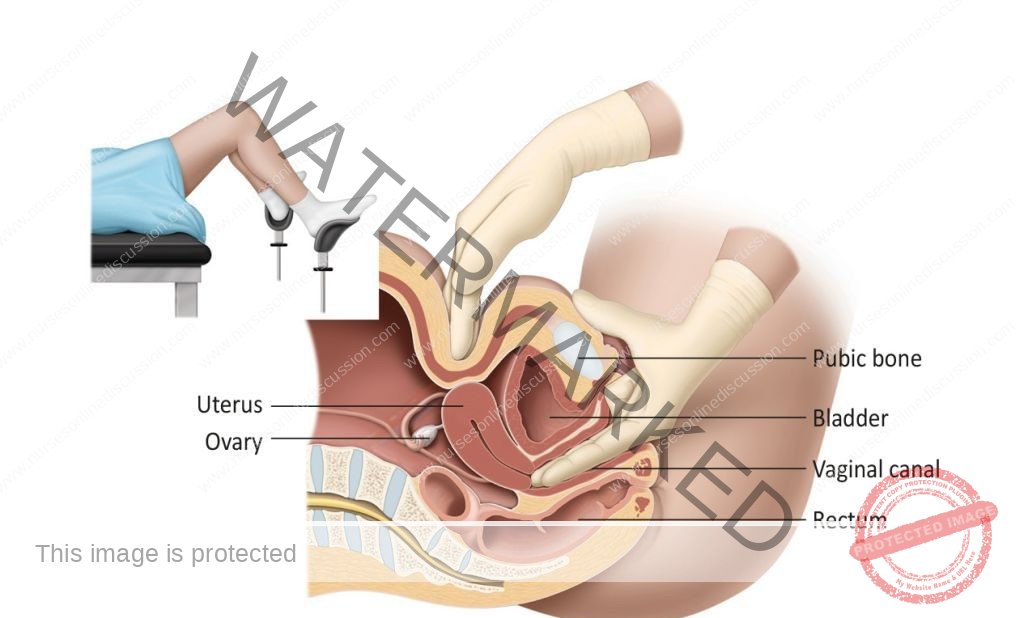
Bimanual Digital examination:
Explain every step to the patient and reassure her. Inform her that an internal examination is to be performed.
- The labia are gently parted with the gloved index finger and thumb of the non-dominant hand.
- Initially the lubricated index finger of the examiner’s dominant hand is inserted through the introitus into the vaginal canal.
- If the patient is comfortable with this, the lubricated middle finger of the same hand is also inserted.
- If not, due to pain, a limited bimanual examination with one finger can be performed.
- The full length of the finger is introduced, assessing the vaginal walls in transit until the cervix is located.
GYNAECOLOGICAL INVESTIGATIONS
Following a detailed patient history and thorough physical examination, specific investigations may be necessary to confirm a diagnosis or differentiate between possible conditions.
Blood Tests:
Full Blood Count (FBC) or Complete Blood Count (CBC): This test evaluates blood cell levels. It’s crucial for assessing haemoglobin levels in cases of suspected excessive blood loss and for checking the white blood cell count when infection is suspected.
Venereal Disease Research Laboratory (VDRL) Test for Syphilis: This is a screening test used to detect syphilis infection.
HIV Serology: This blood test is performed to identify Human Immunodeficiency Virus (HIV) infection.
Urine Analysis and Culture:
Collection Method: A midstream urine sample is required for optimal results.
Purpose: Used to detect urinary tract infections (UTIs) and to confirm pregnancy. Urinalysis is performed when a UTI is suspected.
Vaginal Swab Analysis:
Indication: Performed when a patient presents with abnormal vaginal discharge.
Laboratory Tests: Involves microscopic examination of the swab, as well as culture and sensitivity testing to identify specific pathogens.
Diagnostic Use: Helps diagnose infections such as trichomoniasis, bacterial vaginosis (BV), and vaginal candidiasis (yeast infection).
Cervical Cytology (Pap Smear): This is a routine screening test for cervical cancer.
Hormone Level Assessments (Hormonal Assays):
Hormones Evaluated: Includes hormones like Follicle-Stimulating Hormone (FSH), testosterone, progesterone, Luteinizing Hormone (LH), and prolactin, among others.
Clinical Applications: Used in the diagnosis of conditions such as menopause, Polycystic Ovary Syndrome (PCOS), and to evaluate ovarian function.
Pelvic Ultrasound Imaging:
Purpose: Utilized to assess structural abnormalities within the female reproductive tract.
Diagnostic Value: Effective in identifying pelvic masses or collections of fluid.
Advanced Imaging: Computed Tomography (CT) and Magnetic Resonance Imaging (MRI):
Indication: Typically reserved for cases where malignant conditions of the reproductive organs are suspected.
Usage Considerations: Due to cost and resource implications, these advanced scans are used when clinically necessary to investigate serious pathology.
Hysterosalpingography (HSG):
Indication: Used to assess the patency (openness) of the fallopian tubes, particularly in the evaluation of infertility.
Procedure Description: Involves injecting a radio-opaque contrast agent through the cervix.
Real-time Monitoring: The progress of the contrast agent as it fills the uterus and fallopian tubes is visualized on a screen.
Special Procedures in Gynaecology
These specialized procedures are valuable in gaining further diagnostic information and addressing clinical questions that may remain after initial history and physical assessment.
Evacuation of Uterine Contents: This procedure involves removing the contents of the uterine cavity. It’s often performed when a standard pelvic examination is not possible or provides insufficient information. Anaesthesia is typically required. However, it’s important to note that signs of tenderness might be less obvious under anaesthesia.
Curettage (Uterine Scraping): Curettage involves scraping the lining of the uterus or other body cavity using a curette, a spoon-shaped surgical instrument.
Purposes:
To remove retained products of conception following miscarriage or childbirth.
To obtain tissue samples for diagnostic purposes.
Biopsy (Tissue Sampling): A biopsy is the removal of a small piece of living tissue for detailed microscopic examination. This is crucial in ruling out or confirming various diseases.
Common Biopsy Sites: Examples include the cervix and endometrium (uterine lining).
Ultrasound Scan (Sonography): This imaging technique uses high-frequency sound waves to generate images of pelvic organ structures. It’s a widely used tool for detecting gynaecological diseases and for monitoring pregnancy.
Hysterosalpingography (HSG): As described above, this is an X-ray based imaging technique specifically for examining the uterus and fallopian tubes.
Diagnostic Applications: HSG can identify tubal blockages, adhesions, uterine structural abnormalities, small tumors within the uterine cavity, and issues with the internal cervical os that may contribute to recurrent miscarriages.
Laparoscopy (Minimally Invasive Abdominal Exploration): Laparoscopy involves using a laparoscope (a thin, telescope-like instrument with a camera) to visually examine the abdominal and pelvic organs. It is a minimally invasive surgical approach.
Applications:
Biopsy of tissues.
Aspiration of cysts.
Division of adhesions (scar tissue).
Collection of ova (eggs) for in vitro fertilization (IVF) procedures.
Gynaecological Operations
These are surgical procedures commonly performed in gynaecology to treat various conditions.
Hysterectomy (Uterine Removal): Hysterectomy refers to the surgical removal of the uterus.
Types of Hysterectomy:
Radical Hysterectomy (Wertheim’s Hysterectomy): More extensive removal, often for cancer.
Subtotal Hysterectomy: Removes the uterine body but leaves the cervix in place.
Total Hysterectomy: Removes the entire uterus, including the cervix.
Common Indications: Include uterine fibroids, uterine cancers, and ruptured uterus.
Salpingectomy (Fallopian Tube Removal): Salpingectomy is the surgical removal of one or both fallopian tubes.
Typical Indications: Ruptured ectopic pregnancy (pregnancy outside the uterus) and chronic salpingitis (inflammation of the fallopian tubes).
Vesico-vaginal Fistula Repair: This is surgery to correct an abnormal connection (fistula) between the bladder and the vagina.
Oophorectomy (Ovary Removal): Oophorectomy is the surgical removal of one or both ovaries.
Indications: Include ovarian tumors and chronic oophoritis (inflammation of the ovaries).
Myomectomy (Fibroid Removal): Myomectomy is the surgical removal of uterine fibroids while preserving the uterus.
Recto-vaginal Fistula Repair: This surgery corrects an abnormal connection (fistula) between the rectum and the vagina.
Mastectomy (Breast Removal): Mastectomy refers to the surgical removal of breast tissue.
Types of Mastectomy:
Radical Mastectomy: More extensive removal, including breast tissue, lymph nodes, and chest wall muscles.
Simple Mastectomy: Removal of breast tissue only.
Tubal Ligation (“Tying Tubes”): This is a permanent method of contraception that involves cutting and tying the fallopian tubes to prevent pregnancy.
Vulvectomy (Vulva Removal): Vulvectomy is the surgical removal of part or all of the vulva.
Types of Vulvectomy:
Simple Vulvectomy: Removal of the vulvar skin and superficial tissues.
Radical Vulvectomy: More extensive removal, including deeper tissues and lymph nodes.
Dilatation and Curettage (D&C): This procedure involves dilating the cervix and then scraping the uterine lining (endometrium) with a curette.
Purposes: Include removal of products of conception after abortion or miscarriage, and obtaining endometrial biopsies.
Perineoplasty (Vaginal Opening Enlargement): Perineoplasty is surgery to enlarge the vaginal opening by incising the hymen and perineal tissues.
Perineorrhaphy (Perineal Repair): Perineorrhaphy is the surgical repair of a damaged perineum, often due to tears sustained during childbirth.
We are a supportive platform dedicated to empowering student nurses and midwives through quality educational resources, career guidance, and a vibrant community. Join us to connect, learn, and grow in your healthcare journey
Quick Links
Our Courses
Legal / Policies
Get in Touch
(+256) 790 036 252
(+256) 748 324 644
Info@nursesonlinediscussion.com
Kampala ,Uganda
© 2026 Nurses online discussion. All Rights Reserved