Introduction to Midwifery
Physiology of Puerperium
Table of Contents
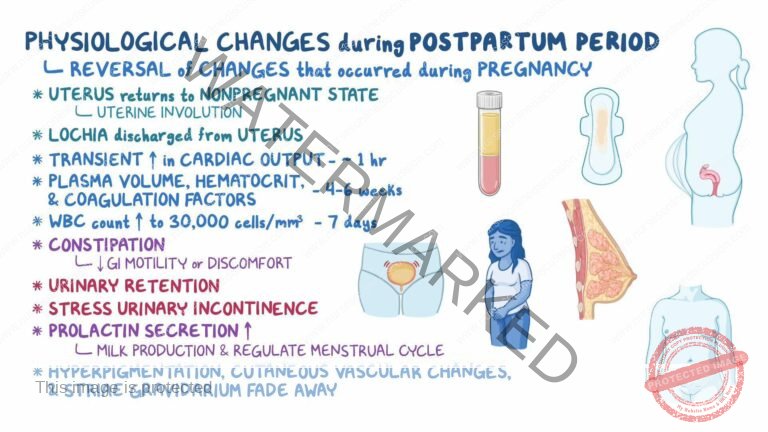
The term “involution” describes the regressive changes that occur in all organs and structures of the reproductive tract during the puerperium. This period is marked by numerous physiological changes as the body returns to a non-pregnant state. The reproductive organs revert to their pre-pregnancy condition, lactation is established, and pregnancy-related physiological changes are reversed. This is also when the foundations of the parent-infant relationship are established, and the mother recovers from the stress of pregnancy and delivery while taking on the responsibility for the infant’s care.
The posterior pituitary gland releases oxytocin, which stimulates uterine contractions. This aids in the expulsion of the placenta during the third stage of labor.
Oxytocin also acts on breast tissue, facilitating milk production when the baby suckles.
Hormones such as HCG, HPL, estrogen, and progesterone, which increased during pregnancy, gradually return to their normal levels.
Uterus:
Involution: The uterus attempts to return to its original pre-pregnancy size, position, and state.
Weight: At the end of labor, the uterus weighs approximately 900g; by the end of the puerperium, it weighs about 60g, representing a reduction to about 1/16th of its weight.
Size: Immediately after labor, the uterus is about 12.5–15 cm above the symphysis pubis (pubic bone). The fundus decreases by about 1.25 cm each day. After one week, the fundus is approximately 7.5cm above the symphysis pubis. After 10-12 days the uterus is usually no longer palpable. The uterus’s size is roughly 15x12x8-10 cm in length, width, and thickness immediately postpartum and reduces to about 7.5x5x2.5 cm by the end of the puerperium.
Shape: After placental expulsion, the uterus contracts and retracts, becoming globular. As involution progresses, the cavity reduces in size. About 6 weeks post-delivery, the uterus returns to its normal shape. The decidua (uterine lining) continues to shed to the basal layer, and a new endometrium forms.
Involution Processes:
Autolysis: Proteolytic enzymes digest muscle fibers that had grown to 10 times their normal length and 5 times their normal thickness during pregnancy.
Phagocytosis: The end products of autolysis are removed through phagocytic action by polymorphs and macrophages in the blood and lymphatic system and are excreted by the kidneys.
Ischemia: The uterine blood supply is reduced due to compression of the blood vessels, leading to a relative state of ischemia. The site is gradually covered by glandular tissue, then by the endometrium.
Contraction and Retraction: Uterine muscles contract and retract under the influence of oxytocin.
Other Factors:
Breastfeeding promotes the production of oxytocin, which assists in uterine involution.
Exercises and ambulation (walking)
Consistent draining of the bladder.
Progression of Changes in the Uterus After Delivery:
| Period | Weight of Uterus | Diameter of Placental Site | Cervix |
| End of Labor | 900g | 12.5cm | Soft and flabby |
| End of 1 Week | 450g | 7.5cm | 2cm |
| End of 2 Weeks | 200g | 5.0cm | 1cm |
| End of 6 Weeks | 60g | 2.5cm | A slit |
Vulva:
The labia majora and minora become flabby and less segmented due to decreased vascularity.
Cervix:
Immediately after delivery, the cervix may be seen protruding into the vagina, soft, and vascular.
It rapidly loses vascularity and typically regains its shape within 2-3 days postpartum.
A finger can still pass through the cervical canal up to one week after delivery.
The external os eventually closes, leaving a transverse slit large enough to admit a finger, known as a multiparous os.
Lochia:
Lochia is the discharge from the uterus during the puerperium.
It is alkaline, which favors the rapid growth of microorganisms compared to the acidic vaginal secretions.
The amount varies between women; it is typically heavy but not offensive and is non-irritant.
Lochia undergoes sequential changes during involution:
Red Lochia (Lochia Rubra): Red in color, consisting of blood from the placental site and debris from the decidua and chorion. It appears immediately after delivery and continues for the first 3-4 days postpartum.
Serous Lochia (Lochia Serosa): Paler than lochia rubra, serous and pink, containing fewer red blood cells (RBCs) but more leukocytes, wound exudates, decidual tissue, and mucus from the cervix. It lasts for 5-9 days.
White Lochia (Lochia Alba): The last lochia, pale and creamy white-brown in color, consisting of leukocytes, decidual cells, mucus, and debris from healing tissue. It lasts up to 15 days.
Some evidence of blood may persist for 2-3 weeks. A slight increase in lochia may be seen when a mother is active or during breastfeeding. The average lochia discharge for the first 5-6 days is about 250ml.
Vagina:
Immediately after delivery, the vagina may be stretched with some edema and gaping at the introitus.
Within a day or so, the vagina regains its tone, and the gaping reduces.
It is smooth-walled rather than elastic and by the 3rd week postpartum, the vaginal rugae return and it reduces in size.
The vagina may remain slightly larger than before the birth of the first child.
Torn hymen heals by scar formation, leaving several tissue tags called carunculae myrtiformes.
Breasts:
No significant anatomical changes occur in the breasts for the first two days postpartum.
Colostrum, the initial secretion from the breasts, starts during pregnancy and becomes more abundant during this period.
The rise in circulating prolactin stimulates milk production in the alveoli of the breasts, causing the breasts to become heavy and engorged in the first 3-4 days. As the baby sucks, engorgement reduces.
Breathing returns to normal as the diaphragm and lungs are no longer compressed as they were during pregnancy.
Physiological Diuresis: Urinary frequency and volume increase due to the elimination of retained fluid from pregnancy and labor.
Bladder Changes: The bladder may initially be edematous and hypotonic, leading to over-distension and incomplete emptying. Proper voiding is encouraged to prevent complications.
Heart size returns to normal after the increased workload during pregnancy.
Blood volume gradually returns to non-pregnant levels by the second week postpartum.
Vital Signs: Blood pressure, pulse rate, respiration, and temperature typically return to normal levels within the first 24 hours postpartum.
Increased Thirst: Women may experience increased thirst due to fluid losses during labor and postpartum diuresis.
Constipation: Constipation may be a concern initially due to reduced muscle tone in the perineal and abdominal areas.
Pelvic joints gradually regain their tone over three months.
Abdominal walls become flabby but can regain tone with exercises.
Disorders of Puerperiumand Relief Measures
These are common discomforts that new mothers may experience after childbirth. There’s no reason for them to suffer unnecessarily, and relief measures are available.
Afterbirth Pains: These are sequential contractions and relaxations of the uterus after childbirth. They are more common in women with higher parity (multiple pregnancies) and those who are breastfeeding.
Management:
Encourage the mother to keep her bladder empty to prevent it from displacing the uterus and hindering its contractions.
Advise the mother to lie in a prone (face-down) position with a pillow under her lower abdomen.
Administer analgesics as prescribed by a doctor to alleviate pain.
Excessive Perspiration: Excessive sweating occurs as the body eliminates excess interstitial fluid, resulting from hormonal changes during pregnancy.
Management:
Ensure the mother stays clean and dry by changing gowns and bedsheets regularly.
Keep the mother well-hydrated by offering fluids frequently.
Breast Engorgement: Breast engorgement is caused by milk accumulation, increased vascularity, and congestion. It typically occurs around the 3rd day postpartum and lasts approximately 24-48 hours.
Management:
Non-breastfeeding:
Provide good breast support using a well-fitting bra.
Apply ice bags or packs to relieve pain and reduce swelling.
Use analgesics like acetaminophen (PCM) or aspirin if needed for pain relief, as prescribed by a doctor.
Avoid massaging the breasts to express milk, as this can stimulate further milk production.
Avoid applying heat to the breasts as it can increase milk flow.
Breastfeeding:
Encourage breast massage, manual expression of milk, and nipple rolling before feeding.
Ensure the baby nurses every 2-3 hours, without missing feeds or using supplements.
Alternate between both breasts during feedings to ensure complete emptying.
Apply warmth to the breasts before each feeding to promote milk flow.
Use proper breast support without creating pressure points that restrict milk flow.
Ice bags may be used between feedings to reduce swelling and pain.
Analgesics can be used if necessary and prescribed by a doctor.
Perineal (Stitch) Pain: Before providing treatment, examine the perineum to determine if the pain is normal or due to complications like a hematoma or infection.
Management:
Apply ice packs or bags to reduce discomfort and swelling.
Use topical analgesic spray as directed by a healthcare provider.
Take sitz baths 2-3 times a day after defecation and voiding, as the warmth and motion of the water can soothe and promote healing.
Constipation: Constipation can be caused by increased progesterone levels in late pregnancy, decreased bowel motility, and reduced fluid intake during labor.
Management:
Stool softeners or mild laxatives are usually prescribed, especially for women with 3rd or 4th-degree perineal tears.
Hemorrhoids: Hemorrhoids can be painful for a few days postpartum.
Management:
Apply ice bags or packs.
Administer analgesics as prescribed by a doctor for pain relief.
Apply warm water compresses to soothe the area.
Prescribe stool softeners to facilitate bowel movements.
Consider rectal suppositories and creams, such as those containing hydrocortisone.
Replace external hemorrhoids inside the rectum if necessary with a doctor’s approval.
postnatal examination
A postnatal examination is crucial for the mother’s well-being and recovery. Typically scheduled around six weeks postpartum, this assessment aims to ensure the mother is fully recovering from the physiological effects of pregnancy, labor, and delivery. This systematic evaluation also allows healthcare providers to identify any potential complications early.
Nurses should use a structured approach to provide consistent, high-quality care. A helpful mnemonic for guiding this assessment is BUBBLE-HE, encompassing the key areas to evaluate:
Breasts
Uterus
Bladder
Bowel
Lochia (postpartum vaginal discharge)
Episiotomy (if applicable)
Homan’s sign (assessment for deep vein thrombosis)
Emotional status
Equipment Required:
VE (Vaginal Examination) Tray:
Sterile swabs in a gallipot
Two receivers
Clean pads
Sterile gloves
Sterile bowl of lotion
Antiseptic lotion in a bowl
Clean gloves
Lubricant
Cusco’s vaginal speculum
Sim’s speculum
Sponge holding forceps
Tape measure
Bedside Supplies:
Vital observations tray (for temperature, pulse, blood pressure)
Acetic acid (for specific assessments)
Stationery (for recording findings)
Procedure:
Initial Assessment: Evaluate the mother’s overall condition, noting her general appearance and emotional well-being. This starts with a visual assessment of the patient’s overall state.
Welcome and Introduction: Welcome the mother, and her partner, if present. Offer her a comfortable seat and greet her warmly. Introduce yourself and confirm her identity.
Explanation of Procedures: Clearly communicate the purpose and process of the clinic visit and any procedures to be conducted. This helps alleviate any anxiety and ensures the mother is fully informed.
Emotional Status: Observe for any signs of emotional distress, depression, or anxiety. Postpartum emotional health is vital and requires careful attention.
History Taking: Collect a thorough history, covering pregnancy, labor, and the postpartum period, noting any complications. This will serve as important context for the assessment.
Current Health Status: Inquire about her present health, including sleep patterns, appetite, breastfeeding practices, and any reactions to motherhood. This provides insights into her day-to-day experience.
Well-being Inquiry: Ask how she is feeling overall, how she is managing with the baby, and if she feels her breast milk is sufficient.
Discomfort Assessment: Specifically ask about any discomforts, pain, or issues she may be experiencing.
Menstrual Status: Ask about the return of menstruation, any vaginal bleeding, or abnormal discharges.
Open Communication: Provide the mother with an open opportunity to discuss any concerns or problems she may have. This fosters a supportive environment.
Vital Signs: Measure and record the mother’s temperature, pulse rate, and blood pressure. This provides a baseline of her physiological stability.
Systematic Examination: Perform a thorough physical examination, systematically from head to toe, screening for any health concerns.
Breast Examination: Conduct a detailed breast examination, re-examining for any signs of infection, lumps, nipple cracks, or blisters. Provide instruction on self-breast examination techniques.
Uterine Assessment: Palpate the uterus and lower abdomen to check for tenderness, confirming involution of the uterus. Note the tone of the abdominal muscles.
Systematic Head-to-Toe Examination
A physical assessment is conducted from head to toe to identify any abnormalities or areas of concern.
Breast Examination
The breasts are thoroughly re-examined, checking for signs of infection, such as redness, warmth, or pain. Palpate carefully for any lumps or masses. Examine the nipples for cracks, blisters, or any signs of mastitis. The mother is provided with detailed instructions on how to perform self-breast examinations to enable early detection of any changes.
Uterine Assessment
The lower abdomen is gently palpated to assess the uterus. This process confirms involution, the return of the uterus to its non-pregnant size. Check for tenderness, which could indicate infection, and note the tone and firmness of the abdominal muscles.
Bimanual Pelvic and Speculum Vaginal Examination
This involves both a visual and manual internal examination.
Speculum Examination:
Adhere to the standard guidelines for pelvic examinations, prioritizing patient comfort and safety.
Instruct the mother to empty her bladder prior to the examination to ensure comfort and accuracy.
Position the mother in the dorsal lithotomy position.
Visually inspect the vulva for any signs of swelling, inflammation, redness, or soreness.
Carefully examine the urethral opening for inflammation, redness, or any abnormal discharge.
Ask the mother to cough or strain while the labia are separated to check for uterine prolapse or stress incontinence, noting any leakage of urine.
If a vaginal specimen is required for lab analysis, this should be collected with the speculum before a digital examination is performed.
Reposition the mother into the Sim’s position to examine the anterior and posterior vaginal walls using a Sim’s speculum.
Bimanual Examination:
Follow the standard rules for pelvic examinations to ensure safe practices.
Ask the mother to empty her bladder to avoid discomfort.
Position the mother in the dorsal lithotomy position.
Perform a vulval swab and apply a drape, maintaining the mother’s privacy and ensuring sterility.
Lubricate the gloved fingers of the dominant hand and gently introduce them into the vagina.
Palpate the labia and adjacent structures for any swelling or abnormalities.
Note the condition of the vaginal wall, checking for any lesions, discharge, or abnormalities.
Assess the cervix for direction (anteverted or retroverted), station (position of the external os relative to the ischial spines), texture, shape, mobility, and tendency to bleed when touched.
Place the non-dominant hand on the abdomen and palpate the uterus using both hands to determine the size, consistency, shape, position, and mobility of the uterus. Identify any tumors or areas of tenderness.
Move the fingers in the vagina to the left and right fornices, following with the hand on the abdomen, to detect any enlargement or tenderness in the fallopian tubes and ovaries. Move the fingers to the posterior fornix to check for any swelling in the pouch of Douglas.
Assess the integrity and tone of the perineal body by flexing the internal finger posteriorly and palpating it externally with the thumb. Withdraw the fingers and inspect them for any bloodstains or abnormal discharges.
Assess the condition of the pelvic floor muscles and the vagina, checking for organ prolapse, such as cystocele, urethrocele, and cystourethrocele.
A cervical smear (Pap smear) may be taken for cytology to screen for cancerous cells.
Bowel and Gastrointestinal System
Assess the mother for signs of dehydration, constipation, and hemorrhoids. Inquire about her appetite and provide guidance as needed.
Lochia
Observe the characteristics of the lochia (postpartum vaginal discharge), including its type (rubra, serosa, alba), color, odor, and consistency. Abnormalities may indicate infection or other complications.
Episiotomy
Examine the perineum for proper healing of the episiotomy (if performed), looking for good muscle tone, adequate apposition of the wound edges and any signs of infection.
Extremities
Assess for Homan’s sign (by flexing the foot) to check for the presence of thrombophlebitis, a potential complication of postpartum.
Emotional Status
Evaluate the mother’s emotional response to her baby, her adjustment to parental roles, her ability to care for the infant, and her family’s overall adaptation. Identify any signs of postpartum depression or anxiety.
Sharing of Findings and Education
Discuss the findings of the examination with the mother and provide relevant education. This will promote her understanding of her condition and promote self-care.
Family Planning
Discuss family planning options with the mother, providing information, and advice, and recommend that she attend a family planning clinic for ongoing support and advice.
Referral and Documentation
Refer the mother appropriately if any issues are identified and document the entire examination process and findings in detail, including a full signature, for complete and accurate medical record.
TRANSFER OR REFERRAL OF MOTHER
Transfer or referral involves the careful preparation of a mother for relocation. This could be to a different department within the same hospital, to another healthcare facility, or even to her home. Such transfers are frequently necessary in situations involving obstetric emergencies, notably instances of antepartum hemorrhage (APH), vasa previa, umbilical cord prolapse, uterine rupture, obstetric shock, pre-eclampsia, eclampsia, and other significant pregnancy-related complications.
To Access Diagnostic Services: To facilitate the performance of critical diagnostic tests and procedures essential for accurate assessment.
To Ensure Specialized Care: To enable the delivery of appropriate treatment and specialized nursing care tailored to the mother’s specific needs.
To Obtain Expert Assistance: To grant access to specialized medical expertise and consultation necessary for complex cases.
To Optimize Resource Utilization: To ensure the efficient utilization of the most appropriate personnel and available services.
To Adjust Nursing Intensity: To ensure that the intensity of nursing care corresponds precisely to the patient’s level of needs and the severity of their condition.
Internal Transfer: This involves moving the patient within the same hospital from one ward or unit to another. This is usually done when the patient requires a different level of care or a more specific type of care. An example would be the transfer of a mother from the general maternity ward to the intensive care unit (ICU) for more intensive monitoring and management.
External Transfer: This type of transfer involves moving a patient from one hospital to a different one. This often becomes necessary when a mother needs specialized care not available at the current facility, like in cases where a patient needs to be transferred from a smaller community hospital to a large referral center equipped for complex obstetric procedures.
Thoroughly assess the planned method of transportation and communicate relevant information to the midwife at the receiving unit.
Monitor and ensure the patient’s physical comfort and safety during the process of transferring her to the new unit.
Provide a concise and comprehensive verbal report to the receiving unit midwife about the patient’s overall condition, treatment plan, and other pertinent information.
Ensure all required documentation, including updated care plans and assessment records, are completed and readily available.
Offer assistance to the patient upon her arrival at the new unit to ease the transition process.
Formally announce the patient’s arrival to the staff in the new unit, ensuring everyone is aware.
Help to safely transport the patient to her designated room and assist in her transfer onto the bed, ensuring comfort and safety.
Provide the receiving midwife with the patient’s complete investigation records and documentation folder.
Appropriate transport equipment such as a wheelchair or a stretcher to ensure safe and comfortable transport.
Clear identification labels that contain the patient’s information to prevent errors.
All of the patient’s personal belongings carefully gathered and packed to be moved with her.
Any relevant scans, medical reports, and test results to be transferred alongside the patient’s records for continuity of care.
Confirm and review the doctor’s official order for the patient’s transfer before proceeding with any steps.
Clearly and compassionately inform the mother and her family about the transfer, explaining the reasons and what to expect.
Notify the ward supervisor, charge nurse, or relevant staff in the unit or hospital where the patient will be transferred, to prepare for her arrival.
Arrange suitable transportation for the mother to the referred hospital, considering her comfort and medical needs.
Review the mother’s medical chart to ensure all essential information is recorded. This includes vital signs, details of nursing care provided, treatments administered, and a written referral note which encapsulates the important medical details.
Carefully collect all of the mother’s medical scans, prescription medicines, and personal items, organizing them for transport.
Ensure the current hospital diet is canceled, if applicable, and any transfer arrangements are completed or adjusted.
Support the relatives in collecting the patient’s belongings and preparing them for transport.
Make arrangements for settling outstanding bills if the patient is being transferred to a different facility, ensuring a smooth process.
Record essential information such as the time of transfer, the chosen method of transport, and the patient’s overall condition at the time of departure.
Assist in carefully moving the mother to a wheelchair or stretcher and accompany her to the receiving hospital, carrying all relevant medical records and documents.
Ensure a smooth handover of all documents and the patient’s belongings to the receiving staff. Provide a thorough verbal report to the nurse in charge at the receiving unit about the patient’s condition and care plan.
Retrieve all ward equipment, such as a wheelchair and any specific medical items, and return them to the appropriate place.
Clean the vacated patient unit thoroughly and prepare it for the next admission, following hospital protocols to maintain hygiene standards.
Date of referral:……………………………..
From: Health unit
To:………………………………………………………………………………………………………
Referral number:………………………………………………………………………………….
Patient name:………………………………………………………………………………………
Patient number:…………………………………………………………………………………..
Date of first visit:………………………………………………………………………………..
History and symptoms:……………………………………………………………………………………………………
………………………………………………………………………………………………………………………………………………………………………………………………………………………………………………………………………………………………………….
Diagnosis:……………………………………………………………………………………………………………………………………..
Treatment given:…………………………………………………………………………………………………………………………………………………………………………………………………………………………………………………………………………………………………
Treatment or surveillance to be continued:………………………………………………………………………………….
………………………………………………………………………………………………………
Remarks:……………………………………………………………………………………………
Name of obstetrician:…………………………………………………………………….signature………………………………
Postnatal Exercises

Postnatal exercises are a collection of physical activities specifically designed to support new mothers in their recovery from childbirth. These exercises are aimed at helping women rebuild their strength, improve flexibility, and restore their overall physical fitness. These practices are crucial for fostering healing, rehabilitating pelvic floor functionality, and supporting overall well-being following delivery.
Kegel Exercises: These exercises focus on the pelvic floor muscles, which are vital for supporting the bladder, uterus, and rectum. By repeatedly contracting and relaxing these muscles, women can help prevent or address issues such as urinary incontinence and pelvic organ prolapse, which are often experienced post-pregnancy.
Deep Breathing Exercises: Practicing deep, controlled breathing can help the body to relax, reduce stress levels, and improve circulation. This is especially helpful for promoting relaxation and effectively managing the stresses that are typical during the postpartum period.
Abdominal Contractions: Gently engaging and releasing the abdominal muscles can aid in strengthening the core and supporting abdominal recovery after childbirth. It’s important to proceed cautiously and avoid overexertion, particularly if you’ve undergone a cesarean section to prevent injury.
Pelvic Tilts: Performed while lying on your back, pelvic tilts involve moving the pelvis forward and backward. This exercise is beneficial for strengthening abdominal muscles, while also helping to alleviate lower back pain that commonly occurs after pregnancy.
Ankle Pumps and Circles: These exercises consist of moving the ankles in a circular motion or pumping them up and down to enhance blood flow and prevent the formation of blood clots, which can be a concern during postpartum recovery.
Glute Squeezes: Squeezing and releasing the gluteal muscles while in a seated or lying position aids in strengthening the buttocks and provides support to the pelvic region.
Leg Slides: Begin by lying on your back with your knees bent. Gently extend one leg straight out while keeping it low, and then slide it back to the starting position. Alternate legs to engage the core and build strength in the hip muscles.
Bridge Pose: While lying on your back with your knees bent, elevate your hips off the ground, forming a bridge-like position. This exercise effectively targets and strengthens the glutes, hamstrings, and lower back muscles.
Wall Push-Ups: Standing and facing a wall, position your palms on the wall at shoulder height. Bend your elbows and move in towards the wall, and then push back to your starting position. This exercise is beneficial for improving the strength of the upper body.
Gentle Cardio: As your postpartum recovery progresses, you can gradually incorporate low-impact cardiovascular exercises such as walking or swimming. It is crucial to begin these activities at a low intensity and increase the level of exertion as your body adjusts and heals.
Join Our WhatsApp Groups!
Are you a nursing or midwifery student looking for a space to connect, ask questions, share notes, and learn from peers?
Join our WhatsApp discussion groups today!
Join NowWe are a supportive platform dedicated to empowering student nurses and midwives through quality educational resources, career guidance, and a vibrant community. Join us to connect, learn, and grow in your healthcare journey
Quick Links
Our Courses
Legal / Policies
Get in Touch
(+256) 790 036 252
(+256) 748 324 644
Info@nursesonlinediscussion.com
Kampala ,Uganda
© 2026 Nurses online discussion. All Rights Reserved