Foundations of Nursing (III)
Subtopic:
Instilling medication
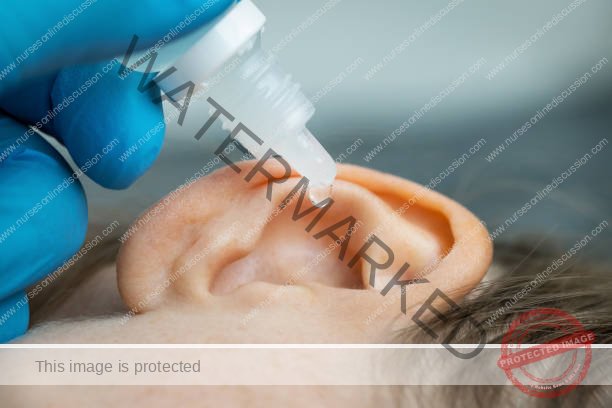
INSTILLING MEDICATION INTO EAR
Learning Objectives
Follow nursing protocols for safe and effective medication instillation.
Prepare and identify equipment for ear, eye, nasal, topical, NG tube, rectal, and vaginal drug administration.
Position patients appropriately for each route to optimize medication delivery.
Apply aseptic technique and maintain hygiene throughout the procedure.
Monitor patient responses and manage adverse reactions or discomfort.
Document accurately, including medication type, dosage, timing, and patient feedback.
Wound dressing
Wound dressing is defined as a method of carrying out surgical dressing and operative treatment with the primary aim of preventing the entry of microorganisms into the wound.
Requirements
Tray: For organizing and transporting supplies.
Cotton tipped applicators: For cleaning the external ear canal if necessary.
Cotton balls: May be used to gently plug the ear after medication instillation to keep the medication in place.
Bowl with warm normal saline: Used to gently cleanse the external ear if needed; warming helps prevent dizziness.
Medication bottle with dropper: Contains the prescribed ear drops and allows for controlled administration.
Receiver: For disposal of used materials.
Clean gloves: To maintain hygiene and prevent the spread of infection.
At the side
Screen: To provide privacy for the patient.
Vomit bowl: In case the patient experiences nausea or dizziness.
Procedure
| Step | Action | Rationale |
| 1 | Review established guidelines for nursing procedures and administering medications. | Ensures adherence to best practices and safety standards in medication delivery. |
| 2 | Enlist help when administering to children or infants. | Prevents accidental harm from sudden movements during the procedure. |
| 3 | Clean the external opening of the ear canal using a sterile cotton-tipped applicator. | Removes debris or discharge, ensuring effective medication delivery. |
| 4 | Warm the medication container by holding it in your hands or placing in lukewarm saline. | Enhances patient comfort and reduces risk of vertigo or nausea. |
| 5 | Draw prescribed medication into the ear dropper, ensuring correct dosage. | Prepares accurate medication amount for instillation. |
| 6 | Correctly position the ear canal: – Pull earlobe down/back for children under 3. – Pull ear up/back for adults and older children. | Straightens ear canal for proper flow of medication to the eardrum. |
| 7 | Instill prescribed drops along the side of the ear canal, holding dropper ~½–1 cm above opening. | Avoids contact with the eardrum and prevents injury. |
| 8 | Gently press and massage the tragus (small flap in front of ear canal). | Aids medication flow deeper into the ear canal. |
| 9 | Instruct patient to lie on their side with treated ear facing up for ~5 minutes. | Prevents leakage and ensures full canal coverage. |
| 10 | Place a loose cotton ball at the ear canal entrance for 15–20 minutes. | Helps retain medication when patient sits upright. |
| 11 | Evaluate patient comfort and monitor for drainage or reactions. | Assesses effectiveness and checks for adverse effects. |
| 12 | Dispose of used materials, restock supplies, and perform hand hygiene. | Maintains cleanliness and prevents infection. |
| 13 | Document medication name, dosage, time, and patient response. | Ensures accurate records for continuity of care. |
Points to remember;
Use sterile technique in administration when administering medication in perforated tympanic membrane.
Consider side effects and toxic effects and contraindications of various medicines.
INSTILLING MEDICATION INTO THE EYES
Requirements
Tray: A clean surface to organize and carry necessary supplies.
Sterile gloves: To maintain asepsis and prevent the introduction of microorganisms.
Sterile cotton balls soaked in sterile normal saline: Used for gently cleansing the eye area.
Dry cotton balls: For drying the area after cleansing and absorbing excess medication.
Adhesive strapping: To secure any eye dressings, if needed.
Receiver: A container for collecting used cotton balls and other waste.
Dry sterile dressing pad: May be needed to cover the eye after medication administration.
Medication: The prescribed eye drops or ointment.
At the side
Screen: To provide privacy for the patient during the procedure.
Procedure
| Step | Action | Rationale |
| 1 | Consult established guidelines for nursing procedures and medication administration. | Ensures adherence to standardized practices and promotes safe medication delivery. |
| 2 | Verify the ophthalmic medication, confirming the name and expiration date on the container. | Helps prevent medication errors by ensuring the correct drug is being administered and that it is still safe for use. |
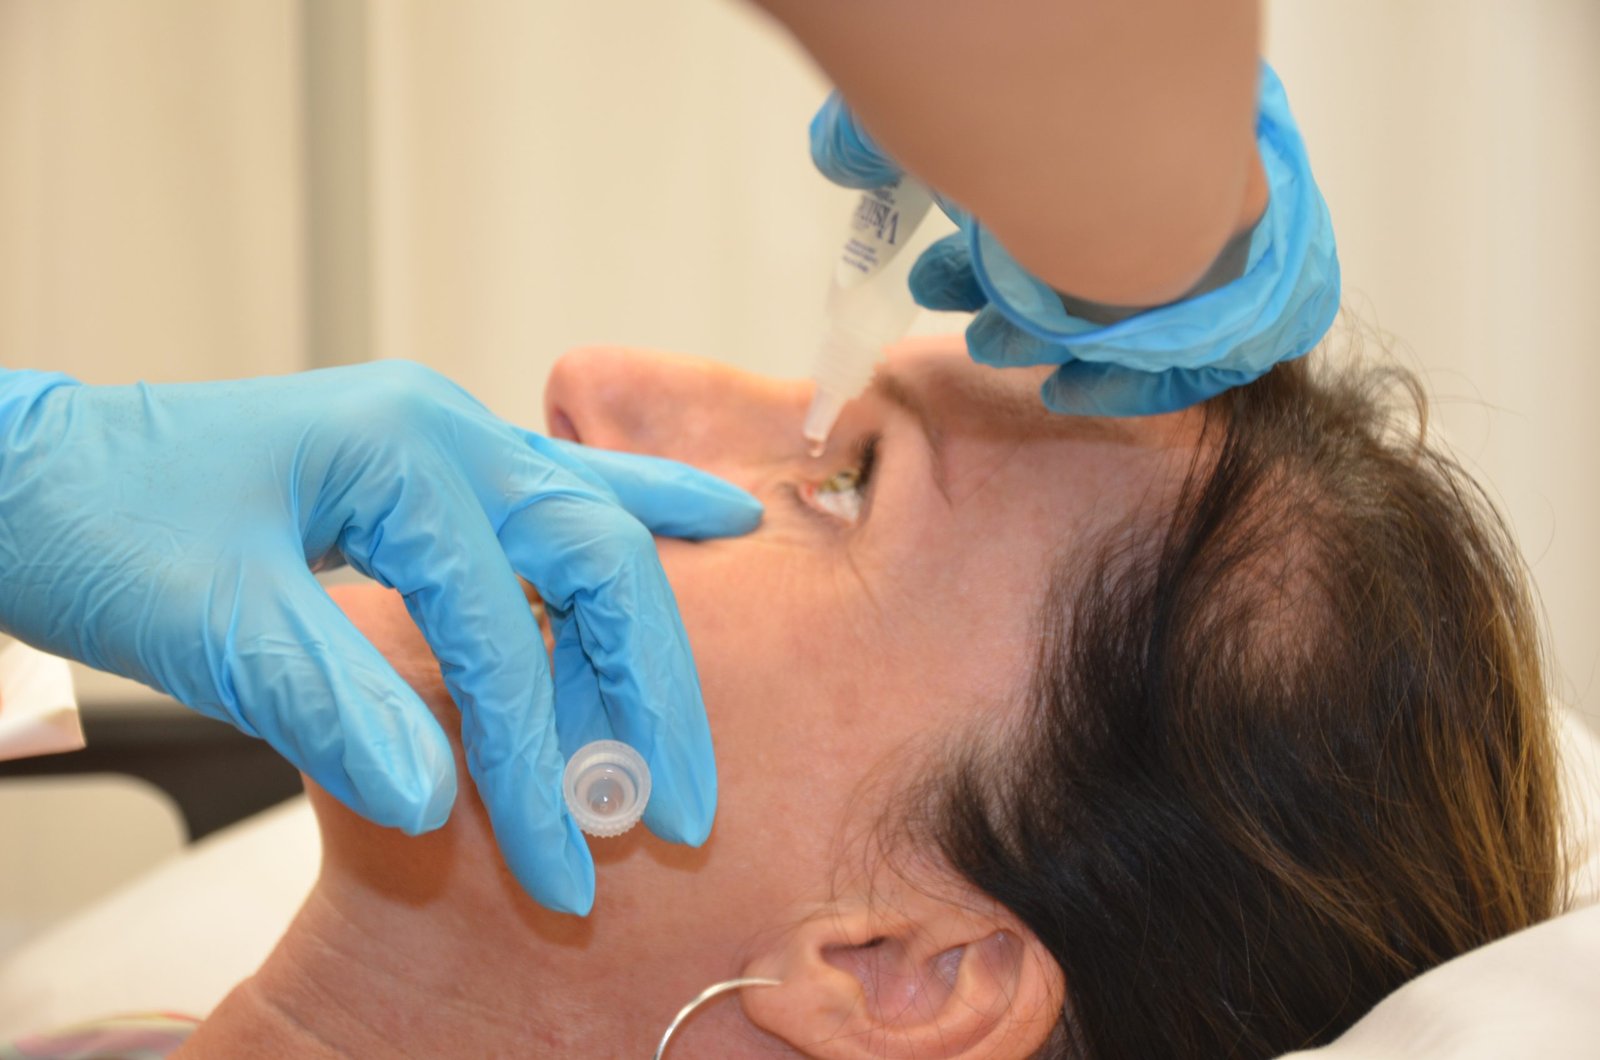
| 3 | Instruct the patient to look upwards towards the ceiling and provide them with a sterile absorbent cotton swab. | Looking up may help to reduce blinking, and this head position allows the upper eyelid to partially shield the cornea during instillation. |
| 4 | Gently expose the lower conjunctival sac by placing the thumb or fingers of your non-dominant hand just below the eye on the cheekbone (zygomatic arch) and gently pulling down the skin. | Positioning fingers on the bony prominence avoids applying pressure to the sensitive eyeball and helps to prevent the patient from involuntarily blinking or squinting. |
| 5 | If using liquid medication, discard the initial drop. If using ointment, discard the first small amount of ointment. Hold the tube above the conjunctival sac, moving from the inner corner (canthus) outwards. | The first drop of liquid or the initial bead of ointment is considered potentially contaminated and should not be instilled into the eye. |
| 6 | Approach the eye from the side and instill the prescribed number of drops into the outer third of the conjunctival sac, holding the dropper approximately 1 to 2 cm above the eye. | Approaching from the side makes the patient less likely to reflexively blink. |
| 7 | After administering liquid medication, instruct the patient to apply gentle pressure to the inner corner of the eye (nasolacrimal duct) for at least 30 seconds. | Applying pressure to the nasolacrimal duct helps to prevent the medication from draining into the tear duct and being absorbed systemically, potentially reducing side effects and increasing local effectiveness. |
| 8 | Instruct the patient to gently close their eyes without squeezing them shut. | Squeezing the eyes can potentially cause injury and may force the medication out of the eye. |
| 9 | If necessary, gently clean the eyelid by wiping from the inner corner of the eye outwards. | This technique helps prevent the potential spread of any infection from the outer area of the eye towards the lacrimal duct. |
| 10 | If required, apply a protective eye pad and secure it in place. Instruct the patient not to rub their eye. | This helps to minimize the risk of injury to the eye and prevents dislodging the medication. |
Key points
If administering multiple eye drop medications, allow at least 5 minutes between each instillation. This allows for proper absorption of each medication and prevents them from being washed out by the subsequent drops.
When administering medication to both eyes, instill the drops in the unaffected eye first. This helps prevent cross-contamination from the affected eye to the healthy eye.
ADMINISTERING NASAL DROPS
Requirements
Tray: A clean surface to organize and transport necessary supplies.
Prepared medication: The prescribed nasal drops, ensuring the correct dosage and medication.
Pen light: To visualize the nasal passages if needed.
Receiver/Toilet paper: For collecting excess nasal discharge or used materials.
Clean dropper: A device for accurately dispensing the nasal drops, if not part of the medication container.
Facial flannels/Tissues: For wiping the patient’s nose after administration.
At the side
Screen: To provide privacy for the patient during the procedure.
Small pillow: To help position the patient’s head correctly.
Procedure
| Step | Action | Rationale |
| 1 | Review standard nursing procedure guidelines and principles of medication administration. | Ensures adherence to established best practices and safety standards in medication delivery. |
| 2 | Examine the condition of the patient’s nose and sinuses using a penlight and gently palpate the sinuses to check for tenderness. | Provides initial assessment data that can be used to monitor the effectiveness of the medication and identify any potential complications. |
| 3 | Perform hand hygiene and apply gloves. | Helps to minimize the risk of transmitting microorganisms and protects both the patient and the healthcare provider from infection. |
| 4 | Instruct the patient to gently clear or blow their nose, unless there are contraindications such as increased intracranial pressure or active nosebleeds. | Removing excess mucus and secretions from the nasal passages ensures that the medication can effectively reach the intended areas. |
| 5 | Position the patient lying on their back (supine) and adjust their head to allow proper access to the posterior pharynx by tilting the head backwards. | This head position facilitates the flow of the medication into the targeted sinuses. |
| 6 | Support the patient’s head with your non-dominant hand and instruct them to breathe through their mouth. | Supporting the head prevents unnecessary strain on neck muscles, and mouth breathing minimizes the risk of the patient inhaling (aspirating) the nasal drops. |
| 7 | Hold the dropper approximately ½ to 1 cm above the nostril (nares) and instill the prescribed number of drops towards the midline of the ethmoid bone (roof of the nasal cavity). | Maintaining a distance prevents contamination of the dropper tip, and directing the drops towards the ethmoid bone helps ensure the medication reaches the intended area within the nasal passages. |
| 8 | Instruct the patient to remain in the supine position for about 5 minutes and offer a facial tissue to gently dab the nose, advising them not to blow their nose. | Keeping the patient in this position prevents the immediate loss of medication and allows for maximum absorption. |
| 9 | After the medication has had time to absorb, assist the patient to a comfortable position. | Enhances patient comfort following the procedure. |
| 10 | Evaluate the patient’s response to the medication, properly dispose of used supplies, and perform hand hygiene again. | Monitoring for any reactions or side effects is crucial. Maintaining a clean environment reduces the risk of infection transmission. |
| 11 | Document the administration of the medication, including the name of the medication, the dosage, the time of administration, and the patient’s response to the treatment. | Ensures accurate and complete record-keeping, which is essential for continuity of care and effective communication among healthcare providers. |
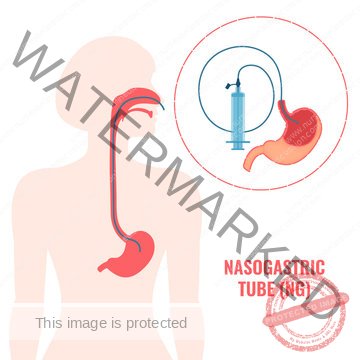
ADMINISTERING MEDICATION THROUGH NASO-GASTRIC TUBE
Requirements
Tray: A clean surface to organize and transport necessary supplies.
All requirements for passing a tube: This includes items such as the nasogastric tube itself, lubricant, tape for securing the tube, a syringe, water for flushing, and emesis basin.
Medication: The prescribed medication in liquid form if possible.
Mortar and pestle: For crushing tablets into a fine powder if liquid form is unavailable (consult pharmacy for crushability).
At the side
Screen: To provide privacy for the patient during the procedure.
Procedure
| Step | Action | Rationale |
| 1 | Review standard nursing procedure guidelines and principles of medication administration. | Ensures adherence to established best practices and promotes safe medication delivery. |
| 2 | Position the patient appropriately and place a protective sheet (mackintosh) and towel under their chest. | Protects the patient’s clothing and bedding from accidental spills or leaks during the medication administration process. |
| 3 | Elevate the head of the bed to an angle of 35 to 45 degrees. | This semi-Fowler’s position helps to minimize the risk of aspiration (inhaling fluids into the lungs). |
| 4 | Verify the correct placement of the nasogastric tube. If placement is confirmed, flush the tube with 15-30 ml of water for adults or 5-10 ml for children. | Flushing the tube ensures patency (that it is open and not blocked) before administering medication. |
| 5 | Administer the prepared medication using the same technique as when providing tube feeds. Administer each medication separately and flush with 5ml of water after each medication. Do not mix medications together. | Administering medications separately and flushing in between helps to prevent potential drug interactions and ensures that each medication is delivered effectively. |
| 6 | After administering all prescribed medications, flush the tubing with at least 30 ml of water. | This final flush helps to clear any remaining medication from the tubing, ensuring the entire dose is delivered to the patient and preventing the tube from becoming clogged. |
| 7 | Assess the patient’s response to the medication administration, replace any used supplies, and perform hand hygiene. | Monitoring the patient’s reaction helps to identify any adverse effects. Proper disposal of materials and hand hygiene help to maintain a safe and hygienic environment and prevent the spread of infection. |
| 8 | Document and record the administration of the medication. | Ensures accurate and complete record-keeping, which is essential for continuity of care and effective communication among healthcare providers. This includes the medication name, dosage, time of administration, and any observations regarding the patient’s response. |
APPLYING TOPICAL MEDICATIONS
Requirements
Tray: A clean surface to organize and carry the necessary supplies for the procedure.
Gloves: To maintain hygiene and prevent the transfer of microorganisms.
Water in a bowl: For cleansing the skin area prior to medication application.
Soap in a dish: Used with water for proper skin cleaning.
Cotton balls or gauze pieces: For applying medication or cleansing the area.
Medicine (ointment, lotion, or liniment) in appropriate container: The prescribed topical medication, ensuring the correct type and dosage.
Adhesive tape and dressing pad: For covering the treated area if required after medication application.
Procedure
Step 1
Action: Consult established nursing procedure guidelines and medication administration protocols.
Rationale: To uphold professional standards of practice.
Step 2
Action: Expose only the specific area of skin where the lotion or liniment will be applied.
Rationale: To maintain patient privacy and ensure focused treatment application.
Step 3
Action: For powders, ensure the skin is completely dry before application. Sprinkle powder uniformly to create a thin, even layer on the skin surface. Cover the area if necessary.
Rationale: Dry skin promotes powder adherence. Even distribution ensures maximum surface coverage. Covering helps protect the area and prevent powder from dispersing.
Step 4
Action: For lotions, shake the container thoroughly. Dispense a small amount of lotion onto a gauze pad and apply it smoothly and evenly, following the direction of hair growth.
Rationale: Shaking ensures proper mixing of lotion components. Applying in the direction of hair growth minimizes skin irritation and improves absorption.
Step 5
Action: For creams, ointments, and pastes, dispense a small quantity of medication onto a gloved hand. Spread the medication uniformly over the skin using long, smooth strokes in the direction of hair growth.
Rationale: Using a gloved hand maintains hygiene. Long strokes and application with hair growth ensure even medication distribution and reduce skin friction.
Step 6
Action: For sprays, shake the container well to properly mix the contents. Hold the container at a distance of 15 to 30 cm (approximately 6-12 inches) from the target area and spray, taking care to avoid spraying near the eyes.
Rationale: Shaking ensures consistent medication delivery. Maintaining distance ensures appropriate spray coverage. Avoiding eye contact prevents potential irritation or injury.
Step 7
Action: For transdermal patches, select a clean, dry, and hairless area of skin. Remove the patch from its packaging, handling it by the edges to avoid touching the adhesive. Apply the patch firmly to the skin using the palm of your hand and press for approximately 10 seconds. Remove the patch at the scheduled time.
Rationale: Clean, dry, hairless skin ensures optimal patch adhesion. Avoiding adhesive contact maintains patch effectiveness. Firm pressure ensures good skin contact for medication absorption. Timely removal prevents prolonged exposure or skin irritation.
Step 8
Action: Carefully observe the treated skin area for any changes in color, swelling, or the development of a rash.
Rationale: To monitor for and promptly identify any adverse skin reactions or complications.
Step 9
Action: Document and record the medication administration details in the patient’s medical record.
Rationale: For accurate patient documentation and to maintain a comprehensive record of care.
ADMINISTERING RECTAL AND VAGINAL MEDICATION
Requirements
Medication tray
Rectal suppository (or prescribed rectal medication)
Clean disposable gloves
Applicator (if administering vaginal cream)
Waste receiver
Lubricant
Toilet tissue or wipes
Swabs and antiseptic solution
Waterproof sheet and protective towel
At the side
Privacy screen
Procedure
Rectal
| Steps | Action | Rationale |
| 1. | Review established nursing guidelines for medication administration. | To ensure adherence to accepted professional standards of care. |
| 2. | Check the patient’s medication order and relevant information. | To verify the correct medication, dose, route, and patient, promoting medication safety. |
| 3. | Assess the patient’s understanding of the procedure and address any concerns. | To ensure patient is informed and to foster cooperation and reduce anxiety related to the procedure. |
| 4. | Provide privacy by screening the bed and position the patient in the left lateral (Sims’) position with the upper leg bent at the knee and hip. | To respect patient dignity and facilitate access to the rectum for medication insertion. |
| 5. | Perform hand hygiene and apply clean gloves. | To minimize the risk of microorganism transmission and maintain aseptic technique. |
| 6. | Drape the patient to expose only the anal area. | To maintain patient modesty and comfort during the procedure. |
| 7. | Remove the suppository from its packaging. Apply lubricant to the rounded tip of the suppository and to the gloved index finger of your dominant hand. | Lubrication decreases friction and facilitates smooth insertion, minimizing discomfort for the patient. |
| 8. | Instruct the patient to breathe slowly and deeply through their mouth. | Deep breaths promote relaxation of the anal sphincter, making suppository insertion easier and less uncomfortable. |
| 9. | Gently separate the buttocks with your non-dominant hand. Using the index finger of your dominant hand, insert the suppository gently along the rectal wall, approximately 10 cm (4 inches) in adults and 5 cm (2 inches) in children. | Insertion against the rectal wall, rather than directly into the stool, optimizes medication absorption. Appropriate insertion depth ensures medication reaches the intended site of action. |
| 10. | Withdraw your finger and cleanse the patient’s anal area with toilet tissue or a wipe. | To ensure patient comfort and hygiene following the procedure. |
| 11. | Instruct the patient to remain lying flat or on their side for approximately 5 minutes. | To prevent immediate expulsion of the suppository, allowing time for it to begin to dissolve and be absorbed. |
| 12. | Reassess after a few minutes to confirm the suppository remains in place. Advise the patient to try to retain the suppository for 30-45 minutes, or as directed. | Adequate retention time is necessary for the medication to be fully released and absorbed for its intended therapeutic effect. |
| 13. | Dispose of used materials appropriately, remove gloves, and perform hand hygiene. | To maintain a clean environment and prevent the spread of infection. |
| 14. | Document the medication administration, including patient response and any observed reactions. | Accurate documentation provides a record of care, ensures continuity of treatment, and allows for monitoring of medication effectiveness and potential adverse effects. |
Vaginal
| Steps | Action | Rationale |
| 1. | Explain to the patient that the procedure is generally painless and intended to alleviate symptoms like itching, pain, or discomfort. | To reduce patient apprehension and promote cooperation by setting realistic expectations about the procedure and its benefits. |
| 2. | Encourage the patient to empty their bladder and bowel prior to medication administration. | An empty bladder and bowel can enhance patient comfort and facilitate medication retention and absorption in the vaginal area. |
| 3. | Position the patient in a semi-recumbent or dorsal lithotomy position, ensuring patient privacy by draping to expose only the perineal area. | Appropriate positioning allows for clear visualization and access to the vaginal opening while maintaining patient dignity. |
| 4. | Prepare all necessary supplies. If using a suppository, unwrap it. If administering cream, fill the applicator according to the manufacturer’s instructions. | To ensure efficient and organized administration of the medication. |
| 5. | Apply clean gloves and gently inspect the perineal area and vaginal discharge. | To assess the condition of the area and identify any pre-existing conditions or potential contraindications before medication administration. |
| 6. | Administer the medication gently into the vaginal canal, following the natural angle of the vagina. | To ensure correct placement of the medication for optimal therapeutic effect. |
| 7. | Instruct the patient to remain lying flat or on their side for 5-10 minutes after insertion. | To allow sufficient time for the medication to be absorbed and to prevent leakage immediately after administration. |
| 8. | Offer a clean perineal pad to the patient if there is excessive vaginal discharge or cream leakage. | To promote patient comfort and manage any potential medication leakage, maintaining hygiene and preventing staining of clothing. |
| 9. | Dispose of used materials appropriately, remove gloves, and perform hand hygiene. | To maintain a clean and safe environment and prevent the spread of infection. |
| 10. | Document the medication administration, including patient response and any observed reactions. Report any significant findings to the healthcare team. | To ensure clear communication among healthcare providers regarding patient care and medication effectiveness, facilitating coordinated and safe patient management. |
Join Our WhatsApp Groups!
Are you a nursing or midwifery student looking for a space to connect, ask questions, share notes, and learn from peers?
Join our WhatsApp discussion groups today!
Join NowRelated Topics
Foundations of Nursing (III)
- Apply Nursing process to the management of patients
- Administer prescribed medicine appropriately
- Instilling medication (general)
- Blood transfusion
Specialized Nursing Care Procedures
- Perform Shortening and removal of drains
- Perform Colostomy Care
- Prepare Abdominis Paracentesis (Abdominal Tapping)
- Prepare Lumbar Puncture
- Perform Gastrostomy Feeding
- Carry out gastric Lavage
- Perform Tracheostomy Care
- Ophthalmological Care
- Care of the patient`s ears
- Pre-Operative Eye Care
- Ear Care
- Peri-Operative Care:
- Orthopedic Nursing Care
- Prepare for Neurological Assessment
Get in Touch
(+256) 790 036 252
(+256) 748 324 644
Info@nursesonlinediscussion.com
Kampala ,Uganda
© 2025 Nurses online discussion. All Rights Reserved Design & Developed by Opensigma.co