Foundations of Nursing (III)
Subtopic:
Medication administration

Learning Objectives
Define medication and explain its purposes in disease management and therapeutic effect.
Identify and apply the ten “Rights” of safe medication administration.
Describe various systemic and local routes of medication administration.
Explain techniques and indications for each route, including oral, parenteral, topical, and inhalation.
Classify medication forms and describe their uses and characteristics.
Recognize proper medication administration timing and frequency.
Interpret common prescription abbreviations and their implications for care.
Apply general rules for drug safety and handling during administration.
Demonstrate equipment setup and procedural steps for oral drug delivery.
Execute oxygen therapy and other inhalation methods with correct equipment.
Safely administer intradermal, subcutaneous, intramuscular, and intravenous injections.
Document medication administration accurately and monitor patient response.
Uphold hygiene, sterility, and patient comfort across all administration procedures.
Medication
A medication is a chemical substance given in a regulated dose for the purpose of diagnosing, curing, treating, or preventing disease. Medications can also be prescribed to produce specific therapeutic effects in the body. Administering medications safely and accurately is a critical responsibility for healthcare professionals.
The Rights of Medication Administration
To ensure patient safety and medication effectiveness, the following “Rights” should always be observed:
Right Patient: Verify the patient’s identity using at least two identifiers (e.g., name, date of birth).
Right Medication: Double-check the medication name and ensure it matches the prescription.
Right Dose: Confirm the correct dosage, including the strength and amount to be administered.
Right Route: Administer the medication via the prescribed route (e.g., oral, intravenous, intramuscular).
Right Time: Give the medication at the correct time and frequency.
Right Storage: Store the medication appropriately according to its specific requirements (e.g., refrigeration, protection from light).
Right Formulation: Ensure the medication is in the correct form (e.g., tablet, liquid, injection).
Right Disposal: Dispose of any unused or expired medication and related supplies properly.
Right Site: For injections and topical applications, administer at the correct site on the body.
Right Equipment: Use the appropriate equipment for medication administration (e.g., syringes, needles, IV tubing).
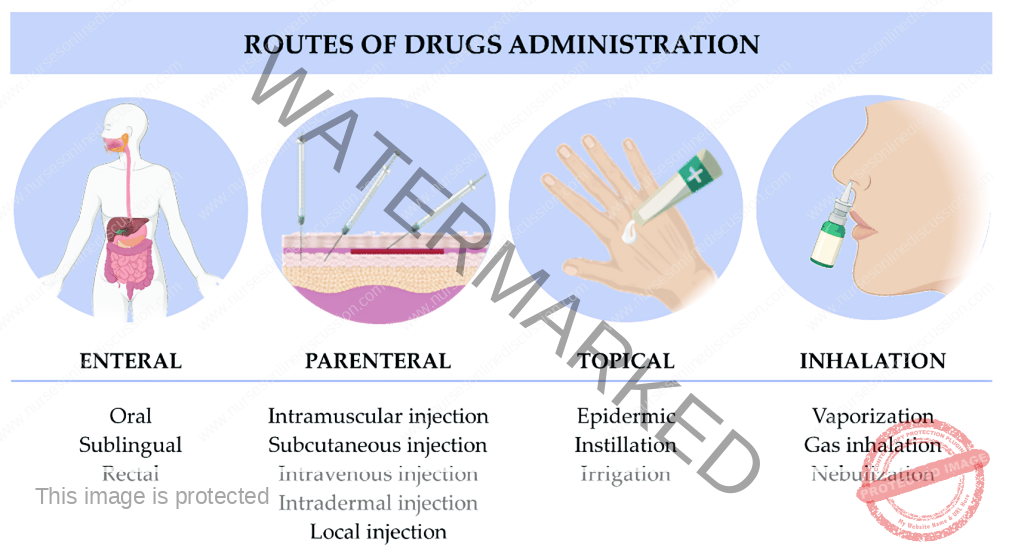
Routes of Medication Administration
Medications can be administered via various routes, broadly categorized as systemic (affecting the whole body) or local (targeting a specific area).
I. Systemic Routes
A. Enteral Route (through the gastrointestinal tract):
Oral: Medications taken by mouth (e.g., tablets, capsules, liquids) and absorbed through the stomach or intestinal lining.
Sublingual: Medications placed under the tongue, where they dissolve and are rapidly absorbed into the bloodstream.
Buccal: Medications placed between the cheek and gum, where they dissolve and are absorbed through the buccal mucosa.
Rectal: Medications administered rectally (e.g., suppositories, enemas) and absorbed through the rectal mucosa.
B. Parenteral Route (by injection):
Intravenous (IV): Injection directly into a vein, providing rapid and complete drug delivery to the bloodstream.
Intramuscular (IM): Injection into a muscle, allowing for gradual absorption into the bloodstream.
Subcutaneous (SC): Injection into the fatty tissue beneath the skin, providing slower absorption than IM.
Intra-arterial: Injection directly into an artery, used rarely for specific diagnostic or therapeutic purposes.
Intra-articular: Injection into a joint space, providing localized treatment for joint conditions.
Intrathecal: Injection into the cerebrospinal fluid surrounding the spinal cord, used for spinal anesthesia and certain medications.
Intradermal: Injection into the dermis (the layer of skin just below the epidermis), often used for allergy testing and tuberculosis screening.
Epidural: Injection into the epidural space surrounding the spinal cord, commonly used for pain management.
Intraperitoneal: Injection into the peritoneal cavity (abdominal cavity), sometimes used for chemotherapy.
Intracardiac: Injection directly into the heart muscle, used in emergencies like cardiac arrest (rarely used).
Intraosseous: Injection directly into the bone marrow, used in emergency situations when intravenous access is difficult or impossible to obtain quickly.
Intralymphatic: Injection into the lymphatic system, used in certain types of cancer treatment and for some vaccines.
II. Local Routes
Topical (Skin): Application of creams, ointments, gels, or lotions to the skin for localized treatment.
Intranasal: Administration of sprays or drops into the nasal passages for local (e.g., nasal decongestants) or systemic effects.
Ocular (Eye): Administration of drops or ointments into the eye to treat local conditions.
Otic (Ear): Administration of drops into the ear canal to treat local ear conditions.
Transdermal: Application of patches or gels to the skin for slow, continuous drug release and systemic absorption.
Mucosal:
Throat: Lozenges, sprays, or gargles for local treatment of throat conditions.
Vaginal: Creams, tablets, or rings inserted into the vagina for local treatment.
Urethral: Medications administered through the urethra.
Rectal: Suppositories or enemas for local treatment of rectal conditions.
Intrapleural: Injection into the pleural space surrounding the lungs, used for treating pleural effusions and certain cancers.
Inhalation: Administration of medications as a gas, vapor, or fine mist that is breathed in, allowing for rapid absorption through the lungs.
Inhalation
Inhalation involves breathing in a gas, vapor, or fine mist of medication into the lungs.
Types of Inhalation:
Dry Inhalation:
Oxygen Administration: Used when respiratory capacity is compromised, such as in chest injuries, pneumonia, and heart failure.
Moist/Steam Inhalation: Used to deliver moisture and often medication to the respiratory tract.
Indications:
To warm and moisten inhaled air and relieve irritation (e.g., in bronchitis, after tracheotomy).
To relieve inflammation and coughing (e.g., in colds).
To relieve congestion and edema (e.g., in sinusitis, acute laryngitis).
Nebulizer: A device that converts liquid medication into a fine mist that can be inhaled.
Indications for Nebulizer Use:
Respiratory diseases (e.g., asthma, pneumonia)
Airway obstruction
Nasal congestion
Nasal bleeding
Chest injuries
Cardiac failure
To relieve bronchospasm (e.g. in asthma) or chest pain (e.g. in angina pectoris)
Forms of Medications
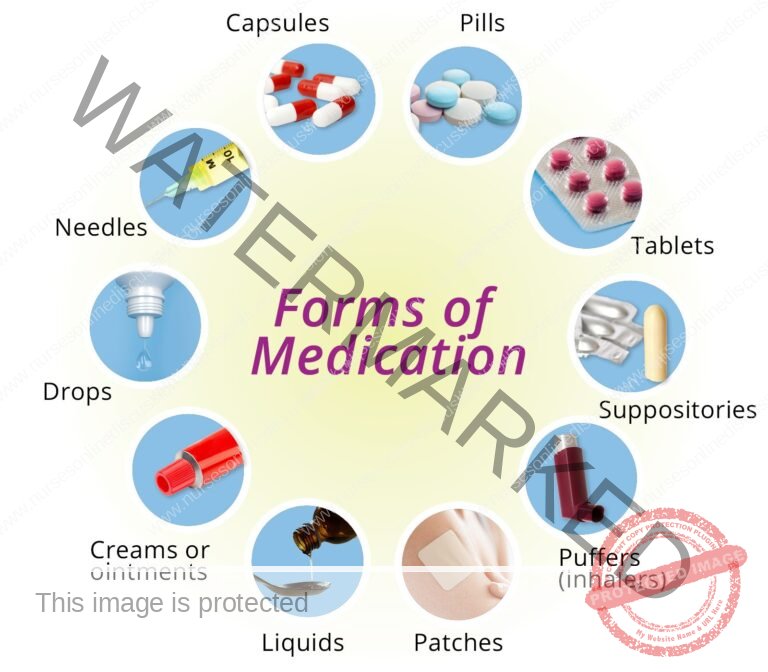
Medications are available in various forms, broadly categorized as liquids, solids, and semisolids.
Liquids:
Solutions: Medications dissolved completely in a liquid, usually water.
Syrups: Medications dissolved in a sugar and water solution, often used to mask unpleasant tastes.
Mixtures: Medications combined with a liquid but not fully dissolved (may require shaking before use).
Milks: White, opaque mixtures of a medicinal substance in water.
Emulsions: Mixtures of oil and water, often containing a medication.
Elixirs: Medications dissolved in a sweetened, flavored, alcohol-containing solution.
Tinctures: Medications dissolved in alcohol or a mixture of alcohol and water.
Fluidextracts: Concentrated liquid extracts of medicinal plants, prepared by boiling and evaporation, and typically dissolved in alcohol.
Liniments: Medications mixed with oil, soap, or alcohol for external use only (applied to the skin).
Lotions: Liquid preparations, often water-based, for external application to the skin.
Solids and Semisolids:
Capsules: Gelatin shells containing medication in liquid, powder, or oil form.
Powders: Finely ground medications, either for internal or external use.
Pills: Round, solid dosage forms, often sugar-coated.
Tablets: Compressed solid dosage forms of various shapes, sizes, and weights.
Enteric-Coated Tablets: Tablets with a special coating that prevents them from dissolving in the stomach, allowing them to be absorbed in the small intestine.
Lozenges (Troches): Hard, disk-shaped medications designed to dissolve slowly in the mouth for local treatment of the mouth or throat.
Ointments: Medications mixed with a fatty or oily base for external application.
Pastes: Ointments with added powders for a thicker consistency.
Suppositories: Medications mixed with a firm base that melts at body temperature, designed for insertion into a body cavity (e.g., rectum, vagina).
Ampoules: Sealed glass containers typically containing a single dose of liquid or powdered medication for injection.
Vials: Glass containers with rubber stoppers, containing either single or multiple doses of liquid or powdered medication for injection.
Common Medication Administration Times
Four Hourly (q4h): Six times in 24 hours (e.g., 6 AM, 10 AM, 2 PM, 6 PM, 10 PM, 2 AM).
Six Hourly (q6h): Four times in 24 hours (e.g., 6 AM, 12 PM, 6 PM, 12 AM).
Eight Hourly (q8h): Three times in 24 hours (e.g., 6 AM, 2 PM, 10 PM).
Twelve Hourly (q12h) or Twice Daily (BID): Two times in 24 hours (e.g., 6 AM and 6 PM).
*Note: these are typical examples, actual administration times may vary based on specific orders and patient needs.
Abbreviations Used in Prescriptions
Aa.: of each
Ad lib.: as much as desired
B.i.d. or b.d.: twice a day
t.d.s. or t.i.d.: three times a day
a.c.: before
P.c.: after
g.: gram
Gr.: grain
Gutt.: a drop
Mane: in the morning
Mist.: a mixture
Nocte: at night
q.h.: every hour
o.m.: every morning
o.n.: every night
p.r.n.:whenever necessary
q.4h: every 4 hours
s.o.s.: if necessary in an
emergency
Stat: immediately
q.i.d.: 4 times a day/every 6 hours
o.d.: once a day.
GENERAL RULES OF DRUG ADMINISTRATION
1. Read the instructions carefully and incase of any doubt ask the Doctor or ward in charge.
2. Never give a drug from a container or a bottle which is not clearly labeled.
3. Check the label against the instructions 3 times .The 1 st time before having the container, 2nd time before the drug is drawn, 3rd time before the drug
is administered to the patient.
4. Give the drug following 10Rs i.e -right patient, right time, right dose, right route, right drug/medication, right formulation, right disposal, right storage, right
equipment and right site.
5. Once a drug is drawn from its container it shouldn’t be returned.
6. Always identify the drug by reading its label on the container not by its color, smell, shape and size.
7. Do not transfer drugs to another container when the old label is still on.
8. Ask for clarification if any order regarding the dose is not readable.
9. Watch all patients for drug reactions, especially parental drugs.
10. If any drug changes its color, it should not be administered.
11. Liquid preparations should always be shaken before drawing from the bottles.
12. Never use a drug which has been left in an unlabeled container.
13. Always measure the dose of the drug in good light.
14. Observe strictly the time of administration of medication.
ORAL ADMINISTRATION
Essential Equipment
Medication Trolley:
Top Level:
- Oral Liquid Medications: Assorted mixtures ready for dispensing.
- Solid Oral Medications: Tablets and capsules in original containers/packaging.
- Dosing Devices: Medicine cups for accurate liquid measurement.
- Utensils for Crushing (if needed): Teaspoon, mortar and pestle for tablet manipulation.
- Hydration Supplies: Jug of fresh drinking water, milk or fruit juice to aid swallowing.
- Drinking Vessels: Glasses for patient fluid intake.
- Medication Records: Patient-specific medication charts.
- Small Tray: Dedicated tray to organise medications for individual patients.
- Scissors: For opening medication packaging.
- Waste Receptacle: Kidney dish for disposal.
Bottom Level:
Cleaning Solution: Bowl containing soapy water for equipment hygiene.
Patient Bedside:
Hand Hygiene Station: Equipment for hand washing (soap, water, paper towels or sanitiser).
Oral Medication Administration Procedure
| Step | Action | Rationale |
| 1. | Adhere to standard nursing protocols. | Upholds safety and precision in every nursing task. |
| 2. | Strictly follow the principles of safe medication administration. | Guarantees medication safety and reduces errors. |
| 3. | Position the medication trolley conveniently at the designated nurse’s station. | Optimises workflow and minimises potential medication errors during preparation. |
| 4. | Prepare medications for one patient at a time, keeping their medication documentation organised together. | Maintains accuracy and avoids mix-ups between patients. |
| 5. | Double-check the medication order against the patient’s chart, medication list, and the medication label itself. | Verifies medication order for correctness. |
| 6. | Perform triple label verification: upon removal from storage, before dispensing, and before restocking. | Multiple checks to ensure the correct medication is selected throughout the process. |
| 7. | For loose tablets/capsules, count the required amount into the container cap and then transfer to the medicine cup; for pre-packaged forms, dispense directly into the cup, retaining the packaging strip. | Minimises handling and potential contamination of tablets/capsules, maintains count accuracy. |
| 8. | When dispensing liquids, hold the medicine cup at eye level and pour to the prescribed level. | Ensures precise measurement of liquid medication. |
| 9. | For small liquid volumes (less than 5ml), utilise a needle-less 5ml syringe for accurate measurement. | Provides a more accurate measurement for smaller liquid doses. |
| 10. | Orient the bottle label upwards, against the palm, when pouring liquid medication. | Prevents label damage from spills and keeps it readable. |
| 11. | Clean the bottle rim before re-capping. | Prevents the bottle cap from adhering due to medication residue. |
| 12. | For medications measured in drops, exclusively use the calibrated dropper provided with that specific liquid. | Ensures correct dosage when administering medications measured in drops as droppers are specific to the medication concentration. |
| 13. | Re-read the medication label just before returning the container to the trolley or storage. | Final verification step to minimise errors before storage. |
| 14. | Place the filled measuring cup on the tray along with a glass of water and then transport it to the patient at the designated administration time. | Facilitates efficient and timely medication delivery to the patient. |
| 15. | Verbally call the patient’s name and cross-reference with room/bed number and medication list prior to administration. | Confirms patient identification immediately before giving medication. |
| 16. | Assess the patient’s current status, including consciousness level and vital signs, especially pulse rate before digitalis administration. | Identifies potential contraindications or pre-existing conditions that might influence medication safety. |
| 17. | Clearly explain the medications to the patient, addressing any concerns or questions they may have. | Respects patient autonomy, promotes understanding, and encourages adherence to the treatment plan. |
| 18. | Assist the patient to an upright sitting or side-lying position. | Reduces the risk of aspiration during swallowing. |
| 19. | Administer each medication individually, accompanied by a glass of water or milk. | Facilitates swallowing and ensures each medication is taken properly. |
| 20. | If swallowing is difficult, crush tablets using a mortar and pestle into a fine powder and mix with a small quantity of water. | Modifies medication form to ease administration for patients with swallowing difficulties. |
| 21. | Prepare crushed medication at the bedside immediately before administration and give it to the patient promptly. | Enhances patient acceptance and ensures immediate administration of modified medication. |
| 22. | Administer effervescent tablets immediately after complete dissolution. | Optimal taste and therapeutic effect of effervescent medications are achieved when administered promptly after dissolving. |
| 23. | If the patient cannot hold the medication cup, assist by bringing the cup to their lips and using a spoon to administer the medication slowly. | Provides necessary support for patients with physical limitations to take their medication safely. |
| 24. | Discard any medication dropped on the floor and obtain a replacement dose. | Maintains medication hygiene and prevents administration of potentially contaminated substances. |
| 25. | Remain with the patient until the medication is fully swallowed; for confused or disoriented patients, verify medication ingestion by checking their mouth. Report any vomiting within 5 minutes to the supervising nurse or physician. Never leave medication unattended at the bedside. | Ensures the patient receives the intended dose at the correct time and prevents medication diversion or accidental overdose. |
| 26. | Ensure the patient is in a comfortable position post-medication. | Promotes patient comfort and well-being following medication administration. |
| 27. | Properly dispose of used supplies, clean the work area, and perform hand hygiene. | Limits the spread of microorganisms and maintains a clean environment. |
| 28. | Document medication administration immediately after giving it, including date, time, and signature. | Provides an accurate record of medication administration for safety and accountability. |
| 29. | Reassess the patient’s response to the medication within approximately one hour, noting any therapeutic or adverse effects. | Monitors medication effectiveness and identifies any potential side effects. |
| 30. | Wash and properly store the medicine cups. | Maintains hygiene and ensures equipment is ready for future use. |
INHALATION
Inhalation refers to the process of breathing in vaporised substances or medications into the respiratory system, specifically the lungs.
Types of Inhalation:
Dry Inhalation (Oxygen Therapy):
Involves the administration of oxygen gas.
Used when the patient’s respiratory function is compromised, such as in cases of:
Chest trauma
Pneumonia
Heart failure
Moist/Steam Inhalation:
Utilises steam or moist air for therapeutic purposes.
Primarily indicated for conditions affecting the airways and nasal passages, such as:
Inflammation of air passages and sinuses.
Purposes of moist/steam inhalation:
Humidification and Soothing: To warm and add moisture to inhaled air, alleviating irritation in conditions like bronchitis, post-tracheotomy care, and other respiratory issues.
Inflammation and Cough Relief: To reduce inflammation and ease coughing, for example, in common colds.
Decongestion and Oedema Reduction: To clear congestion and reduce swelling, such as in sinusitis and acute laryngitis.
Nebuliser Therapy:
Nebulisers are devices that convert liquid medication into a fine mist or vapour, which the patient inhales.
Primary Application: To deliver medication directly to the lungs, for example:
In asthma, to relax constricted bronchial tubes and ease breathing.
To manage chest pain associated with angina pectoris.
Other Clinical Applications: Nebulisers are also indicated in managing a range of respiratory conditions and related issues, including:
Respiratory illnesses like asthma and pneumonia.
Airway blockage.
Nasal congestion.
Nasal haemorrhage.
Chest injuries.
Heart failure.
DRY INHALATION (Oxygen administration)
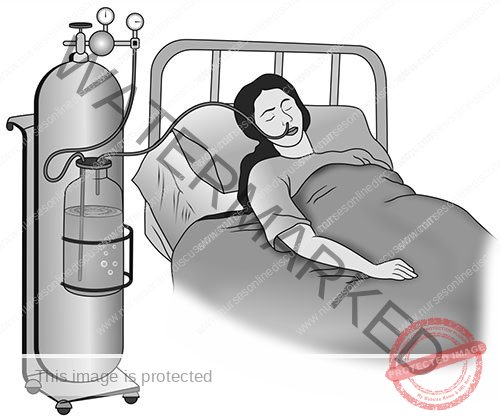
Oxygen administration, also known as dry inhalation, is the delivery of oxygen when a patient’s respiratory function is compromised, such as in cases of chest injuries, heart failure, or pneumonia.
Essential Equipment for Oxygen Administration
Equipment Tray:
Oxygen Delivery Devices:
Rubber tubing for oxygen flow.
BLB (Blow-By) oxygen mask for higher oxygen concentrations.
Nasal cannula/catheter for lower to moderate oxygen concentrations.
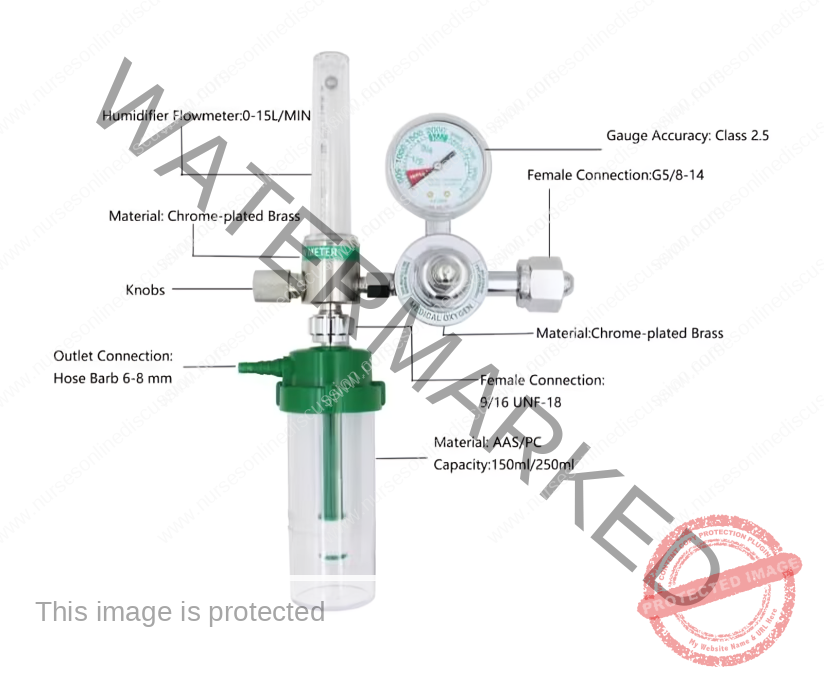
Oxygen Regulation & Monitoring:
Flowmeter to control and measure oxygen delivery rate.
Patient Comfort & Hygiene:
Gallipot containing gauze pads for skin protection.
Humidifier bottle with sterile distilled water to moisturise oxygen.
Preparation & Setup:
Clean tray to organise equipment.
Bedside Items:
Oxygen Source: Wall oxygen outlet or portable oxygen cylinder.
Privacy Screen: To ensure patient privacy during the procedure.
Oxygen Administration Procedure
| Step | Action | Rationale |
| 1. | Adhere to standard nursing safety protocols. | Maintains consistent and safe practice. |
| 2. | Before taking equipment to the bedside, activate and check the oxygen cylinder for proper function. | Saves time and effort by ensuring equipment is functional before patient interaction. |
| 3. | Confirm the patient’s need for oxygen therapy and verify the physician’s specific orders regarding flow rate, delivery device, and oxygen concentration. | Minimises the chance of errors in oxygen delivery by confirming prescribed parameters. |
| 4. | Position the patient comfortably, ideally in an upright (sitting) or semi-upright (side-lying) position. | Enhances respiratory effort and patient comfort during oxygen administration. |
| 5. | For Nasal Cannula Use: Connect the nasal cannula to the oxygen setup including the humidifier; confirm oxygen flow from the cannula prongs. | Humidification prevents drying of delicate mucous membranes in the nasal passages. |
| 6. | Gently insert the cannula prongs into the patient’s nostrils (approximately 2 inches). Secure tubing over and behind each ear, adjusting the slider comfortably under the chin. Alternatively, position tubing around the head, securing the adjuster at the back, and place gauze pads under tubing at ears if needed. | Ensures effective oxygen delivery and maximises patient comfort. Padding reduces potential skin irritation and pressure points. |
| 7. | Encourage the patient to primarily breathe through their nose, keeping their mouth closed as much as possible. | Nasal breathing promotes optimal oxygen intake and delivery. |
| 8. | For BLB Mask Use: Attach the face mask to the oxygen source and initiate oxygen flow at the prescribed rate. For masks with a reservoir bag, allow the bag to inflate with oxygen before proceeding. | The reservoir bag serves as an immediate source of oxygen for inhalation, particularly important for higher flow rates. |
| 9. | Carefully position the face mask to cover both the patient’s nose and mouth. Secure the elastic strap around the patient’s head and adjust the oxygen flow rate as prescribed. | A properly fitted mask minimises oxygen leakage and ensures effective delivery. |
| 10. | Apply soft padding behind the ears and on the scalp where the elastic band makes contact. | Prevents potential skin breakdown and irritation from prolonged mask use. |
| 11. | Regularly reassess the patient’s respiratory status, noting respiratory rate, breathing effort, and auscultating lung sounds. | Evaluates the effectiveness of the oxygen therapy and guides adjustments as needed. |
| 12. | Document all relevant details of the oxygen administration in the patient’s medical record, including date, time, flow rate, device used, and patient response. | Maintains accurate and comprehensive patient records for continuity of care and accountability. |
Parts of an Oxygen Flowmeter
PARENTERAL ROUTE (INJECTION)
Essential Supplies
Medication Trolley
Top Shelf:
Small Organising Tray: For efficient arrangement of items.
Sterile Injection Equipment: Syringes and needles in various sizes and capacities, appropriately selected for different injections.
Sterile Medications: Prescribed injectable drugs in sealed ampoules or vials.
Patient Documentation: Patient-specific medical charts and medication lists.
Swab Container: Gallipot holding sterile swabs.
Antiseptic Solution: Gallipot containing skin disinfectant.
Ampoule Opener: File for safely opening glass ampoules.
Sterile Diluent: Water for injection to reconstitute medications if needed.
Injection Trays/Dishes: Sterile trays to hold prepared syringes.
Tourniquet: To distend veins for intravenous access.
IV Cannula (if required): Appropriately sized cannula for intravenous injections/infusions.
Securement Dressing: Strapping or tape to secure dressings or cannulas.
Scissors: For dressing or tape manipulation.
Clean Gloves: For maintaining aseptic technique.
Bottom Shelf:
- Sharps Disposal Container: Safety box for immediate disposal of needles and sharps.
- Waste Container for Soiled Items: Receiver for used swabs and dressings.
- Waste Container for Used Gloves: Receiver specifically for disposable gloves.
- Arm Support: Small pillow to comfortably position the patient’s arm.
- Waterproof Sheet & Protective Layer: Macintosh and towel to protect bedding
Bedside Supplies
Privacy Screen: For patient modesty.
Hand Hygiene Station: Equipment for hand washing (soap, water, paper towels or sanitiser).
Procedure
A. Intradermal or Intracutaneous Injection
| Step | Action | Rationale |
| 1. | Apply standard injection and medication administration guidelines. | |
| 2. | Select a Tuberculin syringe or a 1 mL syringe with appropriate fine-gauge needles. | |
| 3. | Confirm patient identity and assist them into a comfortable position. | |
| 4. | Disinfect the chosen skin site with an antiseptic swab and allow complete air drying. | Prepares a sterile injection field. |
| 5. | For BCG vaccination, cleanse the area using sterile water instead of antiseptic. | |
| 6. | Gently stretch and tighten the patient’s skin at the injection site, then insert the needle almost parallel to the skin surface, bevel upwards. | |
| 7. | Slowly and steadily inject the medication, observing for the formation of a small, raised wheal on the skin. | Confirms correct intradermal administration. |
| 8. | Carefully and smoothly withdraw the needle. | Minimises tissue trauma. |
| 9. | Avoid massaging the injection site post-needle removal. | Prevents distortion of test results if diagnostic. |
| 10. | Encircle the injection site with a pen, noting the time, and instruct the patient not to wash the area until assessment. | For accurate interpretation of reaction, particularly in diagnostic tests. |
| 11. | Examine the site for any reaction at the prescribed time interval. | Evaluates the body’s response to the injected substance. |
| 12. | Document and report the observed results according to protocol. | Maintains accurate patient records and facilitates follow-up. |
| 13. | Safely dispose of all used equipment following infection control guidelines. | Prevents cross-contamination and ensures safety. |
B. Subcutaneous Injection or Hypodermic
| Step | Action | Rationale |
| 14. | Assist the patient to a position that provides clear access to the chosen injection site. | Ensures optimal visibility and access to the selected area. |
| 15. | Select an appropriate needle gauge; prepare a 1 mL or 2 mL syringe based on the prescribed medication volume. | Needle gauge and syringe size should match medication and patient factors. |
| 16. | Draw up the correct dose of medication into the syringe using aseptic technique. | Ensures accurate dosage and prevents contamination. |
| 17. | Remove any air from the syringe by holding it upright and gently expelling air. | Prevents injection of air into tissues. |
| 18. | Place the prepared syringe in a designated sterile injection dish until administration. | Maintains sterility prior to injection. |
| 19. | Explain the procedure to the patient, emphasizing the importance of remaining still during injection. | Promotes patient cooperation, reduces anxiety, and ensures a safe injection. |
| 20. | Identify the selected subcutaneous site and cleanse it thoroughly with an antiseptic swab; allow to air dry. | Creates a sterile field and minimises risk of infection. |
| 21. | Gently pinch or bunch the patient’s skin between your fingers and thumb and insert the needle at a 45° angle. | Elevates subcutaneous tissue for easier and less painful needle insertion. |
| 22. | Aspirate by gently pulling back the syringe plunger and then slowly inject the medication. | Checks for inadvertent entry into a blood vessel before medication administration. |
| 23. | Once medication is fully injected, place a swab over the injection site, quickly withdraw the needle smoothly. | Reduces discomfort and prevents medication leakage. |
| 24. | If any bleeding occurs at the site, apply firm, gentle pressure with a sterile swab until bleeding stops. | Promotes haemostasis and prevents hematoma formation. |
| 25. | Ensure patient comfort and document the administered medication details on the patient’s medication record. | Promotes well-being and maintains accurate treatment documentation. |
| 26. | Dispose of syringe, needles, gloves, and swabs in designated containers following safety protocols. | Adheres to infection control practices and prevents sharps injuries. |
C. Intramuscular Injection
| Step | Action | Rationale |
| 27. | Adhere to all general nursing and safety guidelines. | Ensures consistent and safe nursing practice. |
| 28. | Carefully review the medication prescription, double-checking medication name and dosage with another nurse. | Reduces the possibility of medication errors through verification. |
| 29. | Assemble the syringe and needle, and put on clean gloves. | Prepares equipment and maintains aseptic technique. |
| 30. | Open the ampoule using a gauze swab or ampoule file, or remove the vial’s rubber cap as appropriate. | Safely accesses the medication within the container. |
| 31. | If using powdered medication, reconstitute it according to the manufacturer’s instructions on the vial. | Ensures correct medication preparation and concentration. |
| 32. | Don gloves and draw up the prescribed medication dose into the syringe, maintaining aseptic technique. | Prevents contamination and ensures accurate dosage. |
| 33. | Expel air from the syringe; when using multi-dose vials or certain antibiotics, expel air into the vial itself. | Prevents air injection and maintains pressure equilibrium in multi-dose vials. |
| 34. | Position the patient appropriately based on the selected intramuscular injection site. | Correct positioning promotes muscle relaxation, facilitating injection. |
| 35. | Select, locate, and thoroughly cleanse the injection site with antiseptic; allow to air dry completely. | Creates a sterile injection field to minimise infection risk. |
| 36. | To administer medication, grasp and bunch the tissue surrounding the injection site or spread the skin as indicated. | Technique varies based on muscle mass and patient factors to aid needle penetration. |
| 37. | Hold the syringe securely between thumb and forefinger and swiftly insert the needle into the skin at a 90° angle. | Ensures proper intramuscular depth and medication delivery. |
| 38. | Aspirate by pulling back slightly on the plunger with your non-dominant hand while stabilising the syringe. | Checks for accidental needle entry into a blood vessel before injecting medication. |
| 39. | If no blood appears during aspiration, slowly and steadily inject the medication. | Promotes medication dispersion within the muscle tissue and reduces patient discomfort. |
| 40. | Withdraw the needle smoothly and steadily, supporting the syringe hub and needle. Simultaneously, support the skin surface with a cotton swab to provide counter-traction. | Minimises discomfort and prevents tissue pulling during needle withdrawal. |
| 41. | Apply gentle pressure to the injection site using a dry cotton swab, but avoid massaging the area. | Pressure aids haemostasis; massage can irritate intramuscular tissues. |
| 42. | Safely discard the uncapped needle and syringe immediately into a sharps container. | Prevents needlestick injuries and ensures safe disposal. |
| 43. | Clear away used equipment, remove gloves, and perform hand hygiene. | Maintains a clean environment and prevents infection spread. |
| 44. | Document the procedure including medication name, dose, injection site, and patient’s response in the medical record. | Ensures accurate record-keeping and facilitates monitoring of treatment effectiveness and patient safety. |
D. Intravenous Injection
| Step | Action | Rationale |
| 45. | Prepare the injection tray with all necessary equipment and bring it to the patient’s bedside. | Ensures all supplies are readily available at the point of care, streamlining the procedure. |
| 46. | Verify patient identity and clearly explain the intravenous injection procedure to the patient. | Confirms correct patient and reduces anxiety through informed consent and preparation. |
| 47. | Provide privacy by screening the bed and put on clean gloves. | Respects patient dignity and adheres to infection control measures. |
| 48. | Place a small pillow and a protective sheet under the patient’s arm. | Enhances patient comfort and protects bed linen from potential spills or bleeding. |
| 49. | Expose the patient’s forearm and the anterior surface of the elbow to visualise potential injection sites. | Provides clear access to common intravenous injection sites. |
| 50. | Examine the veins in the selected area for suitability. If a suitable vein is identified, apply a tourniquet or inflate a sphygmomanometer cuff on the upper arm, approximately 8-10 cm above the intended site. | Tourniquet or cuff distends veins, making them more prominent and easier to cannulate. |
| 51. | Instruct the patient to repeatedly open and close their fist for about a minute. | Promotes venous filling and dilation, improving vein visibility and accessibility. |
| 52. | Thoroughly cleanse the chosen venipuncture site with antiseptic solution and allow it to dry completely with a sterile swab. | Reduces skin microorganisms and minimises the risk of bloodstream infection. |
| 53. | Expel any air from the syringe prior to injection. | Ensures accurate medication delivery and prevents the introduction of air into the venous system. |
| 54. | Hold the patient’s arm steady. With your non-dominant thumb, apply gentle pressure approximately 3 cm below the chosen site and pull the skin taut. | Stabilises the vein, prevents rolling, and facilitates needle entry. |
| 55. | Insert the needle at a shallow angle (15-45 degrees), bevel up, directly into the vein in a swift, controlled motion. Aspirate slightly by pulling back the plunger to confirm blood return. | Ensures successful venipuncture and confirms needle placement within the vein lumen. |
| 56. | Remove the tourniquet or deflate the blood pressure cuff and slowly inject the medication at the prescribed rate. | Prevents excessive venous pressure and ensures controlled medication administration. |
| 57. | Once medication is administered, place a sterile swab directly over the injection site and swiftly withdraw the needle. | Minimises blood leakage and maintains a clean puncture site. |
| 58. | Apply firm pressure to the site with a swab for several seconds to ensure haemostasis. If bleeding persists, apply a swab and secure with adhesive strapping. | Prevents bleeding and haematoma formation at the venipuncture site. |
| 59. | Document the administered medication in the patient’s medical chart and clear away used equipment. | Maintains accurate patient records and ensures a tidy and safe environment. |
COMPLICATIONS OF INTRAVENOUS INJECTIONS
Incorrect IV Placement: Accidental insertion of the IV catheter into an unintended vessel, such as an artery instead of a vein, can have serious negative health consequences.
Medication Administration Errors: Mistakes in drug identification, incorrect dosage calculation, or mixing incompatible medications can lead to significant adverse reactions in patients.
Rapid Infusion & Adverse Reactions: Delivering intravenous medications too quickly can overwhelm the body, potentially causing issues like low blood pressure (hypotension), irregular heartbeats (cardiac arrhythmias), allergic responses, and fluid overload.
Thrombophlebitis: Inflammation of the vein wall, frequently accompanied by blood clot formation, can arise from repeated IV access, poor insertion technique, or irritation from certain medications.
Fluid Overload (Circulatory Overload): Administering excessive intravenous fluids or infusing them too rapidly can overwhelm the circulatory system, leading to fluid accumulation and stress on the heart and lungs.
Embolism: Blockage of a blood vessel by a moving clot, air bubble, or foreign material. This can be a consequence of thrombophlebitis, improper IV insertion, or air entering the IV line.
Shock: A critical condition marked by severely reduced blood flow to vital organs, potentially triggered by severe allergic reactions, significant blood loss, or overwhelming infection (sepsis).
Infiltration/Extravasation: Leakage of IV fluids or medications out of the vein and into the surrounding tissues, causing localised pain, swelling, and possible tissue damage.
Phlebitis: Inflammation of a vein without clot formation, often caused by mechanical or chemical irritation from the IV catheter itself or the infused medication.
Air Embolism: Introduction of air into the bloodstream via the IV line, which can travel to the heart or lungs and create a blockage, possibly leading to breathing difficulties or cardiac arrest.
Catheter-Related Bloodstream Infection (CRBSI): A severe infection where bacteria gain entry to the bloodstream through the IV catheter, resulting in symptoms like fever, chills and potentially progressing to sepsis.
Nerve Injury: Damage to nearby nerves due to incorrect IV catheter placement can result in symptoms such as pain, numbness, or muscle weakness in the affected area.
Hematoma: Collection of blood in the tissues surrounding the IV puncture site, presenting as bruising or swelling.
Phlebosclerosis: Hardening or thickening of the vein wall due to repeated intravenous punctures or irritation from the indwelling catheter.
Common Sites for Intramuscular Injections
Gluteal Muscle (Buttock): The upper outer quadrant of the buttock is considered the safest location due to its distance from the sciatic nerve and major blood vessels.
Thigh Muscles (Vastus Lateralis/Rectus Femoris): The upper outer region of the thigh muscles provides a suitable site, especially in adults and children.
Deltoid Muscle (Upper Arm): The deltoid muscle in the upper arm can be used for smaller volume injections (up to 2 mL) only if the muscle is adequately developed. This site carries a higher risk of nerve injury and is generally avoided when other sites are available.
COMPLICATIONS OF INTRAMUSCULAR INJECTIONS
Abscess Formation: Development of a pus-filled cavity at the injection site, typically caused by non-sterile technique or when certain medications are not injected deeply enough into muscle tissue.
Prevention: Strict adherence to sterile procedures, proper needle selection for depth, and ensuring oily solutions are injected into deep muscle layers are critical preventive measures.
Nerve Injury: Damage to nerves in proximity to the injection site due to improper needle placement, potentially causing pain, sensory loss (numbness), weakness, or paralysis.
Prevention: Comprehensive understanding of anatomy, accurate identification of anatomical landmarks, and careful needle insertion techniques are essential to prevent nerve damage.
Tissue Damage/Necrosis: Injury and death of tissue cells at the injection site resulting from injecting excessive volumes of medication, using irritating substances, or repeated injections in the same area.
Prevention: Administering appropriate medication volumes, selecting less irritating formulations where possible, and consistently rotating injection sites can minimise tissue damage.
Hematoma: Formation of a bruise or swelling due to blood leakage into surrounding tissues from the injection site.
Prevention: Applying direct pressure to the injection site immediately after injection is a key step in preventing hematoma formation.
Pain and Discomfort: Intramuscular injections can cause pain, particularly if the medication is irritating or if the injection technique is not performed correctly.
Prevention: Employing proper injection technique, selecting an appropriate needle size, and allowing cold medications to warm to room temperature before injection can help reduce pain.
Allergic Reactions: Adverse immune responses to the injected medication or components of the medication solution.
Prevention: Thoroughly reviewing patient allergy history, performing allergy testing when indicated, and closely monitoring for any signs of allergic reaction after injection are crucial safety measures.
Injection into a Blood Vessel: Unintentional entry of the needle into a blood vessel during intramuscular injection, potentially leading to rapid drug absorption and complications like overdose or embolism.
Prevention: Aspirating (pulling back on the syringe plunger) before injecting is a standard practice to verify that the needle is not positioned within a blood vessel.
Delayed-Onset Muscle Soreness: Muscle pain, tenderness, or stiffness that may develop hours or even days after an intramuscular injection, often depending on the medication.
Prevention: There is no specific prevention, but advising patients to stay well-hydrated and avoid strenuous activity immediately following injection may be beneficial.
Infection: Infection at the injection site due to breaches in sterile technique during the injection process.
Prevention: Strict adherence to aseptic technique throughout the preparation and administration of intramuscular injections is paramount to prevent infection.
Air Embolism: Though rare, the introduction of air into the bloodstream during intramuscular injection can lead to serious complications such as respiratory distress or cardiac arrest.
Prevention: Using meticulous technique to ensure no air is drawn into the syringe or needle during medication preparation is essential to prevent air embolism.
Formula for Calculating Intravenous Drip Rate
To determine the intravenous (IV) drip rate, the following calculation is used:
Drip Rate (drops per minute) = (Total Volume in mL × Drop Factor) / Total Time in minutes
Example Calculation:
A physician orders 1200 mL of normal saline solution to be administered over 12 hours. The IV administration set has a drop factor of 15 drops per mL. Calculate the required drip rate in drops per minute.
Solution:
Total Volume: 1200 mL
Drop Factor: 15 drops/mL
Total Time in minutes: 12 hours × 60 minutes/hour = 720 minutes
Calculation:
Drip Rate = (1200 mL × 15 drops/mL) / 720 minutes
Drip Rate = 18000 drops / 720 minutes
Drip Rate ≈ 25 drops per minute
Therefore, the IV infusion should be regulated to approximately 25 drops per minute.
Factors Influencing Intravenous Infusion Flow Rate
Several factors can alter the intended flow rate of an intravenous infusion:
Infusion Solution Container Height: Elevating the IV fluid bag or bottle will increase the gravitational pressure, thus speeding up the infusion rate. Conversely, lowering the container will decrease the flow rate.
Infusion Set and Cannula Patency: Obstructions within the IV tubing or cannula, such as a blood clot formation, can significantly reduce or halt the infusion. This is more likely to occur if there are delays in replacing an empty fluid bag.
Tubing Kinks and Cannula Position: Bending or twisting of the IV tubing can impede flow. Similarly, if the cannula tip is positioned against the vein wall or has migrated out of the vein, the flow may be affected.
External Pressure (Tight Restraints): Applying external pressure, such as a tight bandage or splint situated above or at the IV insertion site, can compress the vein and restrict the infusion rate.
Air Vent Obstruction: If the air vent of the IV container is blocked, it creates a closed system and prevents air from entering as the fluid drains. This vacuum effect will stop the IV infusion.
Patient Care During Intravenous Infusion
Continuous monitoring and careful management are essential for patients receiving intravenous infusions:
Precise Documentation: Maintain a detailed record of the IV therapy. This includes noting the initiation time, the specific type of intravenous fluid, the total volume infused, and the prescribed infusion rate. This detailed record is crucial for tracking fluid balance and therapy progression.
Regular Patient Observation: Conduct frequent assessments of the patient’s condition to detect any adverse reactions or complications. Monitor for indicators such as pain at the insertion site, excessive sweating, restlessness or agitation, or any changes in vital signs that may suggest a problem. Prompt identification of issues is key to timely intervention.
Routine Insertion Site Examination: Regularly check the intravenous (IV) insertion site for any indications of fluid leakage into surrounding tissue (infiltration). Look for signs like swelling, coolness to touch, pain, or redness at the site, which may suggest fluid is not flowing correctly within the vein.
Consistent Patient Status Monitoring: Frequently assess and document the patient’s overall condition. This includes regularly measuring and recording vital signs (like heart rate, blood pressure, temperature, and respiratory rate), as well as observing for any new symptoms or changes in their general well-being. This ongoing monitoring helps to detect any complications or responses to the IV therapy.
Daily Site Hygiene: For prolonged intravenous infusions lasting multiple days, perform daily cleansing of the skin area surrounding the IV insertion point. Use sterile gauze and an appropriate antiseptic solution, following established protocols, to maintain cleanliness and reduce the risk of infection at the site.
Join Our WhatsApp Groups!
Are you a nursing or midwifery student looking for a space to connect, ask questions, share notes, and learn from peers?
Join our WhatsApp discussion groups today!
Join NowRelated Topics
Foundations of Nursing (III)
- Apply Nursing process to the management of patients
- Administer prescribed medicine appropriately
- Instilling medication (general)
- Blood transfusion
Specialized Nursing Care Procedures
- Perform Shortening and removal of drains
- Perform Colostomy Care
- Prepare Abdominis Paracentesis (Abdominal Tapping)
- Prepare Lumbar Puncture
- Perform Gastrostomy Feeding
- Carry out gastric Lavage
- Perform Tracheostomy Care
- Ophthalmological Care
- Care of the patient`s ears
- Pre-Operative Eye Care
- Ear Care
- Peri-Operative Care:
- Orthopedic Nursing Care
- Prepare for Neurological Assessment
We are a supportive platform dedicated to empowering student nurses and midwives through quality educational resources, career guidance, and a vibrant community. Join us to connect, learn, and grow in your healthcare journey
Quick Links
Our Courses
Legal / Policies
Get in Touch
(+256) 790 036 252
(+256) 748 324 644
Info@nursesonlinediscussion.com
Kampala ,Uganda
© 2026 Nurses online discussion. All Rights Reserved