Introduction to Midwifery
Normal Second Stage of Labour
Table of Contents
Normal Second Stage of Labour
Learning Objectives
Define the second stage of labour and identify its premonitory and confirmatory signs.
Differentiate between the passive (latent) and active (expulsive) phases of the second stage.
Describe the physiology of the second stage, including descent, uterine action, bearing down, and crowning.
Explain the mechanism of labour in vertex presentation, including engagement, flexion, rotation, extension, restitution, and expulsion.
Identify factors influencing the length of the second stage and recognize possible complications.
Outline principles of active management, nursing care, and immediate newborn care during the second stage of labour
The second stage of labor begins with complete cervical dilation (10cm) and ends with the birth of the baby.
Signs of second stage labor include
Premonitory Signs (May Indicate Approaching Second Stage):
Expulsive Uterine Contractions: Strong, bearing-down contractions may occur even before full dilation, particularly in cases of:
Occiput Posterior Position (baby’s head facing mother’s back)
Full Rectum (creating pressure)
Rupture of Forewaters: Amniotic sac rupture can happen at any point in labor, including as a premonitory sign of the second stage.
Anal Dilation and Gaping: Widening and opening of the anus may occur due to:
Deep Engagement of the Fetal Head
Premature Maternal Pushing Efforts in the late first stage
Appearance of Presenting Part: The baby’s head (or presenting part) may become visible at the vulva.
Excessive Molding: Can cause significant swelling (caput succedaneum) on the baby’s scalp, potentially protruding through the cervix before full dilation.
Breech Presentation: In a breech birth, the baby’s buttocks or feet may be visible even when the cervix is only 7-8 cm dilated.
Show: Increased bloody mucus discharge. Differentiate from:
Placental Abruption Bleeding
Cervical or Vaginal Laceration Bleeding (from descent)
Vulvar Congestion: Swelling and increased blood flow to the vulva, often due to premature pushing.
Bulging Perineum: The tissue between the vagina and anus starts to bulge outwards.
Confirmatory Sign (Definitive Sign of Second Stage):
Cervical Examination (VE) – No Cervix Felt: A vaginal exam confirms full cervical dilation (10cm), meaning the cervix is no longer palpable as a rim around the baby’s head.
Stages within the Second Stage:
Passive (Latent):
Cervix fully dilated (10cm).
No involuntary, forceful pushing contractions yet.
Can last up to one hour in normal labor progression.
Active (Expulsive):
Cervix fully dilated (10cm).
Involuntary, expulsive contractions begin.
Baby’s head becomes visible at the vaginal opening.
Prolonged Active Stage: Notify a doctor if delivery hasn’t occurred after:
2 hours for first-time mothers (primigravida)
1 hour for mothers who have given birth before (multigravida)
Phases within the Second Stage:
Propulsive Phase:
From full cervical dilation until the baby’s presenting part descends to reach the pelvic floor.
Expulsive Phase:
Marked by the mother’s active pushing efforts (bearing down) in response to contractions.
Ends with the birth of the baby.
Physiology of second stage
Descent:
Fetal descent, which starts in the first stage, accelerates in the second stage.
Rapid descent continues until the baby reaches the pelvic floor.
Uterine Action (Contractions):
Contractions become stronger and longer, but may be less frequent than in the first stage.
Resting Phase: Longer rest periods between contractions allow the mother and baby to recover. This rest phase can last up to an hour, especially in first-time mothers.
Intensity: Contractions are very strong and expulsive in nature, designed to push the baby down.
Membrane Rupture: If membranes haven’t ruptured, they often rupture spontaneously at the start of the second stage, releasing amniotic fluid. This allows the baby’s head to directly contact and stretch vaginal tissues, aiding dilation.
Fetal Axis Pressure and Flexion: Pressure from contractions increases fetal head flexion, resulting in smaller presenting diameters of the head, which facilitates faster progress and reduces trauma for both mother and baby.
Bearing Down Urge: As the baby descends further into the vagina, pressure on the pelvic floor stimulates nerve receptors, creating the urge to push (bearing down reflex).
Maternal Effort: Contractions become increasingly powerful and overwhelming, and the mother instinctively pushes by contracting her abdominal muscles and diaphragm to aid expulsion.
Soft Tissue Displacement:
As the baby descends, pelvic soft tissues are displaced and adapted:
Bladder: Pushed upwards into the abdomen, reducing risk of injury. Urethra stretches and thins.
Rectum: Flattened in the curve of the sacrum. Any remaining stool is expelled.
Levator Ani Muscles: Dilate, thin, and move laterally.
Perineal Body: Flattens, stretches, and thins significantly.
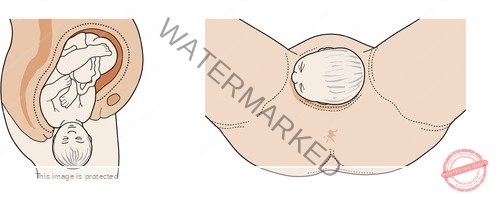
Crowning: Fetal head becomes visible at the vulva, advancing with each contraction and slightly receding between contractions, until crowning occurs (head no longer recedes).
Birth: Head is born, followed by shoulders and body with the next contraction, often accompanied by a gush of amniotic fluid and some blood.
Mechanism of Labour
Mechanism of Labour Defined: The series of movements the fetus makes as it passes through the birth canal to be born vaginally. It’s how the baby navigates the bony pelvis.
Passive Fetal Movements: These movements are largely passive, guided by the shape of the mother’s pelvis and the forces of labor.
Mechanism for Each Presentation: There’s a specific mechanism (set of movements) for each fetal presentation and position that allows for vaginal delivery.
Principles Common to All Mechanisms of Labour:
Descent Throughout: Descent (baby moving down) is continuous throughout labor.
Rotation to Anterior: The part of the baby that first encounters the pelvic floor’s resistance will rotate forward (anteriorly) to position itself under the pubic bone.
Pivoting Under Symphysis Pubis: The part that emerges first will pivot or leverage around the pubic bone to facilitate further passage.
Pelvic Diameter Adaptation: The fetus rotates slightly to align itself with the widest diameters of the pelvis at different levels:
Transverse Diameter at the Pelvic Brim (inlet)
Anteroposterior Diameter at the Pelvic Outlet
TERMS USED IN MECHANISM OF LABOUR
Attitude: The posture of the fetus, specifically the relationship of the fetal head and limbs to its trunk.
Ideal Attitude: Complete flexion (chin tucked to chest, limbs flexed). Flexion allows the smallest head diameters to present, easing labor.
Presentation: The part of the fetus that is lowest in the uterus and positioned to enter the pelvic inlet first.
Normal Presentation: Vertex presentation (head first).
Lie: The orientation of the fetus’s long axis (spine) in relation to the mother’s long axis (spine/uterus).
Normal Lie: Longitudinal lie (fetal spine parallel to maternal spine), occurring in the vast majority (99.5%) of labors.
Position: Describes the location of a specific reference point (denominator) on the presenting part relative to quadrants of the maternal pelvis (Right, Left, Anterior, Posterior, Transverse/Lateral).
Denominator: A specific point on the presenting part used for reference:
Vertex Presentation: Occiput (back of baby’s head)
Breech Presentation: Sacrum (baby’s tailbone)
Face Presentation: Mentum (baby’s chin)
Positions Examples (Vertex Presentation – Occiput as Denominator):
Right Occipitoanterior (ROA): Occiput points to the mother’s right front. Sagittal suture in the left oblique diameter of pelvis.
Left Occipitoanterior (LOA): Occiput points to the mother’s left front. Sagittal suture in the right oblique diameter of pelvis.
Right Occipitoposterior (ROP): Occiput points to the mother’s right back. Sagittal suture in the right oblique diameter of pelvis.
Left Occipitoposterior (LOP): Occiput points to the mother’s left back. Sagittal suture in the left oblique diameter of pelvis.
Right Occipitolateral (ROL): Occiput points to the mother’s right side (midway between front and back). Sagittal suture in the transverse diameter of pelvis.
Left Occipitolateral (LOL): Occiput points to the mother’s left side (midway between front and back). Sagittal suture in the transverse diameter of pelvis.
Presenting Part: The specific fetal part that is foremost and directly over the internal cervical os (opening of the cervix).
Denominator: The anatomical landmark on the presenting part used to define fetal position (see examples above: occiput, sacrum, mentum).
In the Mechanism of Normal Vertex Labour (Occipitoanterior Position):
Attitude: Complete flexion.
Lie: Longitudinal.
Presentation: Cephalic (vertex).
Position: Typically Right Occipitoanterior (ROA) or Left Occipitoanterior (LOA).
Denominator: Occiput.
Presenting Diameters: Biparietal and occipitofrontal diameters of the fetal head.
Engaging Diameters: Biparietal (transverse diameter of pelvic brim) and suboccipitofrontal (anteroposterior diameter of pelvic brim).
MAIN MOVEMENTS IN MECHANISM OF LABOUR (VERTEX PRESENTATION)
Engagement:
Definition: Fetal head enters the pelvic inlet. Occurs when the widest diameters of the head (biparietal and suboccipitofrontal) pass through the pelvic brim (pelvic inlet).
Timing: In first pregnancies (primigravidas), engagement often happens before labor begins. In subsequent pregnancies (multigravidas), it typically occurs in the late first stage of labor.
Descent:
Continuous Movement: Baby moves downwards through the pelvis throughout the first and second stages of labor.
Accelerated Descent: Descent speeds up significantly in the second stage, especially after membranes rupture and with maternal pushing.
Facilitating Factors:
Uterine contractions and retraction
Maternal bearing-down efforts
Fetal body straightening after membrane rupture
Flexion:
Initial Attitude: At labor’s onset, head is already flexed (ROA or LOA position). Suboccipitofrontal diameter (10cm) presents.
Increased Flexion: Resistance from pelvic tissues (lower uterus, pelvic walls, cervix, pelvic floor) causes the head to flex even more.
Optimal Diameter: With full flexion, the smaller suboccipitobregmatic diameter (9.5cm) becomes the presenting diameter, and the occiput becomes the leading point.
Internal Rotation of the Head:
Pelvic Floor Encounter: As the head descends onto the pelvic floor during a contraction, it meets resistance from the pelvic floor muscles.
Forward Rotation: The head rotates anteriorly (forwards) about 1/8 of a circle.
Occiput Under Pubis: Rotation positions the occiput (back of head) directly under the symphysis pubis (front of pelvic bone).
Crowning:
Definition: Occiput (back of the head) emerges under the pubic bone and remains visible – it no longer retracts between contractions.
Widest Diameter Born: Crowning signifies that the widest part of the head (biparietal diameter) has passed through the pelvic outlet.
Continued Flexion: If flexion is maintained, the suboccipitobregmatic diameter (9.5cm) distends the vaginal opening.
Extension of the Head:
Pivoting on Subocciput: After crowning, the head extends (tilts back) around the suboccipital region, pivoting on the pubic bone as a fulcrum.
Birth by Extension: This extension movement allows the sinciput (forehead), face, and chin to sweep over the perineum and be born.
Restitution:
Definition: Head spontaneously rotates slightly backwards (externally) after birth, correcting the slight twist in the neck that occurred during internal rotation.
Direction: Occiput rotates about 1/8 of a circle back towards its original side (transverse position).
Internal Rotation of the Shoulders:
Shoulder Entry: Shoulders enter the pelvic inlet in an oblique diameter.
Anterior Shoulder Rotation: The anterior shoulder (closest to the pubic bone) reaches the pelvic floor first and rotates anteriorly (forwards) about 1/8 of a circle.
Shoulder Alignment: This rotation aligns the shoulders into the anteroposterior (AP) diameter of the pelvic outlet, positioned under the symphysis pubis.
External Head Rotation Link: Internal shoulder rotation happens simultaneously with external rotation of the head. Head turns further to the side. Occiput now points laterally.
External Rotation of the Head:
Simultaneous with Shoulder Rotation: Occurs at the same time as internal rotation of the shoulders. The head’s rotation is externally visible.
Lateral Flexion (Expulsion of Body):
Anterior Shoulder Birth: The anterior shoulder emerges from under the symphysis pubis.
Posterior Shoulder Birth: The posterior shoulder then sweeps over the perineum and is born.
Body Follows: The rest of the baby’s body is born quickly by lateral flexion (sideways bending) towards the mother’s abdomen, completing the delivery.
Factors Influencing the Length of the 2nd Stage of Labour:
Maternal Parity: First-time mothers (primiparas) typically have longer second stages than mothers who have given birth before (multiparas).
Fetal Size: Larger babies may take longer to deliver.
Force of Uterine Contractions: Strong, effective contractions facilitate faster progress.
Presentation and Position: Malpresentations or malpositions can prolong labor.
Pelvic Size and Shape: Pelvic dimensions can affect the ease of fetal passage.
Method of Anesthesia: Epidural anesthesia, for example, may sometimes affect pushing effectiveness and labor duration.
Maternal Expulsive Effort: The mother’s ability and willingness to push effectively significantly impacts the length of the expulsive phase.
MANAGEMENT OF SECOND STAGE OF LABOUR (ACTIVE MANAGEMENT)
Psychological Support: Reassure and provide continuous emotional and psychological support to the woman. Encourage her cooperation and efforts throughout the second stage.
Continuous Presence: Ensure the woman is never left alone. Provide constant attendance and support.
Timely Delivery Room Transfer: Transfer the woman to the delivery room in a timely and calm manner, avoiding rushing or creating anxiety.
Delivery Room Preparation: Prepare the delivery room, all necessary equipment, and a warm cot for the baby well in advance of the anticipated delivery.
Clean and Safe Environment: Ensure the delivery room is thoroughly cleaned and decontaminated, with adequate lighting for visibility.
Personal Protective Measures: Properly prepare yourself and any assisting personnel by:
Wearing appropriate protective gear (apron, boots, etc.).
Washing hands thoroughly with soap and clean water.
Donning sterile gloves before conducting the delivery.
Scrubbing and Protective Gear: Before actively conducting the delivery, perform a surgical scrub and ensure all protective gear is correctly in place.
Maternal Positioning: Position the mother in a dorsal (lying on her back) position for delivery, unless other positions are specifically indicated or preferred by the mother and clinically appropriate.
NURSING CARE DURING THE SECOND STAGE:
Bladder Care:
Encourage Emptying: Urge the mother to empty her bladder at the beginning of the second stage.
Rationale: A full bladder can:
Obstruct fetal descent, slowing labor progress.
Increase risk of bladder injury during fetal descent.
Hygiene and Comfort:
Vulvar Swabbing: Cleanse the vulva with sterile swabs as needed to maintain hygiene.
Sterile Pad: Apply a sterile perineal pad between contractions for comfort and hygiene.
Leg Cramp Relief: If leg cramps occur, massage the affected leg muscles, and gently extend and flex the leg to provide relief.
Emotional Support:
Constant Praise: Offer frequent verbal encouragement and praise to the mother for her efforts.
Keep Informed: Regularly update the woman on her labor progress to maintain her motivation and reduce anxiety.
Calm and Private Environment: Create a calm, quiet, and private atmosphere in the delivery room to minimize stress and promote relaxation.
Minimize Interruptions: Reduce unnecessary interruptions from other caregivers to maintain a focused and supportive environment.
Positioning for Labour:
Consider Alternative Positions: Explore and support the use of maternal positions beyond the dorsal position, such as:
Squatting
Kneeling
All Fours (hands and knees)
Standing
Left Lateral (lying on her left side)
Rationale: These alternative positions may:
Enhance contraction effectiveness.
Utilize gravity to aid fetal descent.
Potentially shorten the second stage.
Observations and Monitoring:
Contraction Monitoring: Regularly assess and document:
Strength (intensity) of contractions
Length (duration) of contractions
Frequency (how often contractions occur)
Fetal Descent: Observe and document the progress of fetal descent through the pelvis.
Fetal Condition Monitoring: Continuously monitor fetal well-being:
Fetal Heart Rate (FHR): Auscultate FHR frequently, especially after contractions.
Amniotic Fluid Color: Observe and document the color of amniotic fluid if membranes have ruptured (clear, meconium-stained, etc.).
Molding: Assess degree of fetal head molding (overlapping of skull bones).
Membrane Status: Note whether membranes are ruptured or intact.
Maternal Condition Monitoring: Regularly assess maternal status:
Emotional Coping: Observe the mother’s emotional state and ability to cope with labor.
Pulse Rate: Monitor maternal pulse every 30 minutes.
Blood Pressure: Monitor maternal blood pressure hourly.
CONDUCTING 2ND STAGE (ACTIVE MANAGEMENT) – EQUIPMENT TROLLEY “TOP SHELF”
Top Shelf of Delivery Trolley – Sterile Delivery Pack Contents:
Sterile Delivery Swabs: 6 swabs for perineal cleaning and antisepsis.
Cord Clamps: 2 clamps for umbilical cord clamping after birth.
Cord Scissors: 1 pair of sterile scissors for umbilical cord cutting.
Episiotomy Scissors: 1 pair of sterile scissors for episiotomy (if needed).
Sterile Gloves: 2 pairs of sterile gloves for the birth attendant and assistant.
Delivery Towels: 4 sterile towels for draping and drying the baby.
Cord Ligatures: For tying off the umbilical cord if clamps are not used.
Sterile Gloves: Extra sterile gloves.
Delivery Towels: Extra delivery towels.
CONDUCTING 2ND STAGE (ACTIVE MANAGEMENT) – EQUIPMENT TROLLEY “BOTTOM SHELF”
Bottom Shelf of Delivery Trolley Contents:
Vial of Lignocaine (Local Anesthetic): For local anesthesia if episiotomy or perineal repair is needed.
Ampoule of Oxytocin: For routine postpartum oxytocin administration to prevent postpartum hemorrhage.
Measuring Jar: For measuring blood loss postpartum.
Ampoule of Ergometrine: For use if oxytocin is ineffective in controlling postpartum bleeding (second-line uterotonic).
Bulb Syringe (Mucus Extractor): For clearing the newborn’s airway of mucus and secretions.
Syringe and Needles: For drawing up and administering medications (lignocaine, oxytocin, ergometrine).
Mackintosh and Towel: Mackintosh (waterproof sheet) to protect bedding; towel for drying hands etc.
Perineal Pads: Sterile perineal pads for postpartum maternal hygiene.
Clean Pads: Extra clean pads for general use.
Safety Box (Sharps Container): For safe disposal of used needles and sharps.
CONDUCTING 2ND STAGE (ACTIVE MANAGEMENT) – EQUIPMENT “BESIDE TROLLEY”
Shelf Beside Trolley Contents:
Warm Cot and Baby Clothing: Pre-warmed cot and clean clothing to receive and keep the newborn warm after birth.
Resuscitation Equipment: Neonatal resuscitation equipment readily available in case of newborn breathing difficulties.
Gum Boots: Protective footwear for birth attendant to maintain hygiene.
Apron: Protective apron for birth attendant to maintain hygiene.
2 Buckets:
Bucket 1: For disposal of used gloves, swabs, and other contaminated waste.
Bucket 2: Contains disinfectant solution for equipment cleaning and hand disinfection.
Hamper: For general linen and laundry disposal.
2 Gallipots: Small containers for holding antiseptic solution (e.g., lotion) and sterile swabs for procedures.
Episiotomy Pack (if separate from main pack): Additional supplies specifically for episiotomy, if anticipated.
Drip Stand: For hanging intravenous fluids if needed (though IV fluids are not routine for normal second stage).
2 Receivers (Kidney Dishes): For collecting used instruments or waste during procedures.
Disinfectant Solution: For hand disinfection and cleaning surfaces/equipment.
Responsibilities of Assistant During 2nd Stage of Labour
The assistant plays a crucial support role during the second stage:
Reassure the Mother: Provide continuous verbal reassurance, emotional support, and encouragement to the mother to help her stay calm, focused, and motivated throughout the pushing stage.
Position the Mother: Assist the mother in assuming and maintaining the most comfortable and effective position for delivery, based on her preference and clinical considerations (e.g., dorsal, squatting, lateral).
Guide Pushing Efforts: Instruct the mother on effective pushing techniques and provide clear guidance on when to push (during contractions) and how to push effectively to aid fetal descent and delivery.
Monitor Fetal Heart Rate: Regularly auscultate (listen to) the fetal heart rate using a fetal Doppler or Pinard stethoscope, especially immediately after each contraction, to continuously assess fetal well-being and identify any signs of fetal distress.
Administer Oxytocin Post-Delivery: Immediately after the baby is born (within one minute), the assistant is typically responsible for administering oxytocin to the mother, as per protocol. This crucial step helps to:
Prevent excessive postpartum bleeding (postpartum hemorrhage).
Promote uterine contraction and involution (returning to normal size).
Show Baby’s Sex (If Requested): If the mother or her partner express a desire to know the baby’s sex immediately after birth, the assistant can respectfully and promptly reveal the baby’s sex, while being mindful of cultural sensitivities and preferences.
Perform Apgar Score: The assistant typically performs the Apgar score assessment at 1 minute and 5 minutes after birth. This standardized scoring system quickly evaluates the newborn’s overall condition and vital signs (heart rate, respiration, muscle tone, reflexes, color) to identify any immediate needs for resuscitation or support.
Ensure Immediate Newborn Care: Immediately after delivery, the assistant ensures essential newborn care measures are promptly implemented:
Drying the Baby: Thoroughly dry the newborn with warm towels to prevent heat loss and hypothermia.
Keeping Baby Warm: Ensure the baby is kept warm by placing them in a pre-warmed cot or through skin-to-skin contact with the mother.
Skin-to-Skin Contact: Facilitate immediate skin-to-skin contact between the newborn and mother by placing the baby directly on the mother’s chest. This promotes warmth, bonding, and early breastfeeding initiation.
Breastfeeding Initiation: Support and encourage the mother to initiate breastfeeding as soon as possible after birth, ideally within the first hour, to provide colostrum and promote early mother-infant bonding.
Procedure: Conducting a Normal Second Stage of Labour
Explain the Delivery Process to the Mother: Clearly describe what will occur during the second stage of labor to the mother. Answer her questions and address any anxieties she may have to ensure informed consent and cooperation.
Don Protective Gear: To ensure a hygienic environment and minimize infection risks for both mother and baby, put on gum boots, a protective gown, and a face mask before starting the delivery.
Position the Mother: Assist the mother in getting into a comfortable position for childbirth. Options include the dorsal (lying on back), squatting, kneeling, all fours, standing, or left lateral (lying on her side) position. Choose based on her preference and labor progression.
Perform Hand Hygiene: Thoroughly scrub your hands with soap and clean running water to remove potential contaminants before initiating the delivery.
Apply Sterile Gloves: Put on two pairs of sterile gloves to maintain a sterile field throughout the delivery procedure.
Prepare Perineum and Drape: Cleanse the perineal area with an antiseptic solution to ensure cleanliness. Drape the perineal region and surrounding delivery area with sterile towels to create a sterile working space.
Protect Anus with Sterile Pad: Place a sterile pad over the anus to prevent fecal contamination of the delivery field and maintain sterility.
Confirm Second Stage: Before proceeding with delivery maneuvers, confirm that the mother is definitively in the second stage of labor. This is confirmed by full cervical dilation (10cm) and the baby’s presenting part being low enough for delivery.
Delivery of the Head:
Control Head Flexion: As the baby’s head becomes visible at the vulva, maintain flexion. Apply gentle pressure with two fingers of your non-dominant hand on the baby’s vertex (the top of the head), directing pressure towards the anterior fontanelle to keep the head flexed.
Manage Fecal Matter: Use your dominant hand to place a small rectal pad to control any fecal discharge and maintain a clean delivery area.
Prevent Rapid Crowning: Control the speed of head descent using your fingers to prevent a sudden, forceful crowning which can increase the risk of perineal tearing.
Panting for Controlled Birth: As crowning occurs and the head is about to deliver, instruct the mother to stop pushing and pant. Panting helps to modulate pushing efforts, maintain controlled pressure, and allow for a slow, controlled birth of the head.
Slow Head Delivery and Airway Clearance: Deliver the head slowly by guiding it into extension, bringing the baby’s occiput (back of the head) under the pubic bone. Immediately after the head is born:
Wipe the baby’s face to clear mucus.
Swab the baby’s eyes from the inner to outer canthus.
Use a bulb syringe to gently clear the baby’s airway (mouth and nostrils) of secretions.
Check for Nuchal Cord: During the brief pause after head delivery, gently check for the umbilical cord around the baby’s neck (nuchal cord).
Loose Cord: If the cord is loose, gently slip it over the baby’s head.
Tight Cord: If the cord is tight around the neck, clamp the cord in two places with artery forceps and cut between the clamps to release the baby from the cord.
Apply Gauze: Hold gauze over the cut cord ends to minimize blood spray risk.
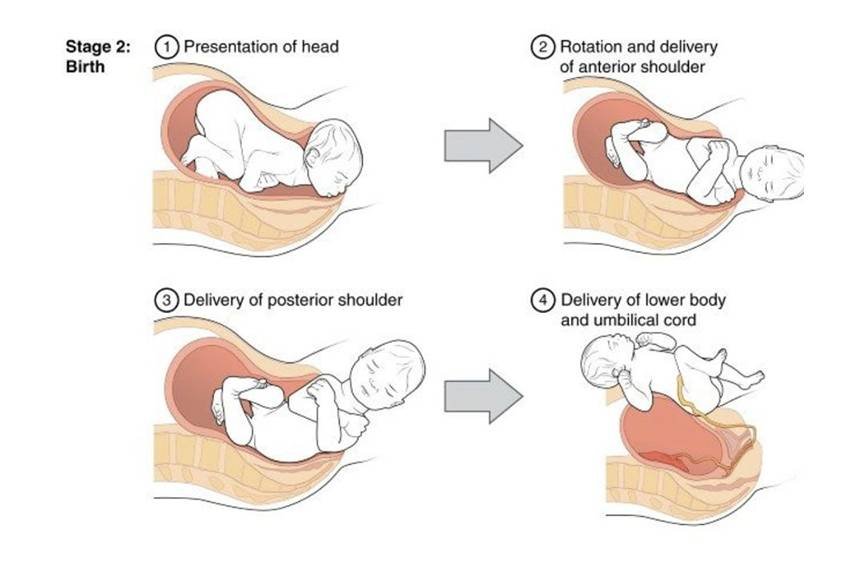
Delivery of the Shoulders:
Restitution and External Rotation: Allow restitution (head untwisting) and external rotation to occur spontaneously. These movements naturally align the shoulders for safe delivery and minimize perineal trauma.
Shoulder Rotation Indication: External rotation of the head visually confirms that the baby’s shoulders are rotating into the optimal anteroposterior (front-to-back) position at the pelvic outlet, ready for delivery.
Sequential Shoulder Delivery: Deliver one shoulder at a time to minimize perineal stretching.
Shoulder Delivery Technique: Place one hand on each side of the baby’s head, positioning your hands over the baby’s ears.
Anterior Shoulder: Guide the anterior shoulder (the one closest to the pubic bone) to deliver first with a gentle downward traction movement.
Posterior Shoulder: Deliver the posterior shoulder (the one closer to the perineum) with a gentle upward traction movement, sweeping it across the perineum.
Body Delivery: After the shoulders are born, gently guide the rest of the baby’s body to deliver upwards towards the mother’s abdomen using lateral flexion (baby bending sideways).
Note Delivery Time and Apgar Score: Record the exact time of baby’s delivery. Perform the Apgar score assessment at 1 minute after birth. Congratulate the mother on the birth of her baby. Palpate the mother’s abdomen to check if there is another baby (rule out multiple gestation).
Immediate Newborn Care After Birth (Within the First Hour):
Clamp and Cut Umbilical Cord: Clamp the umbilical cord in two locations and cut between the clamps.
Clear Airway: Gently clear any secretions from the baby’s mouth and nostrils using a bulb syringe or suction if needed.
Secure Cord Ligature: Tightly tie off the umbilical cord with a ligature if cord clamps are not used.
Keep Baby Warm: Immediately dry the newborn thoroughly and wrap the baby in a sterile, pre-warmed towel to prevent heat loss.
Skin-to-Skin Contact: If the baby’s condition is stable and there are no contraindications, place the baby directly onto the mother’s bare chest for skin-to-skin contact. Encourage immediate breastfeeding.
Apgar Score at 5 Minutes: Perform the second Apgar score assessment at 5 minutes after birth to further evaluate the baby’s condition.
Show Baby to Mother: Show the baby’s face to the mother and, if requested, announce the baby’s sex to the mother and her partner.
Keep Mother Warm: Ensure the mother is kept warm and comfortable after delivery.
Apply Identification Tag: Place an identification tag on the baby’s wrist or ankle with the mother’s name, time of delivery, baby’s sex, birth weight, and date of delivery for proper identification.
Observe Baby’s Cry: Note and document that the baby should have a strong and lusty cry after birth, which is an indicator of good lung expansion and respiratory effort.
Points to Consider During Delivery:
Equipment Readiness: Verify that all necessary delivery equipment, including neonatal resuscitation supplies, is readily available and functional. Ensure the delivery area is clean and adequately warmed.
Maternal Bladder Empty: Confirm that the mother has emptied her bladder before delivery to optimize pelvic space and prevent bladder injury.
Maternal Position Choice: Support the woman in assuming a comfortable and preferred birthing position, respecting her choices within clinical safety guidelines.
Continuous Support: Remain with the mother continuously throughout the second stage, providing ongoing emotional and physical support.
Respect Pushing Urge: Allow the mother to push spontaneously when she feels the urge; avoid actively instructing or forcing her to push if she doesn’t feel the urge.
Trolley Decontamination: Decontaminate the delivery trolley and set up all sterile equipment in an organized manner before the delivery begins.
Environment Preparation: Prepare the delivery environment by decontaminating the birthing bed or surface and ensuring adequate lighting for visualization.
Protective Gear: Ensure you and any assistants are wearing appropriate protective gear (apron, gumboots) to maintain hygiene and safety.
Sterile Gloving: Wear sterile gloves correctly for all intra-vaginal procedures and during delivery to maintain asepsis.
Controlled Head Delivery: Focus on achieving a slow and controlled delivery of the baby’s head to minimize perineal trauma and complications.
Factors Influencing the Length of the 2nd Stage of Labour:
Maternal Parity: (Number of previous vaginal births).
Fetal Size: (Baby’s weight and dimensions).
Uterine Contraction Strength: (Effectiveness of uterine muscle contractions).
Baby’s Presentation: (Vertex, breech, etc.).
Baby’s Position: (Occipitoanterior, occipitoposterior, etc.).
Maternal Pelvic Size and Shape: (Pelvic adequacy for fetal passage).
Anesthesia Method: (Epidural analgesia or other pain relief).
Maternal Expulsive Effort: (Mother’s ability and effort in pushing).
Possible Complications of the 2nd Stage of Labour:
Deep Transverse Arrest: (Failure of the fetal head to rotate to anterior position).
Obstetrical Shock: (Shock due to hemorrhage, infection, or other labor complications).
Uterine Inertia: (Weak or ineffective uterine contractions leading to prolonged labor).
Maternal Distress: (Physical or emotional exhaustion and strain in the mother).
Shoulder Dystocia: (Impaction of the anterior shoulder after head delivery).
3rd Degree Perineal Tear: (Severe laceration extending to the anal sphincter).
Amniotic Fluid Embolism: (Rare but life-threatening condition with amniotic fluid entering maternal circulation).
Ruptured Uterus: (Tear in the uterine wall, a serious obstetric emergency).
Fetal Distress: (Signs of compromise in fetal well-being, such as abnormal heart rate patterns).
Join Our WhatsApp Groups!
Are you a nursing or midwifery student looking for a space to connect, ask questions, share notes, and learn from peers?
Join our WhatsApp discussion groups today!
Join NowWe are a supportive platform dedicated to empowering student nurses and midwives through quality educational resources, career guidance, and a vibrant community. Join us to connect, learn, and grow in your healthcare journey
Quick Links
Our Courses
Legal / Policies
Get in Touch
(+256) 790 036 252
(+256) 748 324 644
Info@nursesonlinediscussion.com
Kampala ,Uganda
© 2026 Nurses online discussion. All Rights Reserved