Specialized Nursing Care
Subtopic:
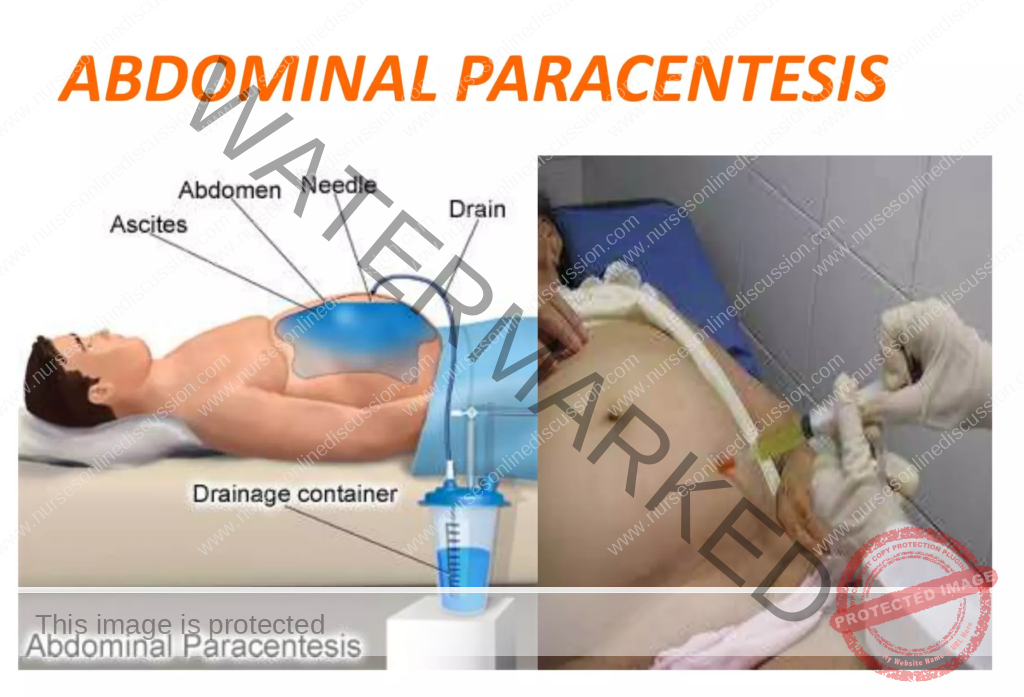
Abdominal paracentesis (Abdominal fluid tap)
Table of Contents
Abdominal paracentesis
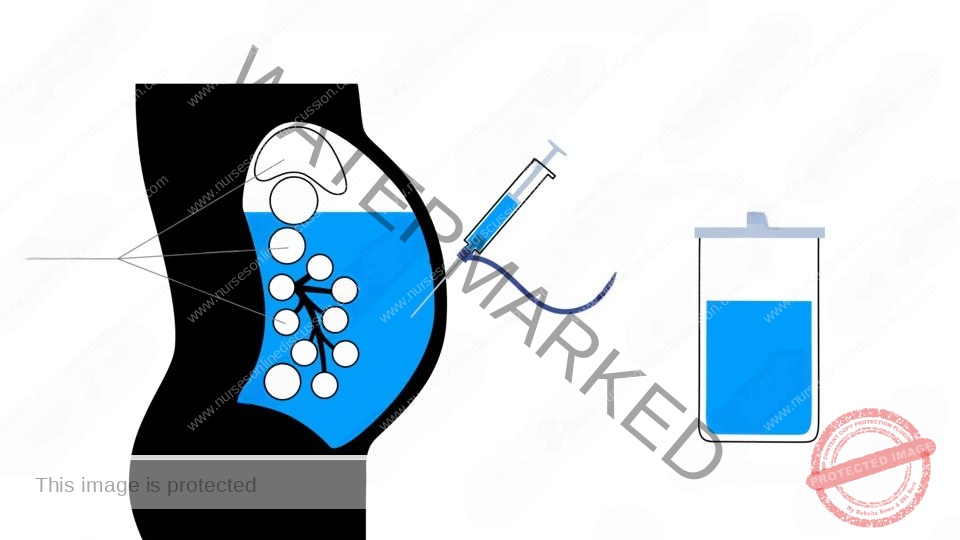
- Abdominal paracentesis is a medical procedure done under sterile conditions. It involves inserting a needle into the abdominal cavity to drain excess fluid buildup (ascites or peritoneal fluid).
- This procedure aims to withdraw fluid from the space within the abdomen (peritoneal space), specifically when there’s an accumulation of fluid (ascites).
- Paracentesis, commonly referred to as an “abdominal tap” or simply a “tap,” involves removing fluid from the abdomen.
- When only a small amount of fluid is needed for examination, it’s called an ascitic tap. In contrast, paracentesis usually involves inserting a drain to remove larger volumes of fluid for treatment purposes
Indications of Abdominal Paracentesis
Specific Circumstances for Paracentesis:
New Ascites: It’s essential to perform a paracentesis when ascites develops for the first time. This helps identify the cause and distinguish between fluid with low protein (transudate) and fluid with high protein (exudate) content.
Suspected Infection: If there’s a suspicion of spontaneous bacterial peritonitis (infection within the ascitic fluid itself) or secondary bacterial peritonitis (infection due to another source), paracentesis is performed to help diagnose and manage these infections.
Diagnostic Analysis: To analyze the fluid’s chemical makeup, look for bacteria, and examine the cells present. This helps diagnose:
- Infections: Detecting bacteria or other microorganisms can indicate an infection of the abdominal lining (peritonitis).
- Cancer: Finding cancerous cells can be a sign of cancers affecting the abdomen, such as peritoneal carcinomatosis (spread of cancer to the abdominal lining).
- Other Conditions: Analyzing the fluid helps understand the cause of fluid accumulation in the abdomen (ascites) and differentiate between different types of fluid.
Therapeutic Purposes:
- Relieving Discomfort: Paracentesis can alleviate symptoms caused by the pressure of excess fluid, such as shortness of breath, abdominal pain, and a feeling of fullness.
- Draining Infected Fluid: In cases of peritonitis, removing the infected fluid through paracentesis can be part of the treatment.
- Creating Artificial Pneumoperitoneum: This involves removing fluid and injecting air. Although less common now, it was previously used to treat tuberculosis affecting the lower parts of the lungs.
- Removing Blood or Pus: Paracentesis can be used to remove blood or pus that has collected in the abdominal cavity due to injury or other medical issues.
Paracentesis can be done in two main ways:
Ascitic Tap: Removing a small amount of fluid primarily for diagnostic testing.
Paracentesis: Removing a larger volume of fluid, often to relieve symptoms.
Contraindications to Paracentesis:
- Bleeding Issues and Severe Jaundice with Risk of Hepatic Coma: Performing a tap in these situations could trigger hepatic coma (brain dysfunction due to liver failure).
- Uncooperative Patient: The patient needs to be able to cooperate and be in a stable condition for the procedure to be safe.
- Skin Infection at the Intended Insertion Site: Infection at the puncture site increases the risk of complications, so the procedure should be avoided in areas of skin infection (like abdominal wall cellulitis).
- Pregnancy: There is a potential risk to the fetus during paracentesis, making it generally not recommended during pregnancy.
- Significantly Distended Bowel: Severe swelling of the intestines can make the procedure more difficult and increase the chance of complications.
- Coagulopathy: There are varying opinions, but some consider paracentesis inadvisable in patients with clear signs of problems with blood clotting (fibrinolysis or disseminated intravascular coagulation – DIC).
- Acute Abdomen Requiring Surgery: If the patient has a sudden, severe abdominal issue that needs surgery, a fluid tap is definitely not the appropriate first step.
- Severe Thrombocytopenia: A very low platelet count (below 20,000 per microliter) is a reason to be cautious.
- Distended Urinary Bladder: A full bladder can interfere with the procedure. This is a reason to be careful when considering paracentesis.
Abdominal paracentesis
Investigations
Before Paracentesis
Complete Blood Count and Coagulation Profile: This blood test evaluates platelet levels and the body’s ability to form clots. Low platelets increase bleeding risk, and impaired clotting might require interventions like platelet transfusion or fresh frozen plasma.
Urea & Electrolytes, Creatinine, and Liver Function Tests: These blood tests assess kidney function, electrolyte balance, and liver health, providing context about the patient’s overall condition and possible reasons for fluid buildup.
Abdominal Ultrasound: While not always mandatory, this imaging can be useful to visualize the amount of fluid, as well as organs like the liver, pancreas, spleen, and lymph nodes. It can also help identify potential underlying issues like ovarian cancer or cancer spread to the liver.
Routine Ascitic Fluid Analysis
Specific Gravity: This measurement reflects the fluid’s density, offering clues about its composition and the cause of the ascites.
Cell Count: This determines the number of white blood cells (WBCs), red blood cells (RBCs), and other cells in the fluid, aiding in the diagnosis of infection, inflammation, or cancer.
Bacterial Count: This test helps detect the presence of bacterial infection.
Protein Levels: Measuring the protein content helps distinguish between fluid with low protein (transudate) and fluid with high protein (exudate).
Culture and Sensitivity: This identifies the specific bacteria causing an infection and determines which antibiotics will be most effective.
Additional Fluid Investigations
Microscopy: Examining the fluid under a microscope can reveal specific characteristics:
White Blood Cell Count (WBC): A high count of neutrophils (a type of WBC) – specifically more than 250 cells per cubic millimeter – is indicative of Spontaneous Bacterial Peritonitis (SBP).
Red Blood Cell Count (RBC): Elevated levels of red blood cells (above 1,000 cells per cubic millimeter) may suggest a malignancy like hepatocellular carcinoma.
Gram Stain: This quick staining technique can help identify bacteria, though it’s not always definitive. Culture and sensitivity testing is still necessary.
Albumin or Protein Levels and Serum Ascites-Albumin Gradient (SA-AG): While previously ascites was categorized based on protein levels (exudate if protein >25 g/L, transudate if protein <25 g/L), the SA-AG is now considered a more reliable indicator:
Calculation: SA-AG = serum albumin concentration – ascitic albumin concentration
SA-AG ≥ 11 g/L: Suggests conditions like cirrhosis, heart failure, or nephrotic syndrome.
SA-AG < 11 g/L: Suggests conditions like malignancy, pancreatitis, or tuberculosis.
Amylase: High levels of amylase in the ascitic fluid may point towards ascites related to pancreatitis.
Cytology: Examining the fluid for cancer cells can be done through cytology, although larger samples (over 100 ml) and concentration methods improve detection rates. It is less sensitive for diagnosing primary hepatocellular carcinoma.
Procedure for Abdominal Paracentesis
Trolley
Here’s the extracted table from the image:
Top Shelf (with sterile trays)
Bowl with two draper towels: 1 fenestrated, 1 nonpenetrated
Bowl with sterile gauze swabs
Bowl with sterile cotton swabs
Gallipot for antiseptic lotion
Receiver with sponge holding forceps, cannula, sterile bottle for specimen if needed
Sterile towel for hand drying
Sterile gloves
Giving set/sterile drainage tube
Doctor’s sterile gown
Sterile calibrated drainage bottle
Sterile tray containing:
i. Sponge holding forceps
ii. Window towel
iii. 2 Small bowls
iv. Swabs
v. Cotton
vi. 2 ml syringe
vii. Subcutaneous needle
viii. Scalpel blade
ix. Trocar & cannula (Thompson’s ascites trocar & cannula)
x. Suture materials (suture & skin needle, suture, scissors, tissue forceps & artery forceps)
Bottom Shelf (tray containing)
- Many tailed bandages
- Safety pins
- Adhesive tape/plaster
- Bottle with antiseptic lotion
- Lab request form
- Specimen bottles
- Tape measure
- Dressing towel and mackintosh
- Floor mackintosh
- Receiver for the used swabs
- Weighing scale
- Plastic mackintosh
- Vital observation tray
- Emergency tray
Unsterile tray containing:
i. Mackintosh & towel
ii. Sterile gloves & masks
iii. Tincture iodine, spirit & tincture benzoin
iv. Novocain 12% / Xylocaine 2%
v. Adhesive tape & scissors
vi. Kidney basins
vii. Pint pressure bucket
viii. IV bottles
ix. Backrest & abdominal binder
x. Specimen bottles
xi. Patient’s file
xii. Pillow
At the Bedside
- IV stand
- Screen for privacy
- Hand washing materials
- Cardiac table (with a bell, newspaper, small pillow)
Procedure
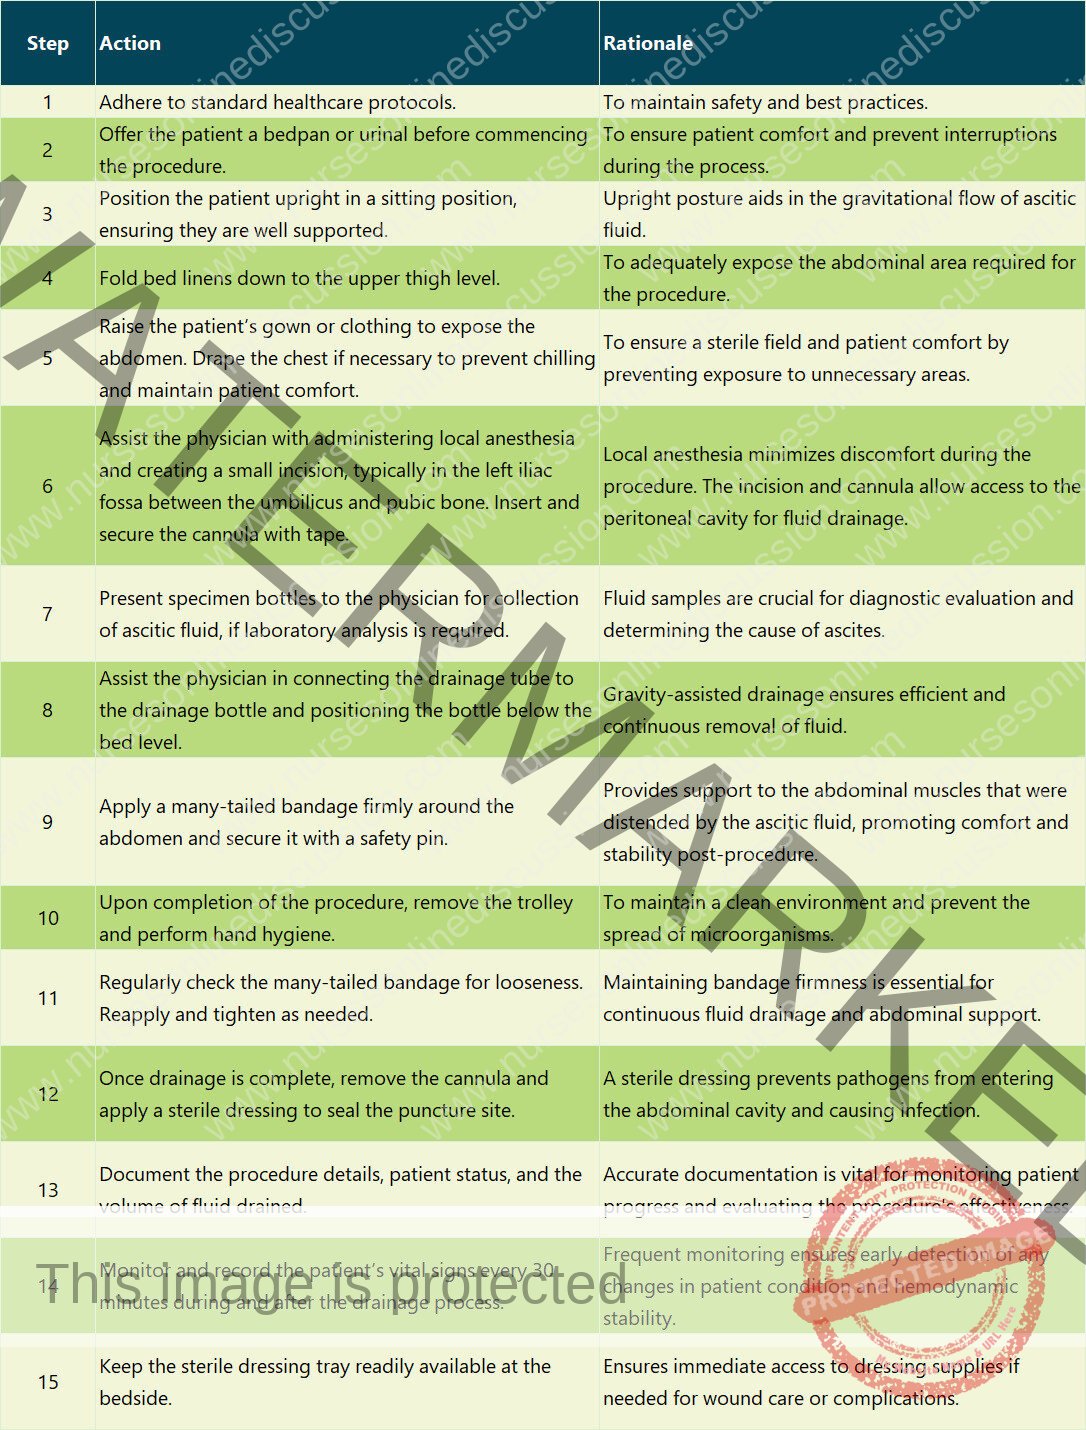
Procedure Care
Introduce and Explain: Greet the patient and clearly explain the procedure to obtain their consent and cooperation.
Ensure Privacy: Screen the patient and close doors/windows to maintain privacy.
Hand Hygiene: Wash hands thoroughly according to infection control guidelines.
Prepare Equipment: Gather all necessary supplies at the bedside.
Weigh Patient: Record the patient’s weight.
Baseline Vitals: Measure and document baseline blood pressure, pulse, temperature, and respiration.
Empty Bladder: Instruct the patient to empty their bladder immediately before the procedure.
Position Patient: Typically, position the patient supine with the head of the bed elevated to encourage fluid pooling in the lower abdomen.
Expose Abdomen: Remove the top linen to expose the procedure site.
Measure Abdominal Circumference: Use a tape measure to record the initial abdominal circumference.
Adjust Clothing: Loosen or remove clothing as needed to expose the area.
Apply Protective Layers: Place a dressing towel and mackintosh under the patient to protect the bedding. Place a floor mackintosh with a collection bottle on top nearby.
Clean Insertion Site: Thoroughly clean the intended insertion site.
Apply Sterile Drapes: Drape the area to maintain a sterile field.
Insert Cannula and Connect: Insert the cannula and connect it to the drainage tubing. Secure the cannula with tape or a dressing.
Collect and Label Samples: Obtain fluid samples, properly label them, and prepare them for lab transport.
Monitor Vitals and Drainage: Continuously monitor vital signs and the rate of fluid drainage throughout the procedure.
Disconnect and Secure: Once the desired amount of fluid is drained, disconnect the tubing and apply a sterile dressing to the insertion site.
Post-Procedure Measurements: Re-measure the patient’s weight and abdominal circumference. Record post-procedure vital signs.
Measure and Record Output: Measure the volume of aspirated fluid and document it.
Thank Patient: Thank the patient for their cooperation.
Ensure Comfort: Assist the patient in getting dressed, make the bed comfortable, and ensure they are in a comfortable position.
Clean Up and Document: Dispose of used materials appropriately and thoroughly document the procedure in the nursing notes.
Post-Procedure Care
Apply Abdominal Binder: Apply an abdominal binder tightly from the top down to support the abdomen and maintain intra-abdominal pressure.
Monitor Condition: Closely monitor the patient’s overall condition. Immediately report any changes in skin color, pulse, respiration, or blood pressure.
Check Dressing: Frequently examine the dressing at the puncture site for any leakage. Reinforce the dressing if needed.
Administer Analgesics: Provide pain medication as prescribed if the patient experiences pain.
Send Specimen to Lab: Ensure the collected fluid samples are sent to the laboratory with the appropriate requisition form.
Clean and Replace Supplies: Clean and properly store all used equipment and supplies.
Hand Hygiene: Wash hands thoroughly.
Record Procedure: Document all aspects of the procedure in the nursing notes.
Complications
Fainting (Syncope): Can occur due to rapid fluid removal. An abdominal binder helps prevent this.
Peritonitis: Infection of the peritoneal lining.
Significant Bleeding: Bleeding at the insertion site or internally.
Infection: Infection at the insertion site.
Renal Failure: Can occur due to decreased blood flow to the kidneys.
Hyponatremia: Low sodium levels in the blood, potentially from repeated paracentesis.
Hepatic Encephalopathy: Brain dysfunction due to liver failure.
Bowel Perforation: Accidental puncture of the bowel.
Paracentesis Leak: Leakage of ascitic fluid from the puncture site.
Organ Injury: Injury to abdominal organs during needle insertion.
Hypovolemia: Low blood volume, potentially leading to shock if fluid is removed too quickly.
Sites and Positioning for Abdominal Paracentesis
Insertion Sites
Midline Site: The most common insertion point is on the midline of the abdomen, halfway between the pubic bone and the belly button. This location is preferred to minimize the risk of injury to the bladder and other internal organs.
Alternative Site: Another option is a point located two-thirds of the way along a line drawn from the belly button to the bony prominence on the front of the hip (anterior superior iliac spine).
Patient Positioning
The patient is typically positioned in Fowler’s position (sitting upright with the torso raised), supported with a backrest and pillows, near the edge of the bed.
Precautions
Maintain Aseptic Conditions: Strict sterile conditions are essential throughout the procedure to prevent infection of the abdominal cavity. Limit the duration of catheter drainage to less than 6-8 hours (some guidelines suggest four hours) to further reduce infection risk.
Procedure Setting: Paracentesis can be safely performed in settings like hospices or outpatient clinics as long as sterile precautions are meticulously followed, potentially avoiding the need for hospitalization.
General Instructions
Explain the Procedure: Clearly explain the procedure to the patient to build trust and encourage cooperation, which is crucial for preventing accidental injury to internal organs.
Strict Aseptic Technique: Adhere to strict sterile procedures to prevent infection.
Bladder Emptying: Instruct the patient to urinate 5 minutes before the procedure to minimize the risk of bladder puncture. If there’s any doubt about bladder emptiness, catheterization should be performed.
Patient Comfort: Ensure the patient is kept warm and comfortable to prevent chills.
Preventing Shock: Be prepared to manage potential shock:
Withdraw fluid slowly and use clamps to control the drainage flow.
Remove small amounts of fluid at a time.
Apply manual pressure to the abdomen or use a many-tailed bandage, tightening it from top to bottom as fluid is drained.
Keep the patient warm.
Continuously monitor vital signs during the procedure.
Drainage Management:
Raising the drainage container increases the drainage speed and the risk of shock. Keep the container at an appropriate level.
Use a smaller gauge needle or catheter to minimize the puncture size and the risk of post-procedure leakage.
Control fluid flow using clamps on the tubing.
The nurse should remain with the patient throughout the procedure, observing their general condition and immediately reporting any changes in color, pulse, breathing, or blood pressure to the doctor, as these could indicate vascular shock.
Post-Procedure Care:
Repeated fluid drainage can lead to low protein levels in the blood (hypoproteinemia); administer plasma protein if necessary.
Seal the puncture site immediately after the procedure to prevent infection and fluid leakage.
Send collected fluid samples to the lab promptly.
Aftercare of the Patient
Wound Care: Apply a sterile dressing and a pressure bandage to the puncture site immediately after removing the needle to prevent fluid leakage.
Abdominal Binder: Tighten the abdominal binder to provide support and maintain pressure within the abdomen.
Monitoring: Closely monitor the patient’s overall condition after the procedure.
Report any changes in skin color, pulse, breathing, or blood pressure immediately.
Check vital signs every half-hour for the first two hours, then hourly for the next four hours, followed by every four hours for 24 hours.
Specimen Handling: Send collected fluid samples to the lab with proper labels and a request form.
Dressing Check: Regularly check the dressing at the puncture site for any leakage and reinforce it if needed.
Monitor Protein Levels: Assess serum protein levels to detect hypoproteinemia and administer plasma proteins if necessary.
Documentation: Record the procedure in the nursing notes, including the date and time, the amount and characteristics of the drained fluid (color, etc.), and the patient’s response to the treatment.
Equipment Cleaning: Clean all reusable equipment by rinsing with cold water, then washing with warm soapy water, followed by a clean water rinse. Dry the equipment and send it for sterilization (autoclaving).
Related Topics
- Wound dressing
- Colostomy Care
- Abdominal Paracentesis(Abdominal Tapping)
- Vulva Toilet/ Swabbing
- Oxygen Administration
- Lumbar Puncture
- Nasogastric tube to feed patients
- Gastrostomy Feeding
- Gastric Lavage
- Catheterization
- Tracheostomy Care
- Caring for patients in traction
- Prepare for application of orthopaedic splints
- Bandaging
- Nursing Process
- Take History of the patient
- Perform a physical examination of the Patient
- Making a Nursing Care Plan
- Admission of a patient
- Drug administration
- Transfer Patients
- Discharge of patients
- Last Office
We are a supportive platform dedicated to empowering student nurses and midwives through quality educational resources, career guidance, and a vibrant community. Join us to connect, learn, and grow in your healthcare journey
Quick Links
Our Courses
Legal / Policies
Get in Touch
(+256) 790 036 252
(+256) 748 324 644
Info@nursesonlinediscussion.com
Kampala ,Uganda
© 2026 Nurses online discussion. All Rights Reserved